Archive
Running Sitecore 9 Field Editor from a Command in Sitecore 9 Experience editor
So I’ve have a post about this topics for the last couple of Sitecore Versions so of course it would make sense to have one for Sitecore 9 as well.
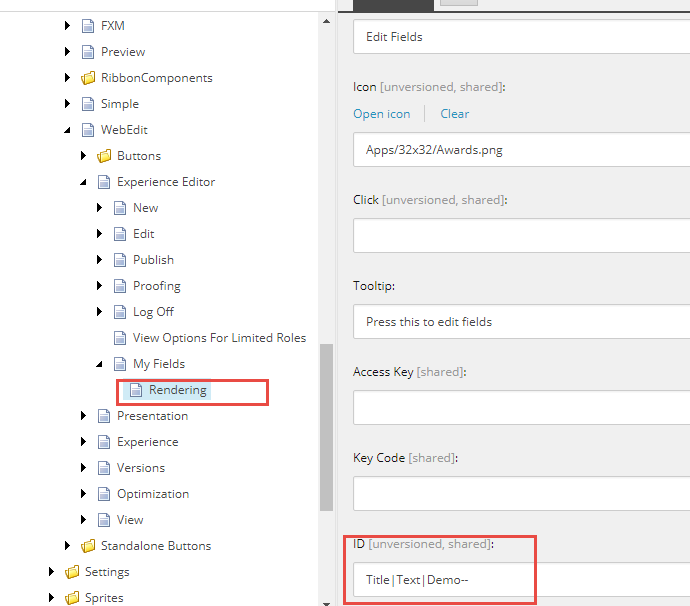
Start by navigating to ” /sitecore/content/Applications/WebEdit/Ribbons/WebEdit/Page Editor” in the core database. From here you can duplicate one of the existing chunk or you can create a new one.

Under your chunk create a new Button for this example I’ve used a “Sprite Large Button”. On the button you can set tootltip and a title for the button. As a field to supply the which Fields is being edited I’m using the id, with the FieldName-Fieldname-Fieldname– I’m using the “-” as a seperated between fields, and “–” to end fieldname section. See image below
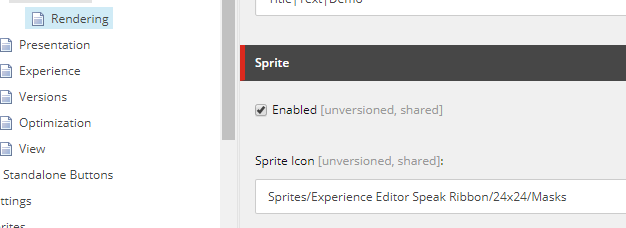
In the Sprite section of the button you define the image to be shown in the experience editor.
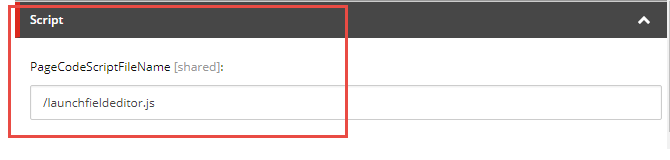
Now on the presentation details for the Button

There are two important section on is the event section which holds what command is triggered

The other one the path to your script file
With Sitecore setting part in place.
You can now add the following javascript for convenience if just added the launchfielditor javascript to the root of the site
define(["sitecore", "/-/speak/v1/ExperienceEditor/ExperienceEditor.js",
"/-/speak/v1/ExperienceEditor/ExperienceEditor.Context.js"
, "/-/speak/v1/ExperienceEditor/ExperienceEditorProxy.js"],

function (Sitecore, ExperienceEditor, ExperienceEditorContext,ExperienceEditorProxy) {
Sitecore.Commands.LaunchFieldEditor =
{
canExecute: function (context) {
//YOU COULD ADD FUNCTIONALITY HERE TO SEE IF ITEMS HAVE THE CORRECT FIELDS blog.istern.dk
return true;
},
execute: function (context) {
var rawString = context.button.attributes.name;

var fields = rawString.substring(0,rawString.indexOf("--"))

var fieldsString =fields.replace(new RegExp("-","g"), "|");

var itemId = context.currentContext.itemId.replace("%7b","{").replace("%7d","}")

ExperienceEditorProxy._pe().postRequest('webedit:fieldeditor(command='+itemId+',fields='+fieldsString+',id='+itemId+')', null,false)

}

};
});
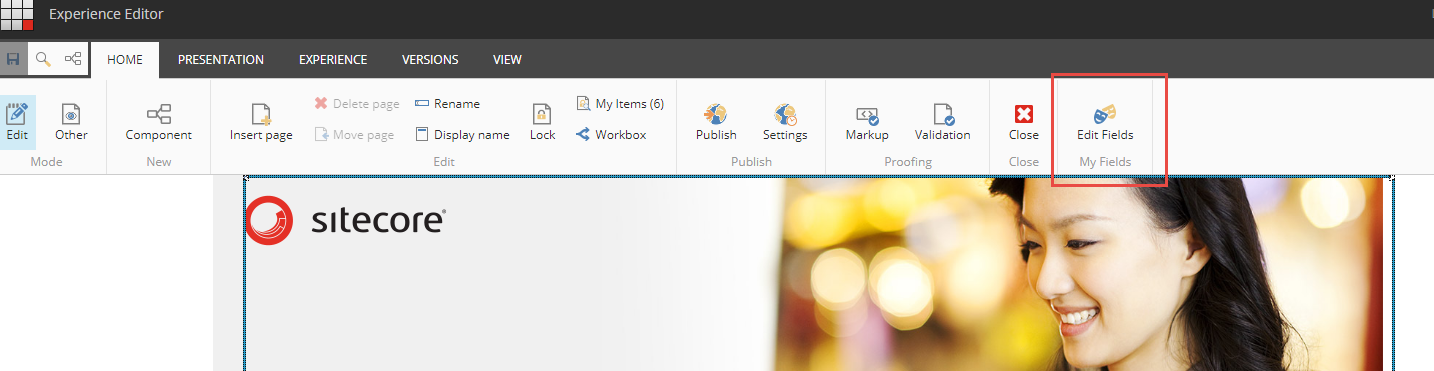
And the outcome of the above can be seen here

Only thing not happening is out save when the editor closes. But I hope to get that part in place soon.
Running Sitecore Field Editor from a Speak Command in Sitecore Experience editor Sitecore 8.1 Version
So with the release of sitecore 8.1 also came some minor changes to how the javascript are structured, this means that to run the Sitecore Field Editor from a Speak Command in Sitecore Experience editor, which i presented in this post, a minor changes is required. All that is needed to be changed is the way the reference to Experience editor is handled the full Javascript with the modification is show below.
define(["sitecore", "/-/speak/v1/ExperienceEditor/ExperienceEditor.js"], function (Sitecore, ExperienceEditor) {
    Sitecore.Commands.LaunchFieldEditor =
    {
        canExecute: function (context) {
            //YOU COULD ADD FUNCTIONALITY HERE TO SEE IF ITEMS HAVE THE CORRECT FIELDS
            return true;
        },
        execute: function (context) {
            // THIS IS FOR THE ALT TEXT ON IMAGE
            context.currentContext.argument = context.button.viewModel.$el[0].firstChild.alt;

            //THIS IS THE TOOLTIP ON LINK TAG "A"
            context.currentContext.argument = context.button.viewModel.$el[0].title;
            console.log(Sitecore);
            console.log(ExperienceEditor);
            ExperienceEditor.PipelinesUtil.generateRequestProcessor("ExperienceEditor.GenerateFieldEditorUrl", function (response) {
                var DialogUrl = response.responseValue.value;
                var dialogFeatures = "dialogHeight: 680px;dialogWidth: 520px;";
                ExperienceEditor.Dialogs.showModalDialog(DialogUrl, '', dialogFeatures, null);
            }).execute(context);

        }
    };
});
Only modification is the mapping of The Experience editor is now loaded with a direct link to ExperienceEditor.js Line 1.
Running Sitecore Field Editor from a Speak Command in Sitecore Experience editor
This post is an update of an old post https://blog.istern.dk/2012/05/21/running-sitecore-field-editor-from-a-command/ . Sitecore 8 brought along speak and deprecated the old solution presented in that blog post. So let’s speakify it and create a new solution. Luckily Alister Berry provided an excellent blog post about creating simple custom ribbon in the experience editor http://www.programmingbynumbers.com/2015/01/31/creating-a-new-experience-editor-button-in-sitecore-8/ – So go read the post a comeback when your are done J. For the rest of this post the button or functionality, if you like, will be to edit the HTML metatags ie. Title, meta-description, meta-keywords.
So let us begin with creating the button. Start Visual Studio launch the Sitecore Rocks and go to the Core database and navigated to “/sitecore/content/Applications/WebEdit/Ribbons/WebEdit/Page Editor” under the item create a new folder and the the newly created folder add a new Large button Fille out the fields as shown below.


So next step is to and a layout to the new button select the button and choose “Design layout” in Sitecore Rocks – shortcut “ctrl + u”, and choose and a new rendering “Large Button”


Next lets add the properties required for the solution to work
The properties are Click is “trigger:button:click”, Command “LaunchFieldEditor”, PageCodeScriptFileName : “PATH TO THE JS FILE WE CREATE NEXT”


Okay now we need to create PageCodeScriptFile:
define(["sitecore"], function (Sitecore) {

Sitecore.Commands.LaunchFieldEditor =
{
canExecute: function (context) {
//YOU COULD ADD FUNCTIONALITY HERE TO SEE IF ITEMS HAVE THE CORRECT FIELDS
return true;
},
execute: function (context) {
///CHOOSE YOUR OPTION BELOW

// THIS IS FOR THE ALT TEXT ON IMAGE
context.currentContext.argument = context.button.viewModel.$el[0].firstChild.alt;

//THIS IS THE TOOLTIP ON LINK TAG "A"
context.currentContext.argument = context.button.viewModel.$el[0].title;

Sitecore.ExperienceEditor.PipelinesUtil.generateRequestProcessor("ExperienceEditor.GenerateFieldEditorUrl", function (response) {
var DialogUrl = response.responseValue.value;
var dialogFeatures = "dialogHeight: 680px;dialogWidth: 520px;";
Sitecore.ExperienceEditor.Dialogs.showModalDialog(DialogUrl, '', dialogFeatures, null);
}).execute(context);

}
};
});
Rather simple file which calls some server side code. Also note that the settings will be save to the item when the ok button is clicked right away not need to click the save button in the experience editor.
public class GenerateFieldEditorUrl : PipelineProcessorRequest<ItemContext>
{
public string GenerateUrl()
{
var fieldList = CreateFieldDescriptors(RequestContext.Argument);
var fieldeditorOption = new FieldEditorOptions(fieldList);
//Save item when ok button is pressed
fieldeditorOption.SaveItem = true;
return fieldeditorOption.ToUrlString().ToString();
}

private List<FieldDescriptor> CreateFieldDescriptors(string fields)
{
var fieldList = new List<FieldDescriptor>();
var fieldString = new ListString(fields);
foreach (string field in new ListString(fieldString))
fieldList.Add(new FieldDescriptor(this.RequestContext.Item, field));
return fieldList;
}

public override PipelineProcessorResponseValue ProcessRequest()
{
return new PipelineProcessorResponseValue
{
Value = GenerateUrl()
};
}
}
Now lyou should register the Request processor open the this file “Sitecore.ExperienceEditor.Speak.Requests.config” found in App_config/include folder. And add the new processor.
<request name="ExperienceEditor.GenerateFieldEditorUrl" type="PT.Framework.SitecoreEditor.GenerateFieldEditorUrl, PT.Framework.SitecoreEditor"/>
Just before we see the result there a few things that are nice to know. Because the server side code actually does a bit more the just returning and url for fieldeditor. The creation of the URL Handle also besides creating a URL to the fieldeditor is storing required parameters in the current session in the urlhand id. The fieldeditor then pickups on parameters by going in to the session with hdl-id see url below. Hdl=F60F9A3AB4DC4CC8A7E28D25C4EC13B8
http://local/sitecore/shell/applications/field%20editor.aspx?mo=mini&hdl=F60F9A3AB4DC4CC8A7E28D25C4EC13B8
Okay now to the tricky part we need to pass in which fields we want to edit to the server class GenerateFieldEditorUrl, unfortunately the parameter part of the layout isn’t rendered out and can’t be used but there are som simple ways we can force the fieldnames out in the HTML.
First you can edit the button item and set in the fieldnames in n the tool tips section

Alternatively you can set it in layout details page under tooltips, Be advised that if you choose this, editor will see the fieldname in the editors.

See the two different models below. The javascript in this post include selector for both option see comments in the js file


And now to the final result

So thats how you laucnh the field editor with a speak modal dialog, in the sitecore experience editor.
UPDATE 1
A problem with the two selector presented above is that they both requires you to add the fields to all language versions of the button item. So one of collegues Stephan Rifbjeg came up with a smart solution, simply to add the fields to the acceskey field on the layout see image below.
You can now get the value out with the following selector
context.currentContext.argument = context.button.viewModel.$el[0].accessKey;
Update from kayeenl to catch the GenerateFieldURI
public class GenerateFieldEditorUrl : PipelineProcessorRequest<ItemContext>
{
public string GenerateUrl()
{
var fieldList = CreateFieldDescriptors(RequestContext.Argument);
var fieldeditorOption = new FieldEditorOptions(fieldList);
//Save item when ok button is pressed
fieldeditorOption.SaveItem = true;
return fieldeditorOption.ToUrlString().ToString();
}<span class="para_break"><i class="copy_only">
</i></span>       private List<FieldDescriptor> CreateFieldDescriptors(string fields)
{
var fieldList = new List<FieldDescriptor>();
var fieldString = new ListString(fields);
foreach (var field in new ListString(fieldString))
{
try
{
var descriptor = new FieldDescriptor(RequestContext.Item, field);
fieldList.Add(descriptor);
}
catch (Exception)
{
Log.Error(string.Format("Cannot create field editor for field '{0}'. Please configure the fields on the tooltip of the button", field), this);
}
}
return fieldList;
}<span class="para_break"><i class="copy_only">
</i></span>       public override PipelineProcessorResponseValue ProcessRequest()
{
return new PipelineProcessorResponseValue
{
Value = GenerateUrl()
};
}
Simple json deserialization in C#
In This post a brieflyguid to how to deserialize Json encoded strings. Json is string that can be used t describe complex datastruces fx. C# class’.
A simple Json string could look something like this.
{"TokenId":"tokenid", "TokenSecret":"secretcode"}
This corresponding C# class would look something like this
public class Token
{
public string TokenId { get; set; }
public string TokenSecret { get; set; }
}
Now given the exaample Json string above we can deserialize using .Net stand javascript deserialze, like this. The Javascriptserializer is placed in System.web.Serializationn.
   JavaScriptSerializer javaScriptSerializer = new JavaScriptSerializer();
Token deserializedToken = javaScriptSerializer.Deserialize<Token>("{\"TokenId\":\"tokenid\", \"TokenSecret\":\"secretcode\"}");
The "deserializedToken" object have now been intialized and both properties "TokenId" and "TokenSecret" has been set to the value folloing the ":" int json string. you can also have more complex structure represented by using in the Json string "[]" you will then have etend your class to contain a list as the example below
public class Token
{
public string TokenId { get; set; }
public string TokenSecret { get; set; }
public IEnumerable<Token> ChildTokens { get; set; }
}
So given the Json string
"{\"TokenId\":\"tokenid\", \"TokenSecret\":\"secretcode\" ,\"ChildTokens\" : [{\"TokenId\":\"tokenid\", \"TokenSecret\":\"secretcode\"}]}"
Your deserialized token object will contain a list with one ChildToken.
Serialization is left for another post.
I will use this Json deserialization in a feature blogpost to communicate with a OAuth server.
Google Chart Tools
No i haven’t forgotten about my blog, and yes it’s been a while since my last post. So i’m sorry for not answering questions quickly.
So in this post I will have a look at the chart tools google provides, you can read more about here http://code.google.com/apis/chart/ .
In Pentia we have a different tools for monitoring different parameters and i thought i could be fun to have some graphical reprensentation of this, and luckely one of colleagues told me about the chart tools at google. So in this post we have a quick look at this service from google. I will only do the simple piechart but it is possible to build more complex chart.
So since I want different input to the chart tools I will first build a simple interface, and do and simple demo implementation.
interface IChartItem
{
string Label { get; }
string Size { get; }
}
and now to the simple implementation
public class Demo : IChartItem
{
public Demo(string label,string size)
{
Label = label;
Size = size;
}<br>

public string Label
{<br>
get; private set;
}

public string Size
{
get;
private set;
}
}
Now to the glue that combines or more build the url for image that hold our chart.
protected void Page_Load(object sender, EventArgs e)
{
DataBind();
}

protected string ChartSource
{
get
{
return BuildGoogleChartUrl();
}
}

private string BuildGoogleChartUrl()
{
string prefix = "http://chart.apis.google.com/chart?cht=p3&chs=500x300";
string chd = "&chd=t:";
foreach (IChartItem chartItem in ChartItems)
{
chd = String.Format("{0}{1},", chd, chartItem.Size);
}
chd = chd.TrimEnd(',');
string chl = "&chl=";
foreach (IChartItem chartItem in ChartItems)
{
chl = String.Format("{0}{1}|", chl, chartItem.Label);
}
chl = chl.TrimEnd('|');
return String.Format("{0}{1}{2}", prefix, chd,chl);
}

private IEnumerable _chartItems;
private IEnumerable ChartItems
{
get
{
if (_chartItems == null)
_chartItems = InstantiateChartItems();
return _chartItems;<br>
}
}

private IEnumerable InstantiateChartItems()
{
List list = new List();
list.Add(new Demo("20","20"));
list.Add(new Demo("4", "40"));
list.Add(new Demo("50", "50"));
list.Add(new Demo("10", "10"));
return list;
}
And now we can use the url generated as a source for img-tag as this <img src=”<%# ChartSource %>” />
and here is the result

Usersessions in sitecore (logout users from backend)
The number of usersession that is possible to have open in sitecore depend onj the licens, which is fair enough. But the task for an administrator to end hanging usersession seems somewhat headless. The administrator have to logout, to get a list of active user sessions, and then choose to end hanging or not used sessions. This might be fine in minor solutions but I think this might pose a problem in solutions where a user with the “Is Adminstrator” flag is set to true can be hard to find. He might be working in different office or just generally be hard to get a hold of. It doesn’t require you have the “Is administrator” flag to end session but it is required to get the list of active sessions. You don’t even have to be logged in to sitecore to end active session, if presented with the option to end active session anonymous users could do so. My idea is to help local administrators with functionality to end session with out leaving the backend, or having to log out or anything like that. Since sitecore is one big tool box I will build it as shortcut in the tray of sitecore.
Okay so we start, all our work is done in the core database and it only contains minimal coding. We start with making the tray icon. In the core database we go to content/applications/Desktop/tray and add a item I will call it UserSessions the Data section of the item find the click attribute and add the command name, this will also have to go in the command file we get back to that. I also and icon for the tray I have choosen the standard user icon.

Now with the tray icon shortcut in place you should be able to see it in th start bar just save the item and hit F5

Now we will add the command to the App_Config/Commands.config add the following line
<command name=”Tray:UserSessionViewer” type=”UserHelper.UserhelperTrayCommand,UserHelper” />
I will add this little user feature helper as an application so we need to add an application and layout for the application in the core database. We start with adding the layout “core database” go to sitecore/layout/applications and add a new layout in the data section in path write the physical path to layout you will create in the next step.

Next we will add the application again this is done in the core database go to sitecore/content/Applications/ and add a new application pull on the the layout we just created make sure you can see it in the layout section for the item. Also note the Id for your application, we will have to use it in the code part.

Okay now we are done with the configuration in sitecore now to code part.
First we will start we the Tray click command which is pretty simple note that is hardcode the id for our application and the database I getting the item from.
Now we have something that handle the click on the Tray command no we will code the popup or application window. First the frontend code for the application. The frontend code shows when the user session started and when the last request was made info need to take into account which user sessions you should end
<div>
<divLiteral">System Time</span>
<span><%# SystemTime %></span>
</div>
<div>
<asp:Repeater ID="taskRepeater" runat="server" DataSource="<%# ScheduleItems %>"
OnItemCommand="taskRepeater_ItemCommand">
<HeaderTemplate>
<table>
<thead>
<tr>
<td>
*
</td>
<td>
Task name
</td>
<td>
Is Due
</td>
<td>
Last run
</td>
<td>
Next run
</td>
<td>
Execute Task
</td>
</tr>
</thead>
<tbody>
</HeaderTemplate>
<ItemTemplate>
<treven" : "odd"   %>">
<td>
<img src="/sitecore/shell/Themes/Standard/<%#((ScheduleItem)Container.DataItem).Icon%>"
alt="<%# ((ScheduleItem)Container.DataItem).DisplayName %>" />
</td>
<td>
<%# ((ScheduleItem)Container.DataItem).DisplayName%>
</td>
<td>
<%# ((ScheduleItem)Container.DataItem).IsDue%>
</td>
<td>
<%# ((ScheduleItem)Container.DataItem).LastRun.ToString("HH:mm dd/MM-yyyy")%>
</td>
<td>
<%# ((ScheduleItem)Container.DataItem).NextRun.ToString("HH:mm dd/MM-yyyy")%>
</td>
<td>
<asp:LinkButton ID="LinkButton1" Text="Execute" CssClass="SortButton" runat="server"
CommandName="Execute" CommandArgument="<%# ((ScheduleItem)Container.DataItem).ID %>" />
</td>
</tr>
</tbody>
</ItemTemplate>
<FooterTemplate>
</tbody> </table>
</FooterTemplate>
</asp:Repeater>
</div>
</div>
Now to the code behind, I am only using standard sitecore functionality nothing fancy here other then the click event for the repeater that end the selected user session.
using Sitecore.Data;
using Sitecore.Security.Accounts;
using Sitecore.Web.Authentication;

namespace Userhelper.Presentation
{
public partial class UserSessionsView : System.Web.UI.Page
{
protected void Page_Load(object sender, EventArgs e)
{
DataBind();
}

public IEnumerable UserSessions
{
get
{
return DomainAccessGuard.Sessions;
}
}


protected void userRepeater_ItemCommand(object source, RepeaterCommandEventArgs e)
{
string id = e.CommandArgument.ToString();
switch (e.CommandName)
{
case "Execute":
EndSession(id);
break;
}
}

private void EndSession(string sessionID)
{
DomainAccessGuard.Kick(sessionID);
}

}
}
This is how I looks when we done

The styling part is left for you. With this little userhelper you can set security on the tray icon so local administrator can see the tray icon and all other users have denied read access so only users with elevate security settings can end user sessions.
System Alert in sitecore
When working with large Sitecore implementation and customers that have a lot of editors maintaining the content of their website, often makes updating the system becomes a hurdle. Because editors may or may not work in on the same floor or even the same building, so even if you have an contact person who’s responsibility is to notify editor about the downtime, it is possible that one or more editors haven’t heart about the downtime and haven’t save the what they where doing the second the system is taken offline, a valuable work may have been lost.
So I thought what would be more smart the implementing a System alert/ notifier system that alert the users about the forthcoming downtime. This Alert could as in this example be a simple javascript alert.
My solution is build around simple Javascript calling a webservice which looks for alert placed inside sitecore and display them as a simple javascript alert. Yes some may argue that I have some hardcoded path string and what have we not, but it is left to you to move these to fx. The web.config. Even more this solution I maybe a little over the edge when looking at the implementation, but I se so many usages for this so I went ALL-IN as implemented with interface and using a provider model. The solution is build and tested against a Sitecore 6.2, but nothing wrong with using on other Sitecore versions.
But here goes first the javascript since Sitecore editors have three different editors Page Edit, Content Editor and the Desktop. So we need to include the javascript in three different files, and because of the we need to ensure that the file is only loaded once so logged into the Desktop and opening the content editor doesn’t give two warnings, hence the cookie check. Now to javascript, it’s all simple stuff.
The javascript should be include in these three files
Webedit:
sitecore\shell\Applications\WebEdit\WebEditRibbon.aspx
Content Editor:
sitecore\shell\Applications\Content Manager\Default.aspx
Desktop:
sitecore\shell\Applications\Startbar\Startbar.xml
/* Function for calling the webservice                             */
function callWebservice() {
var xmlhttp = new ActiveXObject("Microsoft.XMLHTTP");
xmlhttp.open("GET", "/Components/SystemNotifier/AjaxWebservice/SystemNotifier.asmx/GetAlerts", false);
xmlhttp.setRequestHeader("Content-Type", "application/x-www-form-urlencoded");
xmlhttp.send();

if (xmlhttp.status == 200) {
var str = xmlhttp.responseXml.getElementsByTagName("string").item(0).text;
return str;
}
}

/* function that Get system alerts */
/* update timer by calling the webservice    */
function GetSystemAlerts() {
var alertString = callWebservice();
if (alertString != "") {
alert(alertString);
//increase time to next call so we dont get same alert twice
setTimeout("GetSystemAlerts()", 125000);
}
else {
setTimeout("GetSystemAlerts()", 60000);
}
}

var cookieName = "SitecoreSystemNotifier";

function writeCookie() {
document.cookie = cookieName;
}

function cookieExists()
{

if (document.cookie.length >0 )
{
var offset = document.cookie.indexOf(cookieName);
if (offset != -1)
return true;
return false;
}
return false;
}

function init(){
if(!cookieExists()){
writeCookie();
//SetTimeout in ms
setTimeout("GetSystemAlerts()", 60000);
}
}

init();
Okay now that we have the javascript we need the webservice to be called. It’s fairly simple when using the Provider.
namespace SystemNotifier.AjaxWebservice
{
///
/// Summary description for SystemNotifier
///
[WebService(Namespace = "http://pentia.dk/")]
[WebServiceBinding(ConformsTo = WsiProfiles.BasicProfile1_1)]
[System.ComponentModel.ToolboxItem(false)]
// To allow this Web Service to be called from script, using ASP.NET AJAX, uncomment the following line.
[System.Web.Script.Services.ScriptService]
public class SystemNotifier : WebService
{

[WebMethod]
public string GetAlerts()
{
ISystemAlert alert = AlertProvider.NextAlert;
if (alert != null)
return alert.Text;
return "";
}

private SystemAlertProvider _provider;
private SystemAlertProvider AlertProvider
{
get
{
if (_provider == null)
_provider = new SystemAlertProvider();
return _provider;
}
}

}
}
And now to the provider implementation.
public class SystemAlertProvider
{
private IEnumerable _alerts;
public IEnumerable Alerts
{
get {
if(_alerts == null)
_alerts = GetAlertsFromSitecore();
return _alerts;
}
}

private TimeSpan timespan = new TimeSpan(0, 1, 0);
private IEnumerable GetAlertsFromSitecore()
{
ChildList childList = AlertRootItem.Children;
foreach(Item child in childList)
{
ISystemAlert alertItem = new SystemAlert(child);
if(alertItem.AlertTime > DateTime.Now.Subtract(timespan))
yield return alertItem;
}
}

private const string sitecoreRootPath = "/sitecore/system/SystemAlertNotifier";
private Item _rootItem;
private Item AlertRootItem
{
get
{
if(_rootItem == null)
_rootItem = Database.GetItem(sitecoreRootPath);
return _rootItem;
}
}

private const string _databaseName = "master";
private Database Database
{
get
{
return Database.GetDatabase(_databaseName);
}
}
public ISystemAlert NextAlert
{
get
{
if(Alerts.Count() > 0)
return Alerts.OrderBy(w => w.AlertTime).First();
return null;
}
}
}
And finally the Alert interface and implementation of the same.
Inteface
public interface ISystemAlert
{
DateTime AlertTime { get; }
String Text { get; }
}
Implementaion
public class SystemAlert : ISystemAlert
{
public SystemAlert(Item item)
{
Item = item;
}

private Item Item
{
get;
set;
}

private const string _alertTimeField = "SystemAlert_AlertTime";
public DateTime AlertTime
{
get
{

DateField dateField = Item.Fields[_alertTimeField];
return dateField.DateTime;
}
}

private const string _textField = "SystemAlert_Text";
public string Text
{
get { return Item[_textField]; }
}
}
Now we got all the code working so now we need to have someway to get the info, let’s use a sitecore item. So here is a snapshot of the how my sitecore item looks.

So this is pretty much everything you need to have a system alert system up and running inside sitecore. Remember to edit hardcode root path to system alert root folder.
You can download the project in the download section link here.
And hope you can see the posiblities in this solution or implementaion, you could scheduled downtown and have email alert, downtime calendar and much much more hope you enjoy,
Simple GoogleMap
I recently had to make a page showing different locations each with it own little googlemap.
To make it easy to use i used jQuery to hook in a create the googlemap from the html. The map generatet is a simple map with one marker and centered on this marker. with an width and height set to 400px.

So I used span tag html to set the settings need for generating each googlemap.
I then use jQuery to look for a container that have one or multple of theese maps inside and add a map to the specific “mapItem”
The html needed for one item is as shown below:
<div>
<span>
<span>Na;</span>
<span>Na</span>
<span>Map0</span>
<span>Pentia store kongensgade 66 copenhagen denmark</span>
</span>
<div id="Map0" style="width:400px; height:400px;">
</div>
</div>
To get it all to wok you of course need a googlemapApi key get from here
Here is the jquery file i used to hook in on document ready function note if the longtitude and/or latitude isn’t set i’l try to and a marker to map from the address if that fails to you’ll get an invalide map.
jQuery(document).ready(function()
{
buildMapsFromHTML();
}
)

/*****************

*  MAP SEETINGS  *

*****************/
var map;
var geocoder;
var zoomLevel = 14;
var mapIndex = 0;


/*****************

*  MAP FUNCTIONS *

*****************/
function buildMapsFromHTML(){
var googleMaps = jQuery(".Map");
var i;
for (i = 0; i < googleMaps.length; i++)
{
mapIndex = i;
addMap(googleMaps[i],mapIndex);
}
}

function addMap(mapSettings) {
// GET SETTINGS FROM HTML
var setting = jQuery(mapSettings).children(".MapSettings");
var mapId = jQuery(setting).children(".mapId").html();
var longtitude = jQuery(setting).children(".longtitude").html();
var latitude = jQuery(setting).children(".latitude").html();
var address = jQuery(setting).children(".address").html();


if (latitude != "Na" || longtitude != "Na") {
initializeMap(mapId);
addMarkerToMap(longtitude, latitude);
centerMap(longtitude, latitude);
}
else{
generateMapFromAddress(address,mapId);
}
}

function initializeMap(mapId) {
map = new GMap2(document.getElementById(mapId));
}

function generateMapFromAddress(address,mapId) {
var coordinate = cordinatesFromGoogle(address,mapId)
}

function cordinatesFromGoogle(address,mapId) {

geocoder = new GClientGeocoder();

geocoder.getLatLng(address, function(point) {
if(point) {
var longtitude = point.lng().toFixed(5)
var latitude = point.lat().toFixed(5)
initializeMap(mapId);
addMarkerToMap(longtitude, latitude);
centerMap(longtitude, latitude);
}
})
}

function addMarkerToMap(longtitude, latitude) {
var point = new GLatLng(latitude, longtitude);
var marker = new GMarker(point);
map.addOverlay(marker);
}

function centerMap(longtitude, latitude) {
var point = new GLatLng(latitude, longtitude);
map.setCenter(point, zoomLevel);
}
So an example html to bind it all together could look like this:
<html>
<head>
<script src="http://code.jquery.com/jquery-1.4.2.min.js" type="text/javascript"></script>
<script src="http://maps.google.com/maps?file=api&v=2&sensor=true_or_false&key=localhost type="text/javascript"></script>
<script type="text/javascript" src="googlMaps.js"></script>
</head>

<body>
<div>
<span>
<span>Na</span>
<span>Na</span>
<span>Map0</span>
<span>store kongensgade 66 copenhagen denmark</span>
</span>
<div id="Map0" style="width:400px; height:400px;">
</div>
</div>

<div>
<span>
<span>Na</span>
<span>Na</span>
<span>Map1</span>
<span>store kongensgade 66 copenhagen denmark</span>
</span>
<div id="Map1" style="width:400px; height:400px;">
</div>
</div>

</body>
</html>
If no longtitude or/and latitude is set i gets the marker from the address.
and Na should be used to say that you dont have those values. Offcourse it could be extended to specify which kind of map and so on. This could be set in the settings as well togehter with zoomlevel and so on.
remember to set the googlemap key to your domain


