Archive
Easy unit testing in Sitecore with AutoFixture, NSubstitute and Xunit
Unit testing Sitecore code has been around for quite som years now, and with the release of version 8.2 Sitecore has implemented a lot of new abstractions, which makes testing of Sitecore code easier. So if you not on 8.2 yet this might not be for you, or this could be a reason for upgrading to 8.2. Today there exists a couple of framework that will help developers with writing unit test to Sitecore one of the more known ones I Sitecore FakeDb. But as we shall see in the following a good portion of the more simple Sitecore API can easyli be test without, but creating test stubs can quick become a cumbersome tasks, and this is exactly where this post comes into play.
Let me briefly introduce AutoFixture
This is take from The AutoFixture Github pages https://github.com/AutoFixture/AutoFixture
AutoFixture is an open source library for .NET designed to minimize the ‘Arrange’ phase of your unit tests in order to maximize maintainability. Its primary goal is to allow developers to focus on what is being tested rather than how to setup the test scenario, by making it easier to create object graphs containing test data.
For me Autofixture helps me writing clean Tests where magic values, or test object are hidden away, ie dummy data is something created when the test runs. I strongly encourage you to take a deeper look at Autofixture it is an awesome Library
Okay so how does this combined with Xuint and NSubstitute. Today You can create an Subsitute for a Sitecore Item But it stille take quite som parameters to create the item so you need to create more than one Substitute see the example below.
  var db = Substitute.For<Database>();
  var itemId = ID.NewID;
  var language = Substitute.For<Language>();
  var definition = new ItemDefinition(
  itemId, "itemname", ID.NewID, ID.NewID);
  var data = new ItemData(
    definition, language,
    Sitecore.Data.Version.First, new FieldList());
  var item = Substitute.For<Item>(itemId, data, db);
  return item;
You could in your test have a test factory that just creates this object for you of course.
Enough Skip to the point .. okay lets see where you getting at.
Okay given the following class Which I want to test. All it does is, for the master database get the root item and add a ChildItem, with any TemplateId and return the newly created child.
public class MyClass
{
   private readonly IFactory _factory;
     public MyClass(IFactory factory)
     {
        _factory = factory;
     }

     public Item AddToSitecore()
     {
      Database database = _factory.GetDatabase("master");
      Item rootItem = database.GetItem("/sitecore/content/home");
      Item childItem = rootItem.Add("child", new TemplateID(ID.NewID));
      return childItem;
    }
}
I can write the following test
  using FluentAssertions;
  using NSubstitute;
  using Sitecore.Abstractions;
  using Sitecore.Data;
  using Sitecore.Data.Items;
  using Xunit;


namespace Sitecore.AutoFixture.NSubstitute
{
  public class MyClassTests
  {

   [Theory, AutoSitecoreData]
   public void MyClass_AddItemToWithAutoFixtureRoot_ShouldReturnItem(Item rootItem,Item childItem,Database database,IFactory factory)
   {
     //Arrange
     database.GetItem("/sitecore/content/home").Returns(rootItem);
     factory.GetDatabase("master").Returns(database);
     rootItem.Add(Arg.Any<string>(), Arg.Any<TemplateID>()).ReturnsForAnyArgs(childItem);
     MyClass sut = new MyClass(factory);

    //Act
    Item returnItem = sut.AddToSitecore();

   //Assert
   returnItem.Should().NotBeNull();
   returnItem.ID.Should().BeSameAs(childItem.ID);
   returnItem.Name.Should().BeEquivalentTo(childItem.Name);
   rootItem.Add(Arg.Any<string>(), Arg.Any<TemplateID>()).Received();
   database.GetItem("/sitecore/content/home").Received();

  }
 }
}
What is nice here is you can the easy created Database and Items (root,and child), and a Sitecore Factory, you can set your expectations in your own test to match what you’re testing.
All with the help of the AutoSitecoreData Attribute that decorates the tests.
It magically creates new items, database, Sitecore factories, Settings, the last two fund in Sitecore Abstractions. No need for Factories, all you get is relevant data with out static items or
It’s not entirely magic, it extends some AutoFixture attributes, you can have a look at the code at Github
https://github.com/istern/Sitecore.AutoFixture.NSubstitute
There Are a few gotchas For this to work in your test, you need to get the code from Github and build it, Hopefully I will soon build a nuget package which will make this step obsolete . But once build you can reference the SitecoreAutoDataAttribute in your tests. You will also have to reference Sitecore.Kernel but no additional references to Sitecore files is required.
Hope you will find this useful
Running Sitecore Publishing Service in Docker
In this mini series of running Sitecore in docker containers, it is now time to have a look at a container for running Sitecore publishing Service. This container will setting up the service following the manual process found in the installation guide at dev.sitecore.net. The recommendation specifies that service should be hosted on an IIS so as an base image I will be using the Microsoft/IIS from docker hub. Over the base image there will be installed dotnetcore hosting using https://chocolatey.org/. Be aware that this docker image will be using windows containers, and you can’t combine linux and windows continer in docker yet. SO !
STOP REMEMBER TO SWITCH TO WINDOWS CONTAINERS
It is important to note that this container is not being packed with the Publishing Service zip file, but instead a voluome should be created with the publishing service files found in the zip. To be clear this means that you will still have to download and extract the publishing service from dev.sitecore.net
To help configurering the container a couple of support files is created. First a small powershell script for manipaluting the connectionstrings into the templates file ”sc.global.xml” which is then copied into to the configuration.
And yes I know the powershell could be written more crisp sorry..

$user = $env:user
$password = $env:password
$server = $env:server
$coredb = $env:coredb
$masterdb = $env:masterdb
$webdb = $env:webdb
$core = '<core>user id='+$user+';password='+$password +';Data Source='+$server+';Database='+$coredb+';MultipleActiveResultSets=True;</core>'
$master = '<master>user id='+$user+';password='+$password +';Data Source='+$server+';Database='+$masterdb+';MultipleActiveResultSets=True;</master>'
$web = '<web>user id='+$user+';password='+$password +';Data Source='+$server+';Database='+$webdb+';MultipleActiveResultSets=True;</web>'</pre>
(Get-Content C:\resources\sc.global.xml) -replace('{CORE}',$core) | Set-Content C:\resources\sc.global.xml
(Get-Content C:\resources\sc.global.xml) -replace('{MASTER}',$master) | Set-Content C:\resources\sc.global.xml
(Get-Content C:\resources\sc.global.xml) -replace('{WEB}',$web) | Set-Content C:\resources\sc.global.xml

Copy-Item C:\resources\sc.global.xml c:\publishing\config\global\

(Get-IISAppPool "DefaultAppPool" ).ManagedRuntimeVersion = ""

c:\publishing\./Sitecore.Framework.Publishing.Host schema upgrade --force

C:\ServiceMonitor.exe w3svc
And the template xml file
<Settings>
<Sitecore>
<Publishing>
<!--
Overriding & controlling the log level for different parts of the system
-->
<Logging>
<Filters>
<Sitecore>Information</Sitecore>
<Sitecore.Framework.Publishing.DataPromotion>Debug</Sitecore.Framework.Publishing.DataPromotion>
<Sitecore.Framework.Publishing.ManifestCalculation>Trace</Sitecore.Framework.Publishing.ManifestCalculation>
</Filters>
</Logging>
<ConnectionStrings>
{CORE}
{MASTER}
{WEB}
</ConnectionStrings>
</Publishing>
</Sitecore>
</Settings>
With the two helper files, all that is left is the Dockerfile
FROM microsoft/aspnet

RUN mkdir C:\publishing
ADD /resources /resources
RUN powershell -NoProfile -Command \
Import-module IISAdministration; \
New-IISSite -Name "publishing" -PhysicalPath C:\publishing -BindingInformation "*:80:"; \
Remove-IISSite -Name 'Default Web Site' -Confirm:$false;

RUN powershell -Command (Get-IISAppPool "DefaultAppPool" ).ManagedRuntimeVersion = ''

RUN powershell -Command Invoke-Expression ((New-Object Net.WebClient).DownloadString('https://chocolatey.org/install.ps1'))
RUN powershell -Command Install-PackageProvider -Name chocolatey -Force
RUN powershell -Command choco install -y --params="Quiet" dotnetcore-windowshosting
EXPOSE 80

ENTRYPOINT powershell.exe -Command c:\Resources\configure.ps1
Once build you should be able to run it.
docker build . -t sitecorepublisging
Remember to mount a volumen pointing to the folder where you extracted the publishingservice.zip file. The volumen needs to point to “c:\\publishing” inside the container. And also supply relevant information for environment variables ie. your sql user name,password and adresse and Sitecore names for the master web and core so it could looking something like this J
docker run -it -p 80:80 -v d:\\websites\\publishing:c:\\publishing -e “user=sa” -e “password=Sitecore+Docker=Socker!” -e “server=172.29.31.21” -e “coredb=Sitecore_Core” -e “webdb=Sitecore_Web” -e “masterdb=Sitecore_Master” –name demop sitecorpublishingservise
DID YOU REMEMBER TO SWITCH TO WINDOWS CONTAINERS ?
You can’t use localhost because of some windows natting with docker issues sorrym this is comming in the near future.
Once the container is up and running inspect the container to get the ip.
Docker inspect {containername}
With the ip verify the service is running
http://{CONTAINERIP}/api/publishing/operations/status
you should see a status 0
Once you installed the sitecore package enabling publishing service inside Sitecore. you can copy the the container ip into your configuration found in /App_Config/Include/Sitecore.Publishing.Service.config and update the setting
<setting name="PublishingServiceUrlRoot">http://CONTAINERIP/</setting>
And that’s all. Now you are using the new publishing service with IIS hosted in docker.

Congrats. So test it by publish your entire site i Sitecore 🙂 and be amazed be the publishing service speed.
Once i get around to it i will publish the image to docker hub. In this blog post i only gave one way to run the publishing service there are of course others. And also the image can be optimised.
Sitecore Docker Solr on windows container
Lately I’ve been working on getting Sitecore up and running in docker containers. Which now is possible with windows containers, you can read pbering blog post about here http://invokecommand.net/posts/sitecore-and-docker-today. In my last blog post I showed how to use Solr with Docker and Sitecore, unfortunately you can’t run windows container a long side with Linux containers yet. So in the following I’ve created a windows solr container you can use. Remember this will only work if you install docker beta.
Simply run
docker run –d –p 8983:8983 istern/windows-solr54 –name mysolr
Since there are some minor bugs on windows container you can’t reference in on localhost so you will have to inspect the container to get the ip.
docker inspect mysolr
paste the ip into your solr host in Sitecore.ContentSearch.Solr.DefaultIndexConfiguration.config in your environment. And you’re now done.
Solr docker container for Sitecore 8.2
For some time, I’ve wanted to work with Docker. So I took on the task of creating a Solr container for Sitecore, a container you can turn on and have all the required Solr Cores configured and preinstalled, so it just works with Sitecore. This post is not a detailed introduction to Docker if you want a detailed introduction I suggest looking at their website https://www.docker.com. This post is only meant to be a simple demo to shown how you could combine Docker with Sitecore. Dont use this container for more than testing, it is not suposed to be used in production.
First I found a suitable Docker container image to start from , my choice : the Solr:5.3 found here : https://github.com/docker-solr/docker-solr/blob/dfe2c80ca10ca9191ae8ce7c6193ecd47c6c0b5f/5.3/Dockerfile.
I’ve installed the images “spun up a docker container” pulled the schema file and ran it through Sitecore 8.2 “enrichment” process. Next I started to build my docker file containing all the configuration for building the container ie configuring the different cores . All that happens is first to copy in the new schema file to the basic_configset and afterwards copy the basic_configset to multiple new folders one for each core. See the docker file below
FROM solr:5.3
MAINTAINER istern
ENV SOLR_PATH /opt/solr/server/solr
COPY resources/schema.xml $SOLR_PATH/configsets/basic_configs/conf
RUN cp -r $SOLR_PATH/configsets/basic_configs/ $SOLR_PATH/sitecore_core_index && \
echo name=sitecore_core_index > $SOLR_PATH/sitecore_core_index/core.properties && \
cp -r $SOLR_PATH/configsets/basic_configs/ $SOLR_PATH/sitecore_master_index && \
echo name=sitecore_master_index > $SOLR_PATH/sitecore_master_index/core.properties && \
cp -r $SOLR_PATH/configsets/basic_configs/ $SOLR_PATH/sitecore_web_index && \
echo name=sitecore_web_index > $SOLR_PATH/sitecore_web_index/core.properties && \
cp -r $SOLR_PATH/configsets/basic_configs/ $SOLR_PATH/sitecore_fxm_master_index && \
echo name=sitecore_fxm_master_index > $SOLR_PATH/sitecore_fxm_master_index/core.properties && \
cp -r $SOLR_PATH/configsets/basic_configs/ $SOLR_PATH/sitecore_fxm_web_index && \
echo name=sitecore_fxm_web_index > $SOLR_PATH/sitecore_fxm_web_index/core.properties && \
cp -r $SOLR_PATH/configsets/basic_configs/ $SOLR_PATH/sitecore_list_index && \
echo name=sitecore_list_index > $SOLR_PATH/sitecore_list_index/core.properties && \
cp -r $SOLR_PATH/configsets/basic_configs/ $SOLR_PATH/sitecore_marketing_asset_index_master && \
echo name=sitecore_marketing_asset_index_master > $SOLR_PATH/sitecore_marketing_asset_index_master/core.properties && \
cp -r $SOLR_PATH/configsets/basic_configs/ $SOLR_PATH/sitecore_marketing_asset_index_web && \
echo name=sitecore_marketing_asset_index_web > $SOLR_PATH/sitecore_marketing_asset_index_web/core.properties && \
cp -r $SOLR_PATH/configsets/basic_configs/ $SOLR_PATH/sitecore_marketingdefinitions_master && \
echo name=sitecore_marketingdefinitions_master> $SOLR_PATH//sitecore_marketingdefinitions_master/core.properties && \
cp -r $SOLR_PATH/configsets/basic_configs/ $SOLR_PATH/sitecore_marketingdefinitions_web && \
echo name=sitecore_marketingdefinitions_web > $SOLR_PATH/sitecore_marketingdefinitions_web/core.properties && \
cp -r $SOLR_PATH/configsets/basic_configs/ $SOLR_PATH/sitecore_suggested_test_index && \
echo name=sitecore_suggested_test_index > $SOLR_PATH/sitecore_suggested_test_index/core.properties && \
cp -r $SOLR_PATH/configsets/basic_configs/ $SOLR_PATH/sitecore_testing_index && \
echo name=sitecore_testing_index > $SOLR_PATH/sitecore_testing_index/core.properties && \
cp -r $SOLR_PATH/configsets/basic_configs/ $SOLR_PATH/social_messages_master && \
echo name=social_messages_master > $SOLR_PATH/social_messages_master/core.properties && \
cp -r $SOLR_PATH/configsets/basic_configs/ $SOLR_PATH/social_messages_web && \
echo name=social_messages_web > $SOLR_PATH/social_messages_web/core.properties && \
cp -r $SOLR_PATH/configsets/basic_configs/ $SOLR_PATH/sitecore_analytics_index && \
echo name=sitecore_analytics_index > $SOLR_PATH/sitecore_analytics_index/core.properties && \
cp -r $SOLR_PATH/configsets/basic_configs/ $SOLR_PATH/sitecore_core_indexMainAlias && \
echo name=sitecore_core_indexMainAlias > $SOLR_PATH/sitecore_core_indexMainAlias/core.properties && \
cp -r $SOLR_PATH/configsets/basic_configs/ $SOLR_PATH/sitecore_master_indexMainAlias && \
echo name=sitecore_master_indexMainAlias > $SOLR_PATH/sitecore_master_indexMainAlias/core.properties && \
cp -r $SOLR_PATH/configsets/basic_configs/ $SOLR_PATH/sitecore_web_indexMainAlias && \
echo name=sitecore_web_indexMainAlias > $SOLR_PATH/sitecore_web_indexMainAlias/core.properties
You can see the project here at github https://github.com/istern/Sitecore-Containers/tree/master/containers/solr/sitecore8.2 the container image is at dockerhub at https://hub.docker.com/r/istern/solr-sitecore/
You can test it out by installing docker and then running the following command.
docker run –name nameofyoucontainer -d -p 8983:8983 istern/solr-sitecore:8.2
You can now reach you solr admin interface on your http://localhost:8983
If you want to add an extra core I’ve made a script you can run from your favorite prompt.
docker exec [NAMEOFYOURSOLRCONTAINER] ./createcore.sh NameOfNewCore
You could combine the above image with docker compose to have both a solr and mongo running in containers. Below is an example of a docker-compose.yml
version: ‘2.0’
services:
solr:
image: istern/solr-sitecore:8.2
ports:
– “8983:8983”
mongo:
image: mongo
ports:
– “27020:27017”
you can test it by runnning the following command . The “-d” means as a daemon in he background.
docker-compose up -d
and now you have both a solr and mongo server running as containers .
A big thanks to @pbering for getting me started and helping m with all my silly docker questions.
Unit testing in Sitecore 8.2
Sitecore has done a great job but abstracting a lot and marking a lot of methods as Virtual, take the Datbase class for instance it is now abstract class, and implement in the DefaultDatabase Also all methods in the Item class is now marked virtual. I must say I think It is great way Sitcore is heading, and they are doing great but allowing developers easly testing the code by taking the framework in this direction.
Ok, but before I could also test using Microsoft Fakes, yes and there is Sitecore FakeDB, and also there was the old Framework I created myself Sitecore.Fakes, which didn’t work with sitecore 7+ because the Database contructer was made internal, but now working again in 8.2, the latter two Framworks (Sitecore FAkeDB and Sitecore.Fakes) required additional setup in a App.config along with a license file in your Test project With the changes mention before this is no longer required .. I’ve updated the Sitecore.Fakes found here https://github.com/istern/Sitecore-Fakes the solution contains examples of how to test with this Framework, a simple example is given below.
[Fact]

public void NewFakeItemDefaultNameShouldBeFakeItem()

{

var fake = new FakeItem();

fake.Name.Should().Be("FakeItem");

}
Note I’ve trimmed the framework a lot, ie. removed functionality that will be rewritten., so it is no longer as feature rich as before but now working J, also it is by fare not as feature rich as Sitecore FakeDB.
Running Sitecore Field Editor from a Speak Command in Sitecore Experience editor Sitecore 8.1 Version
So with the release of sitecore 8.1 also came some minor changes to how the javascript are structured, this means that to run the Sitecore Field Editor from a Speak Command in Sitecore Experience editor, which i presented in this post, a minor changes is required. All that is needed to be changed is the way the reference to Experience editor is handled the full Javascript with the modification is show below.
define(["sitecore", "/-/speak/v1/ExperienceEditor/ExperienceEditor.js"], function (Sitecore, ExperienceEditor) {
    Sitecore.Commands.LaunchFieldEditor =
    {
        canExecute: function (context) {
            //YOU COULD ADD FUNCTIONALITY HERE TO SEE IF ITEMS HAVE THE CORRECT FIELDS
            return true;
        },
        execute: function (context) {
            // THIS IS FOR THE ALT TEXT ON IMAGE
            context.currentContext.argument = context.button.viewModel.$el[0].firstChild.alt;

            //THIS IS THE TOOLTIP ON LINK TAG "A"
            context.currentContext.argument = context.button.viewModel.$el[0].title;
            console.log(Sitecore);
            console.log(ExperienceEditor);
            ExperienceEditor.PipelinesUtil.generateRequestProcessor("ExperienceEditor.GenerateFieldEditorUrl", function (response) {
                var DialogUrl = response.responseValue.value;
                var dialogFeatures = "dialogHeight: 680px;dialogWidth: 520px;";
                ExperienceEditor.Dialogs.showModalDialog(DialogUrl, '', dialogFeatures, null);
            }).execute(context);

        }
    };
});
Only modification is the mapping of The Experience editor is now loaded with a direct link to ExperienceEditor.js Line 1.
Sitecore 8.1 Preview doesn’t match current site
With the release of sitecore 8.1 came a minor little config change, the resolve site configuration is now default false, previous version this was default set to true.
The settings is in 8.1 is set to default false
<setting name="Preview.ResolveSite" value="false" />
when set to false the preview site, will always be set to what is configured in the following setting
<setting name="Preview.DefaultSite" value="website" />
Change the setting to true and Sitecore will try to resolve the sites matching a site from <sites> section.
Sitecore social connected Invalid Scopes: user_interests
I’ve set my self the task to have a go at the social connected, which I never really had a look at before.
So I’ve set it up a clean sitecore 8.1 and included the Facebook login in a MVC rendering and everything is working fine, except when trying to login on facebook, then I was shown an error See image below

The fix is pretty simple, fields that are pulled out of Facebook is configured in /app_config/include/Social/Sitecore.Social.ProfileMapping.Facebook.config and for the error i got it was the interest field that did’t exist in my user profile or had been renamed, but commenting out the field made, se below,e the error go away. the downside is that facebook interest isn’t mappen to contact details.
<!-- The interests listed on the user's profile. -->
<field enabled="true" originalKey="" sitecoreKey="fb_interests" permission="user_interests" access="/me/interests" text="Interests" />
I have to say my first impression of the module is it an great module easy to use and easy top configure, and can add a lot of value to any Sitecore solution
Running Sitecore Field Editor from a Speak Command in Sitecore Experience editor
This post is an update of an old post https://blog.istern.dk/2012/05/21/running-sitecore-field-editor-from-a-command/ . Sitecore 8 brought along speak and deprecated the old solution presented in that blog post. So let’s speakify it and create a new solution. Luckily Alister Berry provided an excellent blog post about creating simple custom ribbon in the experience editor http://www.programmingbynumbers.com/2015/01/31/creating-a-new-experience-editor-button-in-sitecore-8/ – So go read the post a comeback when your are done J. For the rest of this post the button or functionality, if you like, will be to edit the HTML metatags ie. Title, meta-description, meta-keywords.
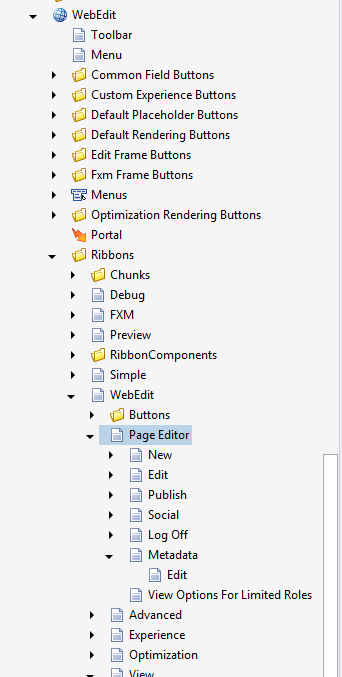
So let us begin with creating the button. Start Visual Studio launch the Sitecore Rocks and go to the Core database and navigated to “/sitecore/content/Applications/WebEdit/Ribbons/WebEdit/Page Editor” under the item create a new folder and the the newly created folder add a new Large button Fille out the fields as shown below.


So next step is to and a layout to the new button select the button and choose “Design layout” in Sitecore Rocks – shortcut “ctrl + u”, and choose and a new rendering “Large Button”


Next lets add the properties required for the solution to work
The properties are Click is “trigger:button:click”, Command “LaunchFieldEditor”, PageCodeScriptFileName : “PATH TO THE JS FILE WE CREATE NEXT”


Okay now we need to create PageCodeScriptFile:
define(["sitecore"], function (Sitecore) {

Sitecore.Commands.LaunchFieldEditor =
{
canExecute: function (context) {
//YOU COULD ADD FUNCTIONALITY HERE TO SEE IF ITEMS HAVE THE CORRECT FIELDS
return true;
},
execute: function (context) {
///CHOOSE YOUR OPTION BELOW

// THIS IS FOR THE ALT TEXT ON IMAGE
context.currentContext.argument = context.button.viewModel.$el[0].firstChild.alt;

//THIS IS THE TOOLTIP ON LINK TAG "A"
context.currentContext.argument = context.button.viewModel.$el[0].title;

Sitecore.ExperienceEditor.PipelinesUtil.generateRequestProcessor("ExperienceEditor.GenerateFieldEditorUrl", function (response) {
var DialogUrl = response.responseValue.value;
var dialogFeatures = "dialogHeight: 680px;dialogWidth: 520px;";
Sitecore.ExperienceEditor.Dialogs.showModalDialog(DialogUrl, '', dialogFeatures, null);
}).execute(context);

}
};
});
Rather simple file which calls some server side code. Also note that the settings will be save to the item when the ok button is clicked right away not need to click the save button in the experience editor.
public class GenerateFieldEditorUrl : PipelineProcessorRequest<ItemContext>
{
public string GenerateUrl()
{
var fieldList = CreateFieldDescriptors(RequestContext.Argument);
var fieldeditorOption = new FieldEditorOptions(fieldList);
//Save item when ok button is pressed
fieldeditorOption.SaveItem = true;
return fieldeditorOption.ToUrlString().ToString();
}

private List<FieldDescriptor> CreateFieldDescriptors(string fields)
{
var fieldList = new List<FieldDescriptor>();
var fieldString = new ListString(fields);
foreach (string field in new ListString(fieldString))
fieldList.Add(new FieldDescriptor(this.RequestContext.Item, field));
return fieldList;
}

public override PipelineProcessorResponseValue ProcessRequest()
{
return new PipelineProcessorResponseValue
{
Value = GenerateUrl()
};
}
}
Now lyou should register the Request processor open the this file “Sitecore.ExperienceEditor.Speak.Requests.config” found in App_config/include folder. And add the new processor.
<request name="ExperienceEditor.GenerateFieldEditorUrl" type="PT.Framework.SitecoreEditor.GenerateFieldEditorUrl, PT.Framework.SitecoreEditor"/>
Just before we see the result there a few things that are nice to know. Because the server side code actually does a bit more the just returning and url for fieldeditor. The creation of the URL Handle also besides creating a URL to the fieldeditor is storing required parameters in the current session in the urlhand id. The fieldeditor then pickups on parameters by going in to the session with hdl-id see url below. Hdl=F60F9A3AB4DC4CC8A7E28D25C4EC13B8
http://local/sitecore/shell/applications/field%20editor.aspx?mo=mini&hdl=F60F9A3AB4DC4CC8A7E28D25C4EC13B8
Okay now to the tricky part we need to pass in which fields we want to edit to the server class GenerateFieldEditorUrl, unfortunately the parameter part of the layout isn’t rendered out and can’t be used but there are som simple ways we can force the fieldnames out in the HTML.
First you can edit the button item and set in the fieldnames in n the tool tips section

Alternatively you can set it in layout details page under tooltips, Be advised that if you choose this, editor will see the fieldname in the editors.

See the two different models below. The javascript in this post include selector for both option see comments in the js file


And now to the final result

So thats how you laucnh the field editor with a speak modal dialog, in the sitecore experience editor.
UPDATE 1
A problem with the two selector presented above is that they both requires you to add the fields to all language versions of the button item. So one of collegues Stephan Rifbjeg came up with a smart solution, simply to add the fields to the acceskey field on the layout see image below.
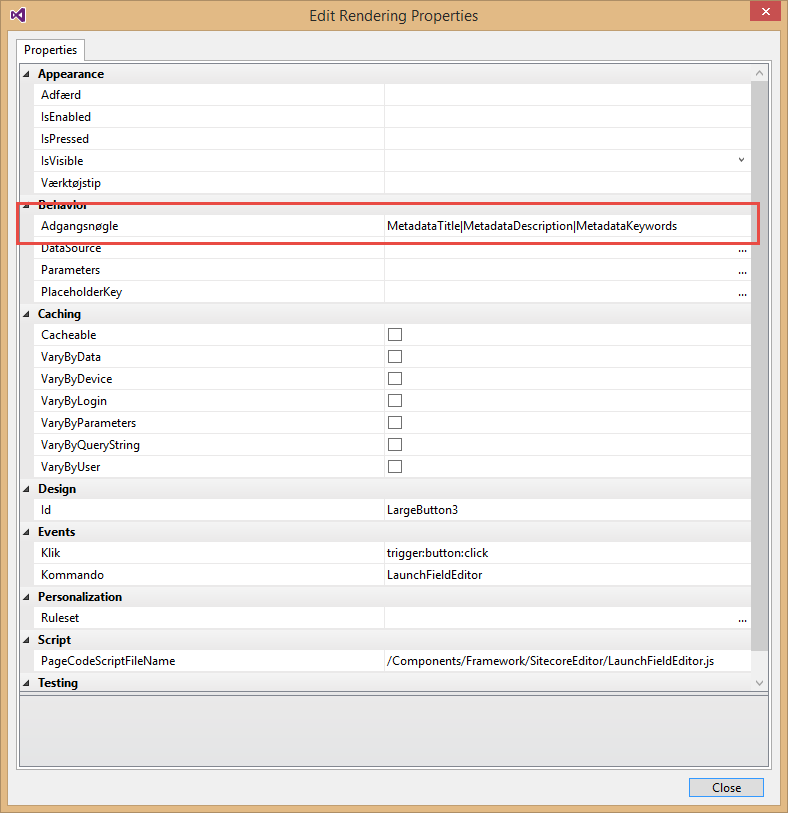
You can now get the value out with the following selector
context.currentContext.argument = context.button.viewModel.$el[0].accessKey;
Update from kayeenl to catch the GenerateFieldURI
public class GenerateFieldEditorUrl : PipelineProcessorRequest<ItemContext>
{
public string GenerateUrl()
{
var fieldList = CreateFieldDescriptors(RequestContext.Argument);
var fieldeditorOption = new FieldEditorOptions(fieldList);
//Save item when ok button is pressed
fieldeditorOption.SaveItem = true;
return fieldeditorOption.ToUrlString().ToString();
}<span class="para_break"><i class="copy_only">
</i></span>       private List<FieldDescriptor> CreateFieldDescriptors(string fields)
{
var fieldList = new List<FieldDescriptor>();
var fieldString = new ListString(fields);
foreach (var field in new ListString(fieldString))
{
try
{
var descriptor = new FieldDescriptor(RequestContext.Item, field);
fieldList.Add(descriptor);
}
catch (Exception)
{
Log.Error(string.Format("Cannot create field editor for field '{0}'. Please configure the fields on the tooltip of the button", field), this);
}
}
return fieldList;
}<span class="para_break"><i class="copy_only">
</i></span>       public override PipelineProcessorResponseValue ProcessRequest()
{
return new PipelineProcessorResponseValue
{
Value = GenerateUrl()
};
}


