Archive
Sitecore 10 Authenticated File upload to RCE / CVE-2021-38366
After looking for some extreme hardening of the Sitecore client I found a way to get Remote Code execution (RCE) via a Update center, described in this post.
It is possible for authenticated users, to upload arbitrary files, via update package functionality.It is possible for a malicious attacker to bypass file upload restrictions, hardened with the Sitecore hardening guide https://doc.sitecore.com/en/developers/101/platform-administration-and-architecture/security-guide.html and with secure file upload functionality, taken from this link
https://doc.sitecore.com/developers/100/platform-administration-and-architecture/en/secure-thefile-upload-functionality.html.
Test Instance information
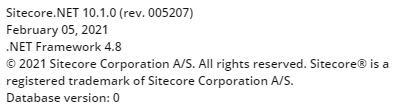
The test of this was done on a local Windows 10 machine with Sitecore 10 XM installation, installed via Graphical installation wizard see more information below

The Additional Filed upload restriction package was also installed with the following settings.
<?xml version="1.0" encoding="utf-8"?>
<configuration xmlns:patch="http://www.sitecore.net/xmlconfig/">
<sitecore>
<processors>
<uiUpload>
<processor mode="on"
type="Sitecore.Pipelines.Upload.CheckExtension,
Sitecore.UploadFilter" patch:before="*[1]">
<param desc="Allowed extensions (comma separated)"></param>
<param desc="Blocked extensions (comma separated)">exe,dll,aspx</param>
</processor>
</uiUpload>
</processors>
</sitecore>
</configuration>
Steps to reproduce
Keep in mind this is a autheticated file upload, so a compromised user must be obtained.
- Authenticate / Login to Sitecore
2. Once correctly logged in. Navigate to the Upload center

3. Choose/click the option to upload custom update

4. Pick your custom webshell
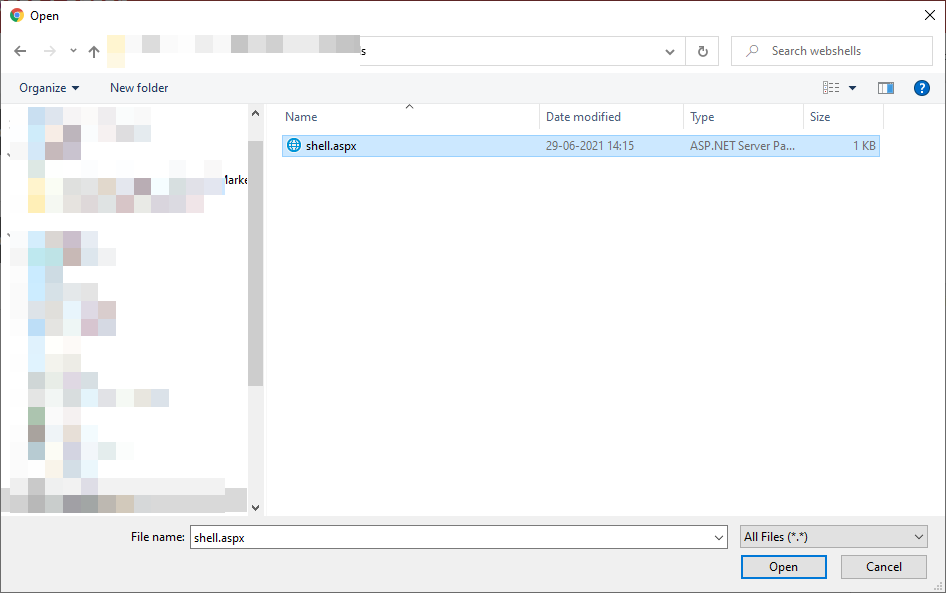
5. If the installer hangs click anywhere in the windows, this is expected.

6. Since uploads of updates packages always goes into the same folder
https://HOSTNAME/sitecore/admin/Packages/
to find the uploaded file in our case
https://sc101cm.dev.local/sitecore/admin/Packages/shell.aspx
7. Now all that is left is running the webshell.

Remediation
Disabled the Update center functionality
One way of doing the in add restriction to path in web.config like below
 <location path="sitecore/api/ssc/updatecenter">
  <system.web>
      <authorization>
        <deny users="*" />
      </authorization>
    </system.web>
  </location>
Other
The findings has been reported to Sitecore, and the Update center is being deprecated, but until this happens a simple fix is as mentioned to disabled the Update center functionality.
This vulnerability has been given CVE-2021-38366
Should you trust your own website ?
Let’s start with a question:
Should you trust data downloaded from your own website?
As a rule of thumb NO ! especially not if what you download contains user generated input, as an example data collected from Sitecore Form.
There is something interesting about this, because there is a trust relation for editors to their own site, most editors “i hope” will see their own site as a trustworthy source for downloads, and why shouldn’t they .But is this really true ? In this blog post I will give an example of how Sitecore can be used as a vessel to deliver a malicious payload to an unknown editor “victim”.
For this I’ve used the latest version of Sitecore 10.0.1 in XM mode.
To enable this let’s assume an editor creates a Form like the one below but it could be any form with fields that allows for text input.
IMG-1-form

Now after publishing the form the attacker sees form “sorry for missing styling:)”
img2

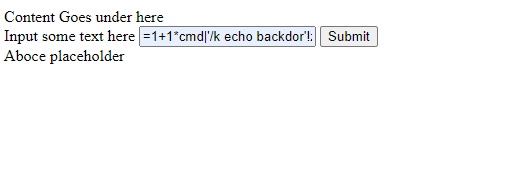
For testing purposes i will use a very simple payload “=1+1*cmd|’/k echo backdor’!z” which opens an command prompt and display the texst backdoor. More payloads can be found here https://github.com/swisskyrepo/PayloadsAllTheThings/tree/master/CSV%20Injection also note that could be other that are more relevant for other application and not Excel specificly.
The vulnerability used here is better known as csv injection or formula injection
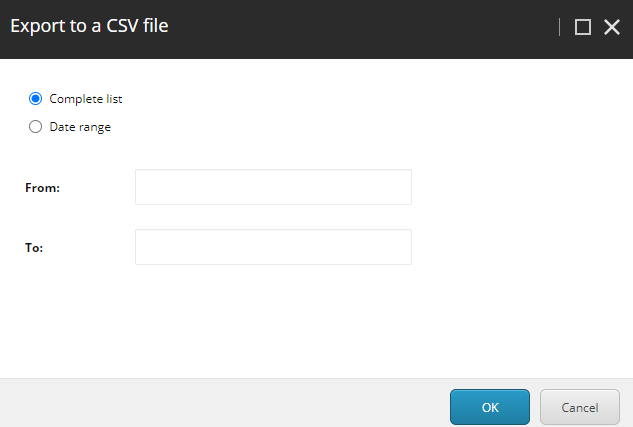
Now after some time the editors want to get the data from his newly created form. He logins into Sitecore and navigates to his form and exports the data “btw only way to view Forms collected data in Sitecore OTB”
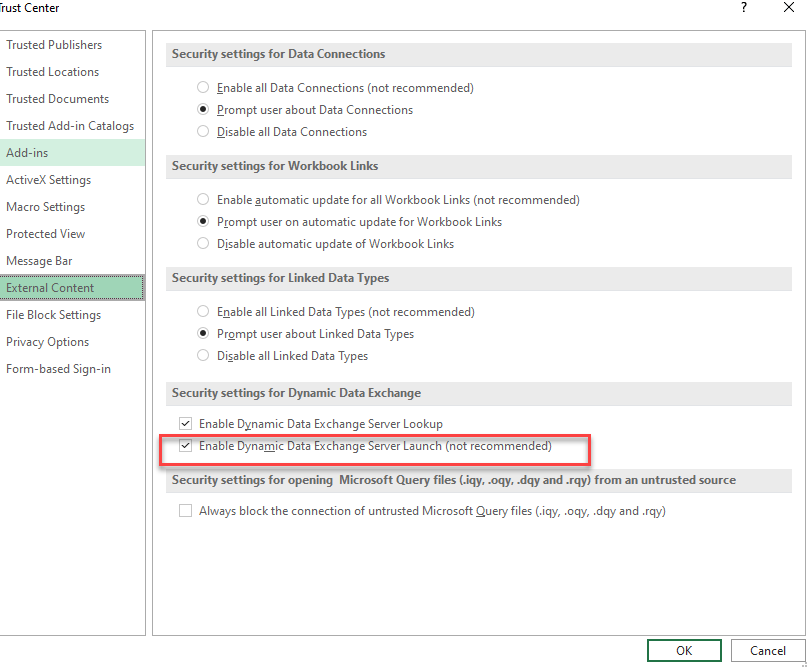
Now the next part is he opens the csv file in Excel “please note I’ve enabled what can be seen as an insecure setting in Excel see below.
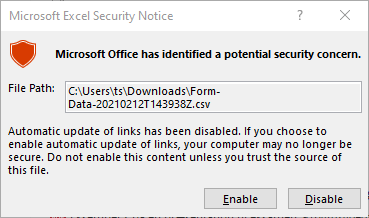
Now lets see what happens when the editor opens the csv file
Excel does show an alert, and this is where the trust comes into play because why wouldn’t the editor accept the warning and continue.

So now lets see what happens after he accepts the warnings
A nice little command prompt has opened with the text defined in our payload earlier.

So the question is this a vulnerability in Sitecore ? No or ….. You could filter out characters that could allow these attacks or you could simply add an “‘“ in front of all fields when exported, I will leave it to you to decide, but at least you should tell your customers to regard it as an insecure source when downloading content that contains user generated input. And please MAKE SURE TO DISABLE “enable dynamic data exchange server launch” in excel. Note this also works for applications then excel., maybe with a different payload.
Sitecore 9.1 IdentityServer On-Premise AD via ADFS
Which the launch of Sitecore 9.1 came the introduction of the identity server to Sitecore list roles. You can find a lot more information about the Identity Server here https://identityserver.io/- Personally I think this I is great enhancement and add are more easy extendable way of enabling 3 party authentication providers to Sitecore. As standard the Identity server runs on Sitecore HOST https://doc.sitecore.com/developers/91/sitecore-experience-management/en/sitecore-host.html And ships with the possibility to use Azure AD and the Identiytserver.Contrib.Membership module allowing for cloud AD and the old DB style of authenticating in Sitecore. This also means the the old Sitecore AD module is now deprecated and no longer supported. So in this blog post I will show how to integrated a On Premise Ad with Sitecore Idenityserver hosted on Sitecore Host.
First you need a AD of course and then you need ADFS server to act as a authentication provide to the Identityserver. This however is a little out of scope for this post. But here is two great links on how to configure and forward AD groups as roles
https://stackoverflow.com/questions/55494354/user-groups-as-claims-through-openid-connect-over-adfs
Before we get to code you need to know about this nuget feed related to Sitcore Identity
https://sitecore.myget.org/F/sc-identity/api/v3/index.json
Since this feed contains some of packages needed. So this project or solution rather is to use OpenId Connect against the with the ADFS server
The solution consist of three class’ i will briefly show them here below
The App Settings classe seen below for retrieving the Setting for the Provider
public class AppSettings
{
public static readonly string SectionName = "Sitecore:ExternalIdentityProviders:IdentityProviders:ADFS";
public ADFSIdentityProvider ADFSIdentityProvider { get; set; } = new ADFSIdentityProvider();
}
The ADFSIdentityProvider which allows for a type strong way of accessing settings related to the module.
public class ADFSIdentityProvider
{
public bool Enabled { get; set; }
public string Authority { get; set; }
public string ClientId { get; set; }
public string AuthenticationScheme { get; set; }
public string MetadataAddress { get; set; }
public string DisplayName { get; set; }
}
And the CongifugreSitecore class which handles the communication with ADFS server
using System;
using System.Security.Claims;
using System.Threading.Tasks;
using Microsoft.AspNetCore.Authentication;
using Microsoft.AspNetCore.Authentication.OpenIdConnect;
using Microsoft.Extensions.Configuration;
using Microsoft.Extensions.DependencyInjection;
using Microsoft.Extensions.Logging;
using Microsoft.IdentityModel.Tokens;
using Sitecore.Framework.Runtime.Configuration;

namespace Sitecore.IdentityServer.ADFS
{
public class ConfigureSitecore
{
private readonly ILogger _logger;
private readonly AppSettings _appSettings;

public ConfigureSitecore(ISitecoreConfiguration scConfig, ILogger logger)
{

this._logger = logger;
this._appSettings = new AppSettings();
scConfig.GetSection(AppSettings.SectionName);
scConfig.GetSection(AppSettings.SectionName).Bind((object)this._appSettings.ADFSIdentityProvider);
}

public object IdentityServerConstants { get; private set; }

public void ConfigureServices(IServiceCollection services)
{
ADFSIdentityProvider adfsProvider = this._appSettings.ADFSIdentityProvider;
if (!adfsProvider.Enabled)
return;
_logger.LogDebug($"Adding ADFS clientId {adfsProvider.ClientId} Authority {adfsProvider.Authority} Scheme {adfsProvider.AuthenticationScheme}");
new AuthenticationBuilder(services).AddOpenIdConnect(adfsProvider.AuthenticationScheme, adfsProvider.DisplayName, (Action)(options =>
{

options.SignInScheme = "idsrv.external";
options.SignOutScheme = "idsrv";
options.RequireHttpsMetadata = false;
options.SaveTokens = true;
options.Authority = adfsProvider.Authority;
options.ClientId = adfsProvider.ClientId;
options.ResponseType = "id_token";
options.MetadataAddress = adfsProvider.MetadataAddress;
options.TokenValidationParameters = new TokenValidationParameters
{
NameClaimType = "name",
RoleClaimType = "roles"

};
//Added to enable DEBUG to see all claims
//Can be removed in production
options.Events = new OpenIdConnectEvents()
{
OnTokenValidated = (context) =>
{
//This identity include all claims
ClaimsIdentity identity = context.Principal.Identity as ClaimsIdentity;
//ADD break POINT to see all the claims,
return Task.FromResult(0);
}
};
}));

}
}
}
With the solution build you can deploy this to your Identity Server in sitecoreruntime folder in a production folder. The installationor placement of files should look like below.

The Sitecore Plugin manifest should point to your assembly name an example given below.

And for the configuration files placed in Config folder is here an examplereplace clientid and autherityaddress and metaaddress with your own values

with that in place you can go ahead and restart the application pool for the identityserver to load in the configurations and you should see the AD login button.
clicking on the button should take you t your ADFS server for authentication, after taht you should be redirect to Sitecore.
Mapping of claims to roles works the same as with Sitecore Azure Ad implementation.
You can find the code for this on github
https://github.com/istern/Sitecore.IdentityServer.ADFS
Encrypting and securing your Sitecore connenction strings.
Finally after a long brake from bloggign here is a little starter post.
It is actually a fairly simple task to encrypt your .net connection strings using the aspnet_regiis.exe. you can find it in C:\Windows\Microsoft.NET\(Framework(32/64))\(.net version fx :4.0.30319)\aspnet_regiis.exe
So what I usually have, is a little .bat file placed in the www-root folder see the file content below
echo Encrypting app_config/connectionstrings.config
C:\Windows\Microsoft.NET\Framework64\v4.0.30319\aspnet_regiis.exe -pef “connectionStrings” .
Pause
running the bat file will transform your connectionstring from
<add name="core" connectionString="user id=user;password=password;Data Source=(server);Database=Sitecore_Core" />

<add name="master" connectionString="user id=user;password=password;Data Source=(server);Database=Sitecore_Master" />

<add name="web" connectionString="user id=user;password=password;Data Source=(server);Database=Sitecore_Web" />
to something like this
<connectionStrings configProtectionProvider="RsaProtectedConfigurationProvider">

<EncryptedData Type="http://www.w3.org/2001/04/xmlenc#Element"

xmlns="http://www.w3.org/2001/04/xmlenc#">

<EncryptionMethod Algorithm="http://www.w3.org/2001/04/xmlenc#tripledes-cbc" />

<KeyInfo xmlns="http://www.w3.org/2000/09/xmldsig#">

<EncryptedKey xmlns="http://www.w3.org/2001/04/xmlenc#">

<EncryptionMethod Algorithm="http://www.w3.org/2001/04/xmlenc#rsa-1_5" />

<KeyInfo xmlns="http://www.w3.org/2000/09/xmldsig#">

<KeyName>Rsa Key</KeyName>

</KeyInfo>

<CipherData>

<CipherValue>RTRWE..=</CipherValue>

</CipherData>

</EncryptedKey>

</KeyInfo>

<CipherData>

<CipherValue>FSM</CipherValue>

</CipherData>

</EncryptedData>

</connectionStrings>
That works for all connection strings in the ConnectionStrings.config file, unlike the analytics connectionstring for example, the standard WFFM connectionstring is stored in the /app_config/include/Sitecore.Forms.Config in following section.
<formsDataProvider type="Sitecore.Forms.Data.DataProviders.WFMDataProvider,Sitecore.Forms.Core">
but it turns out it is fairly simple to encrypt the connection string along with the others just move the connection string to standard ConnectionStrings.config file and call it wfm as shown below
<add name="wfm" connectionString="user …. />
now you can run the .bat file again and the wfm connectionstring is encrypted as well.
Remember that the encrypted connectionstring can only be decrypted on the machine that ran the .bat file.
To decrypt you can run the command
C:\Windows\Microsoft.NET\Framework64\v4.0.30319\aspnet_regiis.exe -pdf “connectionStrings”
Encrypting and signing Mail in .Net part 5/5 (Encrypting the content and sending the mail)
Final part in the serie c# encrypting mail.
So now we got the content build and signed. Now what is left to do i encrypting the content.
In this post we have a look at how the structure of the content should just before it is encrypted, and how to encrypt the content.
Link to part 1, part 2, part 3, part 4
To encrypt the content I will use the GetCert method that we did in part 4 of this series.
As with the signing part we will split this encryption into two bits. adding boundary to the content and encrypting part.
First the encrypting part:
public byte[] DoEncrypt(string message, X509Certificate2 encryptionCertificates)
{
byte[] messageBytes = Encoding.ASCII.GetBytes(message);

EnvelopedCms envelopedCms = new EnvelopedCms(new ContentInfo(messageBytes));

CmsRecipient recipients = new CmsRecipient(SubjectIdentifierType.IssuerAndSerialNumber, encryptionCertificates);

envelopedCms.Encrypt(recipients);

return envelopedCms.Encode();
}
With this function done we can now ready the content for encryptions. We add a simple boundary to the content and specifies what type the innner boundary is of. Important that if you skipped the signing part that you change this accordingly to match the type of you content.
Here is the code for encrypting and sending the mail:
public void encrypt(string content)
{
MailMessage message = new System.Net.Mail.MailMessage();
string encryptedContentType = "application/x-pkcs7-mime; smime-type=enveloped-data; name=\"smime.p7m\"";
string signatureBoundry2 = "--PTBoundry=3";
StringBuilder fullUnencryptedMessageBuilder = new StringBuilder();
fullUnencryptedMessageBuilder.Append("Content-Type: ");
fullUnencryptedMessageBuilder.Append("multipart/signed; ");
fullUnencryptedMessageBuilder.Append(" boundary=\"");
fullUnencryptedMessageBuilder.Append(signatureBoundry2);
fullUnencryptedMessageBuilder.Append("\"; protocol=\"application/x-pkcs7-signature\"; micalg=SHA1; ");

fullUnencryptedMessageBuilder.Append("\r\n");
fullUnencryptedMessageBuilder.Append("Content-Transfer-Encoding: ");
fullUnencryptedMessageBuilder.Append(TransferEncoding.SevenBit);
fullUnencryptedMessageBuilder.Append("\r\n\r\n");
fullUnencryptedMessageBuilder.Append(content);

string fullUnencryptedMessage = fullUnencryptedMessageBuilder.ToString();

byte[] encryptedBytes = DoEncrypt(fullUnencryptedMessage, GetCert());

MemoryStream stream = new MemoryStream(encryptedBytes);
AlternateView view = new AlternateView(stream, "application/pkcs7-mime; smime-type=signed-data;name=smime.p7m");
message.AlternateViews.Add(view);
message.To.Add("youremail@yourdomain.com");

message.From = new MailAddress("someone@yourdomain.com");
message.Subject = "TEST";
SmtpClient smtp = new SmtpClient("smtp.yourdomain.com");
smtp.Send(message);

}
This function also sends out the mail you might wanna spilt this up to seperate methods. And do remember to give valide email adresses and a sane smtphost.
Now lets have a look at the result:

Yes there is a warning with the signature but rember in part 1 where did a selfsigned certificate this is the problem, but you cal always just accept the signature as trusted in your outlook.
Okay so how doesn’t the content that we build look like just before it is encrypted ?
If hightligthe the different steps we done in this series.

Also note the diffenrent boundary references from one part to underlaying content part.

Remember to change email smtp host and serial for certificat
Note you should implement all the explained methods in nice class’s that wraps all this functionality into one simple class. The code file you can download is constructed as a simple file so i would be easier to explain howto encrypt and sign emails. It is not intended to be used for production purposes.
Finished you now know ho to encrypt and sign mails with c#.
c# encrypting and signing mail
Encrypting and signing Mail in .Net part 4/5 (Signing the content)
Okay so now we are done and have build the content of the mail. Now we need to sign it. If you dont want to sign the mail skip this part and jum straight to encrypting “which will be the next post”. I’ve found quite a few post on tje net on howto sign at encrypt mails but none of them worked for me. I’ve had to look at package and mail content to analyze how to to build the right content and signing part as well. For the signing part we off course need a certificate with access to the private key.
Link to part 1, part 2, part 3
NOTE AGAIN IF THE PROCESS RUNNING THE CODE DOESN’T HAVE ACCESS TO THE PRIVATE KEY YOU GET A KEYSET DOESN’T MATCH OR PRIVATE KEY COULD NOT BE FOUND ERROR WHEN TRYING TO SIGN THE MAIL.
See earlier post on howo to setup up security for certificates.
Now finaly to some code. First we gonna make a little helper method for signing the content. Also note that I use a simple helper function “GetCert()” all i does is returning the same certificate since i use the same certificate for signing and ecrypting. You should offcourse use the methode shown in part 2 of this series. My get cert is a like but just with an hardcode serial number. this should be replaced with the serial number for your certificate.
The little helper function:
public static X509Certificate2 GetCert()
{
//Sets up a new store to look for at certificat in.
X509Store localStore = new X509Store(StoreName.My, StoreLocation.LocalMachine);
localStore.Open(OpenFlags.ReadOnly | OpenFlags.OpenExistingOnly);

try
{
//NOTE FALSE IS ONLY USED FOR TESTS SHOULD BE CHANGED TO true

X509Certificate2Collection matches =
localStore.Certificates.Find(X509FindType.FindBySerialNumber, "a0 51 bf 0a bc 4a 11 8b 41 9d 56 47 92 b2 34 6c", false);
if (matches.Count > 0)
{
return matches[0];
}
else
{
return null;
}
}
finally
{
localStore.Close();
}

}
And here is how crypting part works. The signature calculation. Note that the function takes two certifactes one for signing the mail and the certificates used for encrypting the mail. Theese two could be the same. But you might have an certificat only for signing and the you need the extra one for encrypting the mail.
</pre>
public byte[] GetSignature(string message, X509Certificate2 signingCertificate, X509Certificate2 encryptionCertificate)
 {
 byte[] messageBytes = Encoding.ASCII.GetBytes(message);

SignedCms signedCms = new SignedCms(new ContentInfo(messageBytes), true);

CmsSigner cmsSigner = new CmsSigner(SubjectIdentifierType.IssuerAndSerialNumber, signingCertificate);
 cmsSigner.IncludeOption = X509IncludeOption.WholeChain;

if (encryptionCertificate != null)
 {
 cmsSigner.Certificates.Add(encryptionCertificate);
 }

Pkcs9SigningTime signingTime = new Pkcs9SigningTime();
 cmsSigner.SignedAttributes.Add(signingTime);

signedCms.ComputeSignature(cmsSigner, false);

return signedCms.Encode();
 }
With this function we can start adding new boundary to the content so it will be correct signed. This part was nesscary for me otherwise i could either encryot the mail or sign it not both. So before we sign the mail we add som new boundaries and finaly we gonna add the calculated signature. Again this function accept the content from we made in the laste post so as input you could give the method the result from “buildcontent()”. Againg note this is build in simple function so we can got a simple reference when we wnat to encrypt the content.
</pre>
public string signed(string Content)
 {
 string signatureBoundry = "--PTBoundry=2";
 string signatureBoundry2 = "--PTBoundry=3";
 StringBuilder fullUnsignedMessageBuilder = new StringBuilder();

fullUnsignedMessageBuilder.Append("Content-Type: ");
 fullUnsignedMessageBuilder.Append("multipart/mixed;");
 fullUnsignedMessageBuilder.Append(" boundary=\"");
 fullUnsignedMessageBuilder.Append(signatureBoundry);
 fullUnsignedMessageBuilder.Append("\"\r\n");
 fullUnsignedMessageBuilder.Append("Content-Transfer-Encoding: ");

fullUnsignedMessageBuilder.Append(TransferEncoding.SevenBit);
 fullUnsignedMessageBuilder.Append("\r\n");
 fullUnsignedMessageBuilder.Append(Content);

string fullUnsignedMessage = fullUnsignedMessageBuilder.ToString();

byte[] signature = GetSignature(fullUnsignedMessage, GetCert(), GetCert());

StringBuilder signedMessageBuilder = new StringBuilder();

signedMessageBuilder.Append("--");
 signedMessageBuilder.Append(signatureBoundry2);
 signedMessageBuilder.Append("\r\n");
 signedMessageBuilder.Append(fullUnsignedMessage);
 signedMessageBuilder.Append("\r\n");
 signedMessageBuilder.Append("--");
 signedMessageBuilder.Append(signatureBoundry2);
 signedMessageBuilder.Append("\r\n");
 signedMessageBuilder.Append("Content-Type: application/x-pkcs7-signature; name=\"smime.p7s\"\r\n");
 signedMessageBuilder.Append("Content-Transfer-Encoding: base64\r\n");
 signedMessageBuilder.Append("Content-Disposition: attachment; filename=\"smime.p7s\"\r\n\r\n");
 signedMessageBuilder.Append(Convert.ToBase64String(signature));
 signedMessageBuilder.Append("\r\n\r\n");

signedMessageBuilder.Append("--");
 signedMessageBuilder.Append(signatureBoundry2);
 signedMessageBuilder.Append("--\r\n");

return signedMessageBuilder.ToString();
 }
It is now posssible to return and signed message string ready to be encrypted by calling :
signed(buildcontent())
Do note the reference the tells we the content boundary start is different form the boundary for the signing part, and boundary for the signature is offcourse the same as for the signing boundary. So it is important to have acces to the different boundaries for between each steps. And when we want to encryp the content we also need the referencs for the signing boundary.
Okay with the content now signed we should be ready to encrypt the mail and send it see next post Where we also will look at how the final content should look just before it is send, This will also help one to build the mailcontent for your own purposes.
Now whe signed the mail.
Encrypting and signing Mail in .Net part 3/5 (Building the content – with attachments)
Lets get startet with the real stuff on how to encrypt mail with c#
Now we have created the certificats and we have the methods for retrieving them. So before we can sign and encrypt the mail we need to prepare there content for security operations. When sending encrypted mail with attachment the content should be included as a part of the content. If add an attahcment to an email with using the normal “System.net.mail – message.attachments.add() ” breaks the encryption. To overcome this the attachments are added to the maincontent of message but seprated with boundries.
Since there are different ways to fetch filecontent and bodycontent i’ve have focused only on howto message data should be build, so there are left some work for you to do. Implementing functions for retrieving filecontent into byte[] fx.
To make the next couple of step easier to connecto to this one which is the backbone in encrypting the mail, I will make a simple builcontent() function that builds a simple text/plain mail and adds an attachment called snebar.jpg placed on the root of my c drive.
public string buildMessageContent()
{
string messageBoundry = "--PTBoundry=2";
StringBuilder message = new StringBuilder();
message.Append("\r\n");
message.Append("\r\n");
message.Append("--");
message.Append(messageBoundry + "\r\n");
message.Append("Content-Type: text/plain; charset=us-ascii\r\n");
//could use text/html as well here if you want a html message
message.Append("Content-Transfer-Encoding: ");
message.Append(TransferEncoding.QuotedPrintable);
message.Append("\r\n\r\n");
message.Append("TEST AF kryptering")//BODY TEXT GOES HERE

message.Append("\r\n");

//ADD file section
//could be filename or whatever
//foreach (string filename in attachments){
//Read file part implement your own
byte[] buff = null;
FileStream fs = new
FileStream("c:\\snebaer.jpg", FileMode.Open, FileAccess.Read);
BinaryReader br = new BinaryReader(fs);
long numBytes = new FileInfo("c:\\snebaer.jpg").Length;
buff = br.ReadBytes((int)numBytes);
byte[] bytes = buff;
//Setup filecontent
String filecontent =
Convert.ToBase64String(bytes,Base64FormattingOptions.InsertLineBreaks);

message.Append("--");
message.Append(messageBoundry);
message.Append("\r\n");
message.Append("Content-Type: ");
message.Append("application/octet-stream;");
message.Append("name=c:\\snebaer.jpg");
message.Append("\r\n");
message.Append("Content-Transfer-Encoding: base64\r\n\r\n");
message.Append(filecontent);
message.Append("\r\n\r\n");
//} //END FILSECTION

message.Append("--");
message.Append(messageBoundry);
message.Append("--\r\n");
return message.ToString();
}<br>
Note that there isout comment foreach loop which could added if you need to add multiple attachments. I will also be a good idee to ad at method for building unique boundaries that could be used you can use Guid or what ever you like. I use theese static one so it easier to refence them in the next post. the string returned here is now readyto be signed. Look
Encrypting and signing Mail in .Net part 2/5 (retrieving certificats)
Part two in the series of 5 on howto c# encrypt and sign mail
So in this post we will looking at howto fetch the security certs we installed in the last post. There are a few attributes you can use for this, but for now i’m gonna settle with the serial number for the certificate.
The serial number can be found on the certificate it self so open up mmc and add a snap in for the local computer, if you forgot howto do this have a look in part 1 of series. Once you you found your recently installed certificate double click the cert and choose the fan details, click on serial number to allow you to see the entire key.
Okay now we got the serial number.
now we gonna fetch it out with through .Net
using System;
using System.Security.Cryptography.Pkcs;
using System.Security.Cryptography.X509Certificates;
using System.Text;
<br>
/// Finds a certificates on Localmachines  local store based on its serial number
///
/// The serial number of the certificate to retrieve
/// The requested certificate, or null if the certificate is not found
public X509Certificate2 FindCertificateFromSerial(string serialNumber)
{
//Sets up a new store to look for at certificat in.
X509Store localStore = new X509Store(StoreName.My, StoreLocation.LocalMachine);
localStore.Open(OpenFlags.ReadOnly | OpenFlags.OpenExistingOnly);<br>

try
{
//NOTE FALSE IS ONLY USED FOR TESTS SHOULD BE CHANGED TO true<br>
X509Certificate2Collection matches = localStore.Certificates.Find(
X509FindType.FindBySerialNumber,
serialNumber,
false);
if (matches.Count > 0)
{
return matches[0];
}
else
{
return null;
}
}
finally
{
localStore.Close();
}

}
Note the false parameter passed to Certificates.Find this should be change to true on live system that certificate that has expired or a like, would also be returned. Also note you need a referencens to System.Security so you can use the
using System.Security.Cryptography.Pkcs;
There are other possible ways to find the certifcate but i leave that to you find thefindtype that fits your purpose best.
Encrypting and signing Mail in .Net part 1/5
So the following couple of blog post will be about encrypting mails with attachments.
Today we start with creating certificates for signing the mails and encrypting them.
For this to make sensse we need to certificates, one for signing and on for each reciever of the mail in this example there will be only one reciever. I will be using win 7 so all screenshots shown will be from win 7 .
First we create two certificates, we do this by opening the visual studio command prompt.
the first certificate we create will be the signing certificate using this line
makecert -n “CN=SigningCert” -ss -sr Currentuser -pe -r
This will create a selfsigned certificates where there privatekey can be exported.
next we will create the certificate for encrypting and decrypting the mail content.
makecert -n “CN=Encrypting” -ss -sr Currentuser -pe -r
NOTE: CERTIFICATS ARE ONLY VALID FOR TEST
Note i’ve tried installing the certificates on the localmachine but every time it fails, with a write error, and yes I have logged in as administrator.
So now we need to setup the certificates for localmachine open mmc.exe.
Now we add to snap-ins one for the currentuser and one for the localmachine and snap-in for both should be certificates.
Do this by File-> Add/remove Snap-in
When you are done with this step you should have one snap-in fo currentuser and one for localmachine see image below

Next we will export the two certificates, same procedure for both certificates so i will only do it for the signing certificate open the currentuser personal certificate find the signingcert “right mouse click choose copy”, next go to the Localcomputer ->personal-Certificates and choose paste. Volia you should now be able to se the certificate. in your iis-manger.

HERE starts one of the most important steps i’ve had and error one trying to signing mails with a cert where the .Net user doesn’t have acces to the private key.
Right click the certificate. choose All task Manage Private Keys and give you .Net user full access. Or everyone for TEST ONLY.
The more correct way to do this step is on your current user right click your cert choose alltaks export and choose to export private key. This should work.

If this step is missing you will get the following error KEYSET DOES NOT EXIST OR CANNOT FIND PRIVATE KEY


