Archive
Obfuscating sensitive data in Azure Application Insights
While working with a legacy Api which where called via GET request exposing sensitive data in query strings, I saw this sensitive data in Application Insight and wanted to obfuscate them.
This can be done by creating a Customer ITelemetryInitializer, since the API Dependency to the main Application only when this dependency log is made do we want to obfuscate the data, other scenarios can be covered in other ways. With a DependencyTelemetry it is possible to test if I HTTP request. If the request do have any query parameter filtering should now be done from the source list of query strings which is passed in via the constructor. See the code below for the finished QueryStringFilterTelemetryInitializer
using Microsoft.ApplicationInsights.Channel;
using Microsoft.ApplicationInsights.DataContracts;
using Microsoft.ApplicationInsights.Extensibility;
using System;
using System.Collections.Generic;

namespace Application
{
    public class QueryStringFilterTelemetryInitializer : ITelemetryInitializer
    {

        public QueryStringFilterTelemetryInitializer(IEnumerable<string> queryStringSource)
        {
            QueryStringSource=queryStringSource;
        }

        public IEnumerable<string> QueryStringSource { get; }

        public void Initialize(ITelemetry telemetry)
        {
            var dependencyTelemetry = telemetry as DependencyTelemetry;
            if (dependencyTelemetry == null)
                return;

            if (dependencyTelemetry.Type.Equals("http", StringComparison.InvariantCultureIgnoreCase))
            {
                var uri = new Uri(dependencyTelemetry.Data);
                var queryDictionary = System.Web.HttpUtility.ParseQueryString(uri.Query);
                if (queryDictionary != null || !queryDictionary.HasKeys())
                    return;

                foreach (var source in QueryStringSource)
                {
                    var queryValue = queryDictionary[source];
                    if (queryDictionary !=null && !string.IsNullOrEmpty(queryValue))
                    {
                        dependencyTelemetry.Data = dependencyTelemetry.Data.Replace(queryValue, "***********");
                    }
                }
            }
        }
    }
}
With the QueryFilterTelemetryInitializer created we can now instantiate it in our startup.cs file
 public virtual void ConfigureServices(IServiceCollection services)
{
  services.AddSingleton<ITelemetryInitializer>(
             new QueryStringFilterTelemetryInitializer(
                               new List<string>() { "SOMEQUERYSTRING" }));

  services.AddApplicationInsightsTelemetry();
  ..
  ..
  ..
}
Instead of providing the list of string at compile time you can also load them in via a config file as shown below
{
 "QueryStrings": [
    "querystring0",
    "querystring1",
    "querystring2"
  ],
}
and in the startup class replace with this line
services.AddSingleton<ITelemetryInitializer>(new QueryStringFilterTelemetryInitializer(Configuration.GetSection("QueryStrings")?.Get<List<string>>().ToArray()));
This is how it will look in the Data in Azure AppInsights
https://URL/API/?queryString0=**********
Sitecore 9.1 IdentityServer On-Premise AD via ADFS
Which the launch of Sitecore 9.1 came the introduction of the identity server to Sitecore list roles. You can find a lot more information about the Identity Server here https://identityserver.io/- Personally I think this I is great enhancement and add are more easy extendable way of enabling 3 party authentication providers to Sitecore. As standard the Identity server runs on Sitecore HOST https://doc.sitecore.com/developers/91/sitecore-experience-management/en/sitecore-host.html And ships with the possibility to use Azure AD and the Identiytserver.Contrib.Membership module allowing for cloud AD and the old DB style of authenticating in Sitecore. This also means the the old Sitecore AD module is now deprecated and no longer supported. So in this blog post I will show how to integrated a On Premise Ad with Sitecore Idenityserver hosted on Sitecore Host.
First you need a AD of course and then you need ADFS server to act as a authentication provide to the Identityserver. This however is a little out of scope for this post. But here is two great links on how to configure and forward AD groups as roles
https://stackoverflow.com/questions/55494354/user-groups-as-claims-through-openid-connect-over-adfs
Before we get to code you need to know about this nuget feed related to Sitcore Identity
https://sitecore.myget.org/F/sc-identity/api/v3/index.json
Since this feed contains some of packages needed. So this project or solution rather is to use OpenId Connect against the with the ADFS server
The solution consist of three class’ i will briefly show them here below
The App Settings classe seen below for retrieving the Setting for the Provider
public class AppSettings
{
public static readonly string SectionName = "Sitecore:ExternalIdentityProviders:IdentityProviders:ADFS";
public ADFSIdentityProvider ADFSIdentityProvider { get; set; } = new ADFSIdentityProvider();
}
The ADFSIdentityProvider which allows for a type strong way of accessing settings related to the module.
public class ADFSIdentityProvider
{
public bool Enabled { get; set; }
public string Authority { get; set; }
public string ClientId { get; set; }
public string AuthenticationScheme { get; set; }
public string MetadataAddress { get; set; }
public string DisplayName { get; set; }
}
And the CongifugreSitecore class which handles the communication with ADFS server
using System;
using System.Security.Claims;
using System.Threading.Tasks;
using Microsoft.AspNetCore.Authentication;
using Microsoft.AspNetCore.Authentication.OpenIdConnect;
using Microsoft.Extensions.Configuration;
using Microsoft.Extensions.DependencyInjection;
using Microsoft.Extensions.Logging;
using Microsoft.IdentityModel.Tokens;
using Sitecore.Framework.Runtime.Configuration;

namespace Sitecore.IdentityServer.ADFS
{
public class ConfigureSitecore
{
private readonly ILogger _logger;
private readonly AppSettings _appSettings;

public ConfigureSitecore(ISitecoreConfiguration scConfig, ILogger logger)
{

this._logger = logger;
this._appSettings = new AppSettings();
scConfig.GetSection(AppSettings.SectionName);
scConfig.GetSection(AppSettings.SectionName).Bind((object)this._appSettings.ADFSIdentityProvider);
}

public object IdentityServerConstants { get; private set; }

public void ConfigureServices(IServiceCollection services)
{
ADFSIdentityProvider adfsProvider = this._appSettings.ADFSIdentityProvider;
if (!adfsProvider.Enabled)
return;
_logger.LogDebug($"Adding ADFS clientId {adfsProvider.ClientId} Authority {adfsProvider.Authority} Scheme {adfsProvider.AuthenticationScheme}");
new AuthenticationBuilder(services).AddOpenIdConnect(adfsProvider.AuthenticationScheme, adfsProvider.DisplayName, (Action)(options =>
{

options.SignInScheme = "idsrv.external";
options.SignOutScheme = "idsrv";
options.RequireHttpsMetadata = false;
options.SaveTokens = true;
options.Authority = adfsProvider.Authority;
options.ClientId = adfsProvider.ClientId;
options.ResponseType = "id_token";
options.MetadataAddress = adfsProvider.MetadataAddress;
options.TokenValidationParameters = new TokenValidationParameters
{
NameClaimType = "name",
RoleClaimType = "roles"

};
//Added to enable DEBUG to see all claims
//Can be removed in production
options.Events = new OpenIdConnectEvents()
{
OnTokenValidated = (context) =>
{
//This identity include all claims
ClaimsIdentity identity = context.Principal.Identity as ClaimsIdentity;
//ADD break POINT to see all the claims,
return Task.FromResult(0);
}
};
}));

}
}
}
With the solution build you can deploy this to your Identity Server in sitecoreruntime folder in a production folder. The installationor placement of files should look like below.

The Sitecore Plugin manifest should point to your assembly name an example given below.

And for the configuration files placed in Config folder is here an examplereplace clientid and autherityaddress and metaaddress with your own values

with that in place you can go ahead and restart the application pool for the identityserver to load in the configurations and you should see the AD login button.
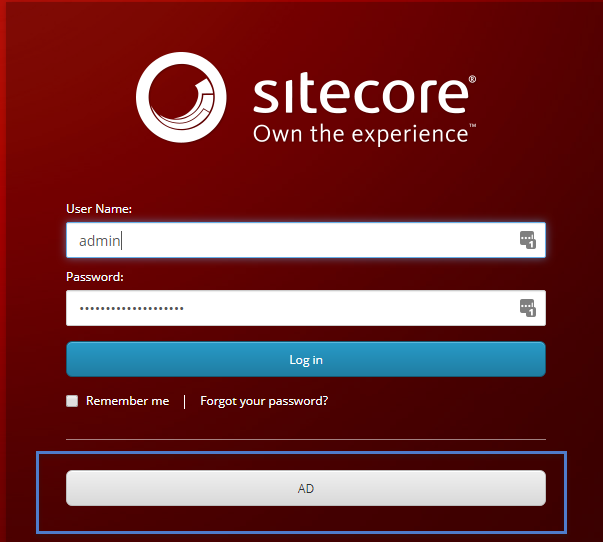
clicking on the button should take you t your ADFS server for authentication, after taht you should be redirect to Sitecore.
Mapping of claims to roles works the same as with Sitecore Azure Ad implementation.
You can find the code for this on github
https://github.com/istern/Sitecore.IdentityServer.ADFS
Storring Sitecore Logs Using RabbitMQ Logstash Elasticsearch and Kibana (ELK)
In an earlier post I showed how to store Sitecore logs files in MongoDB see it here. Now I will demonstrate how to do the same thing using RabbitMQ, Logstash and Elasticsearch, and afterwards you can view and search in the logs using Kibana. It out of scope for this post to do any advance installation of the stack during this post. Also for the entire will be setup on localhost, if moved to a server additional configuration may be required.
So let’s jump right in and get RabbitMQ installed. So go to and download RabbitMQ and Erlang. See the marked download links in image below-
https://www.rabbitmq.com/install-windows-manual.html
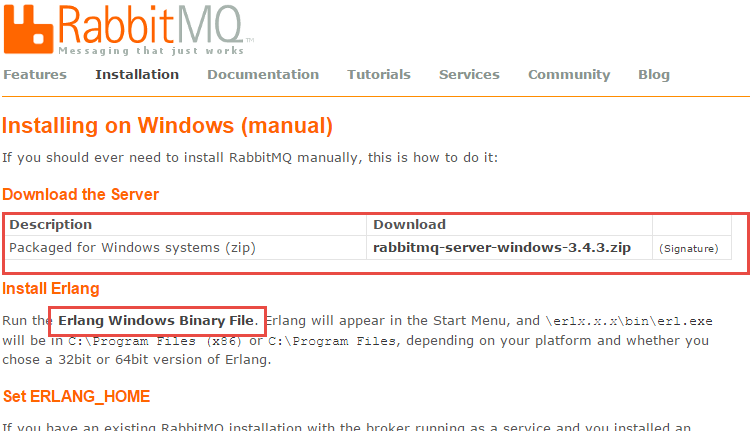
Erlang dowload

Start running the Erlang installer the installation should be next … next and done Next install RabbitMQ again next … next and done.
Now we need to install a add on to RabbitMQ this is easiest done by go through the windows start menu
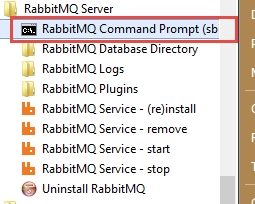
In the command prompt copy in and hit enter
“rabbitmq-plugins enable rabbitmq_management”
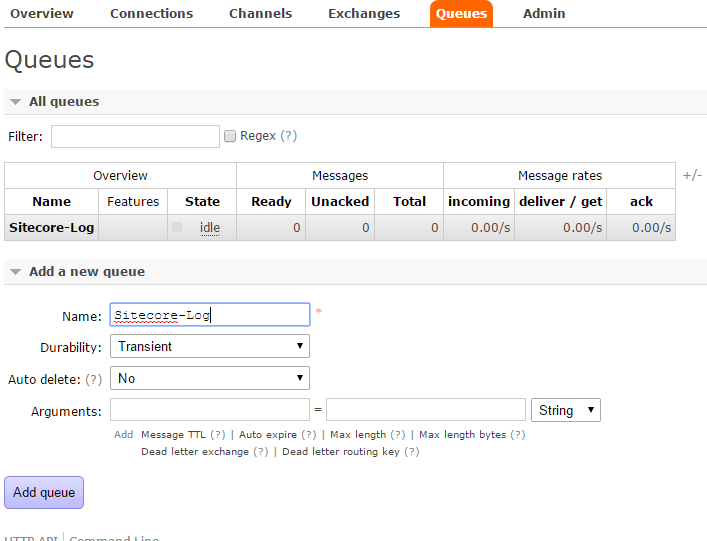
Now you can navigate to http://localhost:15672/ The default username and password is guest and guest.
Go to the Queues tab and create a new queue call it Sitecore-Log and make it Transient
Perfect now with that in place lets get some code to push log entries to out newly created queue.
First lets create our Log appender
public class LogAppender : AppenderSkeleton
{
  public virtual string Host { get; set; }
  public virtual string UserName { get; set; }
  public virtual string Password { get; set; }
  public virtual string ExchangeName { get; set; }
  public virtual string QueueName { get; set; }
  protected override void Append(LoggingEvent loggingEvent)
  {
   var message = LogMessageFactory.Create(loggingEvent);
   var messageBuffer = SerializeMessage(message);
   PushMessageToQueue(messageBuffer);
  }

  private byte[] SerializeMessage(LogMessage message)
  {
   var serializedMessage = JsonConvert.SerializeObject(message);
   byte[] messageBuffer = Encoding.Default.GetBytes(serializedMessage);
   return messageBuffer;
  }

  private void PushMessageToQueue(byte[] messageBuffer)
  {
    RabbitQueue.GetInstance(Host,UserName,Password).Push(ExchangeName, QueueName, messageBuffer);
  }
}
If created a simple LogMessage with the additional parameters that I want to log, like the Machine name ApplicationPoolNameand and the Sitename. So here is a factory tha can create a LogMessage from the LoggingEvent
public class LogMessageFactory
{
 public static LogMessage Create(LoggingEvent loggingEvent)
 {
  loggingEvent.GetLoggingEventData();
  var message = new LogMessage()
  {
   ApplicationPoolName = HostingEnvironment.SiteName,
   InstanceName = Environment.MachineName,
   Level = loggingEvent.Level.Name,
   Message = loggingEvent.RenderedMessage,
   Site = GetSiteName(),
   Exception = GetException(loggingEvent),
   TimeStamp = loggingEvent.TimeStamp
  };
  return message;
}

 private static string GetSiteName()
 {
  return Sitecore.Context.Site != null ? Sitecore.Context.Site.Name : string.Empty;
 }

 private static string GetException(LoggingEvent loggingEvent)
 {
  if (!string.IsNullOrEmpty(loggingEvent.GetLoggingEventData().ExceptionString))
   return loggingEvent.GetLoggingEventData().ExceptionString;
  return string.Empty;
 }
}
public class LogMessage
{
  public string Level { get; set; }
  public string Message { get; set; }
  public string Source { get; set; }
  public DateTime TimeStamp { get; set; }
  public string ApplicationPoolName { get; set; }
  public string InstanceName { get; set; }
  public string Site { get; set; }
  public string Exception { get; set; }
}
Next is the communication with the queue, This is done through a singleton pattern but use whatever implementation fit your purpose best.
public sealed class RabbitQueue
{
  private static volatile RabbitQueue instance;
  private static object syncRoot = new Object();
  private static IModel _queue;
  private static IBasicProperties _queueProperties;

  public static string Host { get; set; }
  public static string UserName { get; set; }
  public static string Password { get; set; }

  private RabbitQueue(string host, string userName, string password)
  {
   Host = host;
   UserName = userName;
   Password = password;
   IntializeConnectionToQueue();
  }

public static void IntializeConnectionToQueue()
{
  var connectionFactory = new ConnectionFactory() { HostName = Host, UserName = UserName, Password = Password };
  var connection = connectionFactory.CreateConnection();
  _queue = connection.CreateModel();
  _queueProperties = _queue.CreateBasicProperties();
  _queueProperties.SetPersistent(false);
}

public static RabbitQueue GetInstance(string host, string userName, string password)
{
  if (instance == null)
  {
   lock (syncRoot)
   {
    if (instance == null)
    instance = new RabbitQueue(host,userName,password);
   }
  }
 return instance;
}

 public void Push(string exchangeName, string queueName, byte[] messageBuffer)
 {
  _queue.BasicPublish(exchangeName, queueName, _queueProperties, messageBuffer);
 }
}
Now lets add the new appender to web.config, use something like this
<appender name="RabbitMqAppender" type="RabbitMQLog4NetAppender.LogAppender, RabbitMQLog4NetAppender">
<host value="localhost" />
<username value="guest" />
<password value="guest" />
<exchangeName value="" />
<queueName value="Sitecore-Log" />
<layout type="log4net.Layout.PatternLayout">
<conversionPattern value="%4t %d{ABSOLUTE} %-5p %m%n %X{machine} " />
</layout>
<encoding value="utf-8" />
</appender>
Lets add out new log appender to the default file appender so we still have log files written to disk. This means that we can set the queue to be transient, and not persistent.
<root>
  <priority value="INFO" />
  <appender-ref ref="LogFileAppender" />
  <appender-ref ref="RabbitMqAppender" />
 </root>
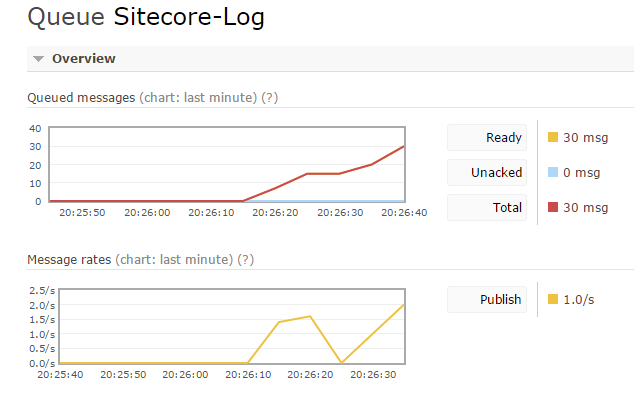
Now you can start up Sitecore and you should start to see Messages starting to build up in the queue
Wuhuuuu now lets start putting the messages into elasticsearch via Logstash. Go to http://www.elasticsearch.org/overview/elkdownloads/ and download elasticsearch, Kibana and Logstash . Now lets start with the setting up elastichsearch After you have extracted the zip file you should see a file structure like the one below. Before you start the server edit the file elasticsearch.yml placed in the config directory at the end of the files add “http.cors.enabled: true”. Now go to the bin directory and launch the elasticsearch.bat.

Next we need Kibana, Make a new site in IIS setting the root the kibana folder it should look something like this.

Now we are almost done last part is logstash so in the directory where you have extracted logstash go into the bin folder

Create a new file call it test.conf and put in the following content
input {
  rabbitmq {
    host => localhost
    queue => "Sitecore-Log"
  }
}

output {
  elasticsearch {
    host => localhost
  }
}
Startup a cmd and go to the bin folder of logstash and run the following command
logstash-1.4.2\bin>logstash.bat agent -f test.conf
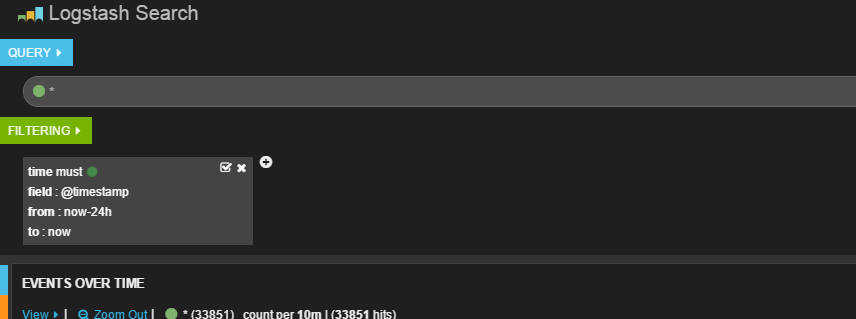
Now we done lets go into our kibana website and have a look Kibana comes with a default view for logstash See below.

With that in place we can start seeing our log entries.

Choose what is shown by selecting on left side

You can see details about individual message by click on them se example below

In the top you can add your own filtering and search in through the log entries
That was the first post in 2015, and the first post that for Sitecore 8.
Alexander Smagin have also done something like this see his blog here
Storing Sitecore log events in MongoDB
After Sitecore announced the new Sitecore Experience Database (former DMS), which also included a move from a SQL to a NoSQL database, I thought it was about time to give MongoDB a closer look. After reading a lot of related blog post, seeing educational videos and more, I build few demo apps using the MongoDB. But what Ireally wanted to do, was to use Mongo along with Sitecore, and yes i know there exist MongoDB data providers but i really wanted to start with something more simple, or at least for me as an MongoDB rookie.
So what better then trying to store Sitecore’s Log events in a Mongo database.
First we need to derive from the log4net implementation found in Sitecore.Logging.dll, to build functionality to catch log entries.
public class MongoLogger : AppenderSkeleton
{
  public string ConnectionString { get; set; }
  public string CollectionName { get; set; }
  private MongoRepository _mongoRepository;

  public MongoRepository MongoRepository
  {
   get
     {
      if (_mongoRepository == null)
      {
        _mongoRepository = new MongoRepository(ConnectionString, CollectionName);
      }
      return _mongoRepository;
     }
  }

  protected override void Append(LoggingEvent loggingEvent)
  {
    MongoRepository.Put(loggingEvent);
  }
}
As it turns out the LogEvents is easily serialized and deserialized by the Mongo C# driver. I’ve used the offcial MongoCSharprDRiver for this project.
As seen in code above the logger talks with a Data Repository. So next is the MongoDB repository that handles all calls to the Database.
public class MongoRepository
{
private readonly string _connectionString;
private readonly string _collectionName;

public MongoRepository(string connectionString, string collectionName)
{
_connectionString = connectionString;
_collectionName = collectionName;
UnMapAllMongoIdField();
}

public void UnMapAllMongoIdField()
{
//Only need once per instance

BsonClassMap.RegisterClassMap<T>(cm =>

{
cm.AutoMap();
cm.SetIgnoreExtraElements(true);
});
}

public virtual void Put(LoggingEvent logEntry)
{
Collection.Insert(logEntry);
}

public virtual LoggingEvent GetSingle(Func<LoggingEvent, bool> filter)
{
return Get(filter).FirstOrDefault();
}

public virtual IEnumerable<LoggingEvent> Get(Func<LoggingEvent, bool> filter)
{
return Collection.AsQueryable<LoggingEvent>().Where(filter);
}

private MongoUrl _mongoUrl;
private MongoUrl MongoUrl
{
get { return _mongoUrl ?? (_mongoUrl = MongoUrl.Create(_connectionString)); }
}

private MongoClient _client;
private MongoClient Client
{
get { return _client ?? (_client = new MongoClient(MongoUrl)); }
}

private MongoServer _server;
private MongoServer Server
{
get { return _server ?? (_server = Client.GetServer()); }
}

private MongoDatabase _database;
private MongoDatabase Database
{
get { return _database ?? (_database = Server.GetDatabase(MongoUrl.DatabaseName)); }
}

private MongoCollection<BsonDocument> _collection;
private MongoCollection<BsonDocument> Collection
{
get { return _collection ?? (_collection = Database.GetCollection(_collectionName)); }
}
}
You could off course make the repository more generic but for simplicity it will only handle LogEvents.
Next we need to change the default Logger to use our new Mongo Logger. For this post I will only change the default Logger but you could if you wanted change all the Logger Appenders (SearchLogger, WebDavLogger, CrawlingLoggeror the PublishLogger). In the web.config under the log4net section add a the new log appender we created above like shown below. You can off course change DB-name and collection name as you like.
<appender name="MongoDBAppender" type="SitecoreMongoDBAppender.MongoAppender, SitecoreMongoDBAppender">
<connectionstring value="mongodb://localhost:27017/Logs" />
<collectionname value="log" />
</appender>
and also update the root section to point to long appender
 <root>
 <priority value="INFO" />
 <appender-ref ref="MongoDBAppender" />
 </root>
if you start up Sitecore now you should get entries into the MongoDB

You could replace all the log appender with the new MongoLogger . You can if you want use the different collections or just store each logevent in one big collection. Maybee next one should build a Sitecore Speak application to show the relevant log information, inside Sitecore but that is left for the reader :). The repository allready have Get method, where you can parse in your own linq queries.
Encrypting and securing your Sitecore connenction strings.
Finally after a long brake from bloggign here is a little starter post.
It is actually a fairly simple task to encrypt your .net connection strings using the aspnet_regiis.exe. you can find it in C:\Windows\Microsoft.NET\(Framework(32/64))\(.net version fx :4.0.30319)\aspnet_regiis.exe
So what I usually have, is a little .bat file placed in the www-root folder see the file content below
echo Encrypting app_config/connectionstrings.config
C:\Windows\Microsoft.NET\Framework64\v4.0.30319\aspnet_regiis.exe -pef “connectionStrings” .
Pause
running the bat file will transform your connectionstring from
<add name="core" connectionString="user id=user;password=password;Data Source=(server);Database=Sitecore_Core" />

<add name="master" connectionString="user id=user;password=password;Data Source=(server);Database=Sitecore_Master" />

<add name="web" connectionString="user id=user;password=password;Data Source=(server);Database=Sitecore_Web" />
to something like this
<connectionStrings configProtectionProvider="RsaProtectedConfigurationProvider">

<EncryptedData Type="http://www.w3.org/2001/04/xmlenc#Element"

xmlns="http://www.w3.org/2001/04/xmlenc#">

<EncryptionMethod Algorithm="http://www.w3.org/2001/04/xmlenc#tripledes-cbc" />

<KeyInfo xmlns="http://www.w3.org/2000/09/xmldsig#">

<EncryptedKey xmlns="http://www.w3.org/2001/04/xmlenc#">

<EncryptionMethod Algorithm="http://www.w3.org/2001/04/xmlenc#rsa-1_5" />

<KeyInfo xmlns="http://www.w3.org/2000/09/xmldsig#">

<KeyName>Rsa Key</KeyName>

</KeyInfo>

<CipherData>

<CipherValue>RTRWE..=</CipherValue>

</CipherData>

</EncryptedKey>

</KeyInfo>

<CipherData>

<CipherValue>FSM</CipherValue>

</CipherData>

</EncryptedData>

</connectionStrings>
That works for all connection strings in the ConnectionStrings.config file, unlike the analytics connectionstring for example, the standard WFFM connectionstring is stored in the /app_config/include/Sitecore.Forms.Config in following section.
<formsDataProvider type="Sitecore.Forms.Data.DataProviders.WFMDataProvider,Sitecore.Forms.Core">
but it turns out it is fairly simple to encrypt the connection string along with the others just move the connection string to standard ConnectionStrings.config file and call it wfm as shown below
<add name="wfm" connectionString="user …. />
now you can run the .bat file again and the wfm connectionstring is encrypted as well.
Remember that the encrypted connectionstring can only be decrypted on the machine that ran the .bat file.
To decrypt you can run the command
C:\Windows\Microsoft.NET\Framework64\v4.0.30319\aspnet_regiis.exe -pdf “connectionStrings”
Using SecurityDisabler and EditContext With Sitecore Fakes
Recently I had to write some code that import a lot of content for a customer, who on a daily basis wanted to imported 100+ news Items into Sitecore. Importing and filling out the data field of items isn’t that complex task, or code to write. But I really wanted to test the functionality so I could guarantee and verify the behavior of my code before I released into a running LIVE environment. So I’ve sat myself the goal to extend Sitecore Fakes so I could test against and “Database” in memory instead of cleaning the Sitecore solution every time I’ve ran a test import.
An Example of a simple import code could look something like this
using (new SecurityDisabler())
{
subNode = homeItem.Add("SubNode", templateId);
using (new EditContext(subNode))
{
subNode[fieldIdA] = "test";
subNode[fieldIdB] = "testBBB";
}
}
To do this I’ve had to include some more section in the App.config for the test project. The section is listed below are the changes I’ve added
<authentication defaultProvider="forms">
 <providers>
 <clear />
 <add name="forms" type="Sitecore.Security.Authentication.FormsAuthenticationProvider, Sitecore.Kernel" />
 </providers>
 </authentication>
 <authorization defaultProvider="sql">
 <providers>
 <clear/>
 <add name="sql" type="Sitecore.Fakes.ConfigurationFakes.FakeAutheorizationProvider, Sitecore.Fakes" />
 </providers>
 </authorization>
 <domainManager defaultProvider="file">
 <providers>
 <clear />
 <add name="file" type="Sitecore.Fakes.ConfigurationFakes.FakeDomainProvider, Sitecore.Fakes" />
 </providers>
 </domainManager>
 <accessRights defaultProvider="config">
 <providers>
 <clear />
 <add name="config" type="Sitecore.Fakes.ConfigurationFakes.FakeAccessRight,Sitecore.Fakes" />
 </providers>
 </accessRights>
As you can see the Sitecore Fakes comes with som substitutes from the original configuration section, this implements dummy functionality and helps keeping the app.config file to a minimum. These includes
Sitecore.Fakes.Config.FakeAutheorizationProvider
Sitecore.Fakes.Config.FakeDomainProvider
Sitecore.Fakes.Config.FakeAccessRight
Also the itemprovider have been extended so it now overrides the base functionality for Item.Add(..)
public override Item AddFromTemplate(string itemName, ID templateId, Item destination, ID newId)
 {
 FakeDatabase fakeDatabase = Factory.GetDatabase(destination.Database.Name) as FakeDatabase;
 FakeItem child = new FakeItem(newId, templateId, itemName, fakeDatabase.Name);
 FakeItem fakeParent = destination as FakeItem;
 fakeParent.AddChild(child);
 fakeDatabase.FakeAddItem(child);
 return child;
 }
With these change in place we can now run our test from the beginning.
public void CreateAndEditItemTest()
 {
 //setup database so we have a rood node to add our content to
 var homeFakeItem = new FakeItem();
 Item homeItem = (Item) homeFakeItem;

 //Define some Field IDs
 TemplateID templateId = new TemplateID(ID.NewID);
 Item subNode;
 ID fieldIdA = ID.NewID;
 ID fieldIdB = ID.NewID;

//add and edit the ite,
 using (new SecurityDisabler())
 {
 subNode = homeItem.Add("SubNode", templateId);
 using (new EditContext(subNode))
 {
 subNode[fieldIdA] = "test";
 subNode[fieldIdB] = "testBBB";
 }

}
 subNode[fieldIdA].ShouldAllBeEquivalentTo("test");
 subNode[fieldIdB].ShouldAllBeEquivalentTo("testBBB"); ;
 }
If you need more then one database or another then “web” which is default for Sitecore Fakes either alter or add one more to the DataBase section of your test project so it look like something like below.
<databases>
<database id="web" singleInstance="true" type="Sitecore.Fakes.FakeDatabase, Sitecore.Fakes">
<param desc="name">$(id)</param>
</database>
<database id="master" singleInstance="true" type="Sitecore.Fakes.FakeDatabase, Sitecore.Fakes">
<param desc="name">$(id)</param>
</database>
 </databases>
You Can download Sitecore fakes from github here: https://github.com/istern/Sitecore-Fakes
Introducing Sitecore Fakes
Mocking Sitecore recently became a lot easier with Microsoft Fakes in Vs 2012 update 2 or by using Typemock. Lately I’ve started using NCrunh and yes it might be a bit overpriced but it is worth every penny, at least for me. I know Typmock work with NCrunch but that comes with an even larger price tag, and unfortunately Microsoft fakes doesn’t work “yet” with NCrunch, so I’m back to my Sitecore Test Item Orginal Post.
Earlier I showed how to stub out field data with the sitecore test item. With the test item you can cover the most basic data transfer stuff from Sitecore through the field collection. But I really wanted to do more complex testing without talking to the database or doing integrationtest. Mike Edwards showed a solution where you copy sections from the web.config to a local app.config in your test project. By doing that you are doing more integration testing then unit ttestin.
So i wanted to find out how little you should copy from the web.config to make Sitecore test item now “FakeItem” extend more Sitecore functionality, for example Item.Children.
So i found by some investigation that the minimal configuration required to query the dataprovider is as follows
  <configSections>
    <section name="sitecore" type="Sitecore.Configuration.ConfigReader, Sitecore.Kernel" />
    <section name="log4net" type="log4net.Config.Log4NetConfigurationSectionHandler, Sitecore.Logging" />
  </configSections>
  <sitecore database="SqlServer">
    <settings>
      <setting name="LicenseFile" value="D:\license.xml" />
    </settings>
  </sitecore>
  <log4net>
  </log4net>
Note that the path for the license file i absolute,
Now the problem is when asking for the ChildList through the Children Property you end up deep down in a provider instantiate by the ItemManager. The default provider for some reason requires a valid licens. But with a valid license file now in place, what is next?
Why not replace the default Provider for the itemManager with a fake one, where we can control what to return for different calls to the Provider through the ItemManager.
<itemManager defaultProvider="default">
  <providers>
    <clear />
    <add name="default" type="Sitecore.Fakes.FakeItemProvider,Sitecore.Fakes" />
   </providers>
</itemManager>
and the complete configuration is now as follows
<configSections>
 <section name="sitecore" type="Sitecore.Configuration.ConfigReader, Sitecore.Kernel" />
 <section name="log4net" type="log4net.Config.Log4NetConfigurationSectionHandler, Sitecore.Logging" />
</configSections>
<sitecore database="SqlServer">
  <itemManager defaultProvider="default">
    <providers>
      <clear />
       <add name="default" type="Sitecore.Fakes.FakeItemProvider,Sitecore.Fakes" />
    </providers>
  </itemManager>
 <settings>
   <setting name="LicenseFile" value="D:\license.xml" />
 </settings>
</sitecore>
 <log4net>
 </log4net>
And my i present the new FakeItemProvider. And luckily Sitecore finally found good use of virtual methods.
public class FakeItemProvider : ItemProvider
{
 public override ChildList GetChildren(Item item, SecurityCheck securityCheck)
 {
    return new ChildList(item,((FakeItem)item).FakeChildren);
 }

 public override Item GetParent(Item item, SecurityCheck securityCheck)
 {
    return ((FakeItem) item).FakeParent;
 }
}
The fake itemprovider depend on the FakeItem which I have extended a bit so it is possible to add children and parents to an item. Off course this should be extended even more to support more Sitecore functionality.
 public class FakeItem : Item
 {
   public FakeItem(FieldList fieldList, string itemName = "FakeItem")
     : base(
    new ID(new Guid()),
    new ItemData(new ItemDefinition(new ID(new Guid()), itemName, new ID(new Guid()), new ID(new Guid())),
    Globalization.Language.Invariant, new Data.Version(1), fieldList),
    new Database("web"))
   {
     FakeChildren = new ItemList();
   }

  public void AddChild(Item child)
  {
   ((FakeItem) child).FakeParent = this;
    FakeChildren.Add(child);
  }

  public virtual Item FakeParent { get; set; }
  public virtual ItemList FakeChildren { get; set; }
 }
An example that shows the childList and parent stub in action.
 public class FakeItemProviderTests
 {

   [Fact]
   public void FakeItem_AddMultipleChildren_ChildListShouldHaveAllChildren()
   {
    Item child = new FakeItem(new FieldList());
    FakeItem fake = new FakeItem(new FieldList());
    fake.AddChild(child);
    fake.AddChild(child);
    fake.AddChild(child);
    fake.AddChild(child);
    fake.AddChild(child);

    fake.Children.Should().HaveCount(5);
   }

  [Fact]
  public void FakeItem_AddChildToChildren_ShouldReturnChild()
  {
    Item child = new FakeItem(new FieldList());
    FakeItem fake = new FakeItem(new FieldList());
    fake.AddChild(child);

    fake.Children.First().ShouldBeEquivalentTo(child);
  }

  [Fact]
  public void FakeItem_AddChildToChildren_ChildShouldHaveParent()
  {
    Item child = new FakeItem(new FieldList());
    FakeItem fake = new FakeItem(new FieldList());
    fake.AddChild(child);

    fake.Children.First().Parent.ShouldBeEquivalentTo(fake);
  }

 [Fact]
 public void FakeItem_AddChildToChildren_ChildShouldHaveParentWithId()
 {
   Item child = new FakeItem(new FieldList());
   FakeItem fake = new FakeItem(new FieldList());
   fake.AddChild(child);

   fake.Children.First().ParentID.ShouldBeEquivalentTo(fake.ID);
 }
}
The code for this is free to download and can be found on GitHub Sitecore.Fakes.
Let me know what the next thing you like to get stubbed should be !
Typemock Isolator Review
Typemocks Isolator has been around for quite some time now, and I was given the opportunity to review version 7.4 of the product. Isolator is best known for the ability to test legacy code, i.e. code that with other mocking frameworks isn’t possible to mock or stub. Typemock ships the Isolator package with a lot more features than the ordinary mocking framework. Short list given below. I will consider each of these in this review.
Features of Typemock Isolator
- Smart Runner
- Coverage
- Mock Interfaces
- Mock Everything
- Test Legacy Code
- Test Code Autocompletion
Smart Runner
The smart runner allows for tests to be run when building your solution. At startup it examines all your current tests to get a baseline, and from that it should in for this session when rebuilding only run test relevant for the changes made. It sounds smart but In this context, I would rather use something like NCrunch. The good news is that NCrunch has support for Typemock Isolator. Maybe for larger application this would be a nice feature, especially if running the entire battery of tests takes more time than building your application.
Coverage
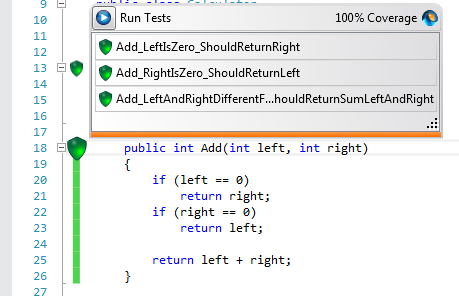
The coverage analyzer part is nice touch where you can hook up with your favorite test coverage analyzer for example DotCover or NCover. But, and this is a big but, for me with the test runner included with Typemock I simply can’t find a window or output which shows the entire test coverage for my application, not even for a single class. Maybe I’m missing something. But all I can see on each methods in each class. See images below.

With that said I do like the information on coverage for methods where you easily can see which test covers the code. This is shown in the illustration below
Mock interfaces, Mock Everything and Test Legacy code
As with any mocking framework, e.g. Nsubstitute, Rhino, Moq, you can with the Isolator mock virtual methods, interfaces and abstract classes and methods. In addition, it is possible to mock statics-, private- methods and classes which cannot be mocked with standard mocking frameworks. As promised you can mock everything with Isolator.
I previously wrote a blog post where I stubbed out a lot of Sitecore functionality. You can read the blog post [Mocking Sitecore with Typemock Isolator Here].
Test Code Autocompletion
The intellisense for autocompletion for fakes is one of the features which quickly became one of my favorite things about Isolator. This feature really speeds up the process of writing tests.
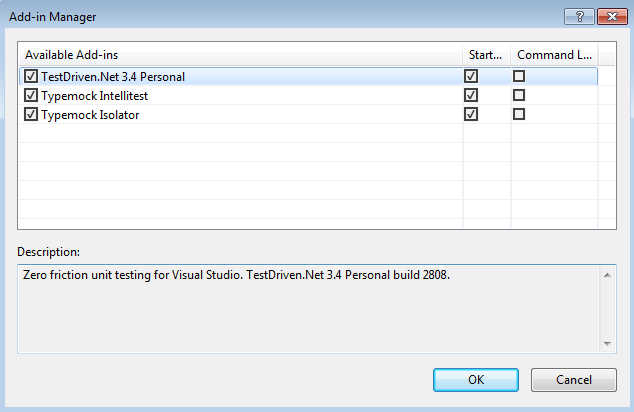
As a standard this feature isn’t enabled to begin with. You will have to enable it under
Tools->Add-in manager
As illustrated here:
Instead of writing Arrange part of a unit test, it automatically generates it for you using the shortcut “alt+7” .
Pros
- Mock/Stub Everything
- Test Code Autocompletion – Really liking this one.
- Easy to use syntax
Cons
- Missing Application/Class Test Coverage
- Price
Conclusion
With the Isolator from Typemock you get much more than a standard mocking framework, you get a feature rich add-in for Visual Studio. For those only looking for an Isolation framework, this might be a bit too much. But if you are working in an organization with a lot of “Legacy Code” or trying to introduce unit testing or even TDD, I think the Isolator will offer you some really good assistance. It comes with a price tag but you also get a lot more than a standard isolation framework. For me working with Sitecore I need something like Isolator where you can mock/stub everything. But there are other alternatives out there for example Microsoft Fakes or JustMock, with Fakes coming free with Update 2 for Visual Studio, fakes syntax isn’t as intuitive as Typemocks Isolator..
If you are interested Typemock offers a lot of really good webinars. You can find a list of previous webinars [here]. Also if you follow them on twitter @Typemock you can be notified about upcoming webinars. With these webinars you can get a good introduction to unit testing and TDD, and how to introduce Testing into to your organization.
Mocking Sitecore with Microsoft Fakes part 3
This will be that last in this series Mocking Sitecore with Microsoft Fakes Links to Part 1 and Part 2 . To end end th series I will revisted a old blog post found here. In the original post I I created a TestItem, to test some old Production code. So in this post i will Test the same piece code.
First a view of the code we want to test.
 public class NavigationTitleFactory
 {
    public static string Create(Item item)
    {
      bool showInNavigation = item.GetCheckBoxValue(Constants.Fields.Navigable.ShowInMenu);

      if (!showInNavigation)
      {
         return string.Empty;
      }
      string navigationTitle = item.GetString(Constants.Fields.Navigable.Title);

      if (string.IsNullOrEmpty(navigationTitle))
        navigationTitle = item.Name;

      return navigationTitle;
    }
 }
With code above there a two ways we can test it. We could as in the original post create an Item mock using fakes, or we could overwrite the extension method something that is not possible with ordinary mocking frameworks.
Here below I will create an Item Mock.
[TestMethod]
  public void CreateItemWithShowInMenuFalseShouldReturnEmptyString()
  {

    string expectedNavigationTitle = "NavigationTitel";
    using (ShimsContext.Create())
    {
       Field showInMenu = new ShimField()
      {
        IDGet = () => Constants.Fields.Navigable.ShowInMenu,
        ValueGet = () => "0"
      };

      Field navigationTitle = new ShimField()
     {
       IDGet = () => Constants.Fields.Navigable.Title,
       ValueGet = () => expectedNavigationTitle
      };

     FieldCollection fieldCollection = new ShimFieldCollection()
     {
       ItemGetID = (id) => id == Constants.Fields.Navigable.ShowInMenu ? showInMenu : id ==                          Constants.Fields.Navigable.Title ? navigationTitle : null
     };

     Item itemStub = new ShimItem() { FieldsGet = () => fieldCollection };
     string actualNavigationTitle = NavigationTitleFactory.Create(itemStub);

     Assert.AreSame(string.Empty, actualNavigationTitle);
   }
 }

 [TestMethod]
 public void CreateItemWithShowInMenuTrueNoNavigationTitleShouldReturnItemName()
 {
   using (ShimsContext.Create())
   {
     Field showInMenu = new ShimField()
     {
       IDGet = () => Constants.Fields.Navigable.ShowInMenu,
       ValueGet = () => "1"
     };

     Field navigationTitle = new ShimField()
     {
       IDGet = () => Constants.Fields.Navigable.Title,
       ValueGet = () => string.Empty
      };

     FieldCollection fieldCollection = new ShimFieldCollection()
     {
       ItemGetID = id => id == Constants.Fields.Navigable.ShowInMenu ? showInMenu : id == Constants.Fields.Navigable.Title ? navigationTitle : null
     };

     string expectedItemName = "Name";
     Item itemStub = new ShimItem() { FieldsGet = () => fieldCollection, NameGet = () => expectedItemName };

     string actualNavigationTitle = NavigationTitleFactory.Create(itemStub);

     Assert.AreSame(expectedItemName, actualNavigationTitle);
   }
 }

 [TestMethod]
 public void CreateItemWithShowInMenuTrueShouldReturnItemNavigationTitle()
 {
   using (ShimsContext.Create())
  {
    string expectedNavigationTitle = "Navigation Title";
    Field showInMenu = new ShimField()
    {
      IDGet = () => Constants.Fields.Navigable.ShowInMenu,
      ValueGet = () => "1"
     };

     Field navigationTitle = new ShimField()
     {
       IDGet = () => Constants.Fields.Navigable.Title,
       ValueGet = () => expectedNavigationTitle
     };

    FieldCollection fieldCollection = new ShimFieldCollection()
    {
      ItemGetID = id => id == Constants.Fields.Navigable.ShowInMenu ? showInMenu : id == Constants.Fields.Navigable.Title ? navigationTitle : null
    };

    Item itemStub = new ShimItem
    {
      IDGet = () => ID.NewID,
      FieldsGet = () => fieldCollection,
    };

    string actualNavigationTitle = NavigationTitleFactory.Create(itemStub);

    Assert.AreSame(expectedNavigationTitle, actualNavigationTitle);
  }
}
Since the code only use extension methods to access item data it might make more sense to overwrite these methods to isolate any faulty implementations of item access in the extensions methods. This is shown below.
[TestMethod]
   public void EXTENSION_CreateItemWithShowInMenuFalseShouldReturnEmptyString()
   {
      using (ShimsContext.Create())
      {
        Item itemStub = new ShimItem();
        ShimItemExtensions.GetCheckBoxValueItemID = (item, id) => { return false; };
        string actualNavigationTitle = NavigationTitleFactory.Create(itemStub);

        Assert.AreSame(string.Empty, actualNavigationTitle);
      }
   }

  [TestMethod]
  public void EXTENSION_CreateItemWithShowInMenuTrueNoNavigationTitleShouldReturnItemName()
  {
     using (ShimsContext.Create())
     {
       string expectedItemName = "Name";
       Item itemStub = new ShimItem(){ NameGet = () => expectedItemName};
       ShimItemExtensions.GetCheckBoxValueItemID = (item, id) => true;
       ShimItemExtensions.GetStringItemID = (item, id) => string.Empty;

       string actualNavigationTitle = NavigationTitleFactory.Create(itemStub);

       Assert.AreSame(expectedItemName, actualNavigationTitle);
     }
  }

 [TestMethod]
 public void EXTENSION_CreateItemWithShowInMenuTrueShouldReturnItemNavigationTitle()
 {
    using (ShimsContext.Create())
    {
       string expectedNavigationTitle = "Navigation Title";
       Item itemStub = new ShimItem();

       ShimItemExtensions.GetCheckBoxValueItemID = (item, id) => true;
       ShimItemExtensions.GetStringItemID = (item, id) => expectedNavigationTitle;
       string actualNavigationTitle = NavigationTitleFactory.Create(itemStub);

       Assert.AreSame(expectedNavigationTitle, actualNavigationTitle);
    }
 }
The result of the test

This was the last part in this series. I hope this covers the most basic mocking of Sitecore, which until vs 2012 update wasn’t possible Otherwise let me know… 🙂
Sitecore MVC new Ninject Controller Factory – clean version
In this post we will have revisit my last blog post, using Ninject with Sitecore MVC. In this new approach we will simplify the code to do the exactly same thing as in the last post LINK.
So what we want is to be able to inject Concrete implementation in the our Sitecore Controller.
We will do this by creating a ninjectc controller factory and forwarding to the default Sitecore controller factory, so our implementation is used when Sitecore creates it’s controller. By doing it this way all standard Sitecore MVC functionality will still work, but we now have the possibility to inject our concrete implementation on creation time of the controllers.
First we need a Factory for creating the Ninject kernel
 public class NinjectKernelFactory
 {
   public IKernel Create()
   {
    return LoadAssembliesIntoKernel(new StandardKernel());
   }

   private IKernel LoadAssembliesIntoKernel(IKernel kernel)
   {
     foreach (Assembly assembly in AppDomain.CurrentDomain.GetAssemblies())
     {
      try
      {
        kernel.Load(assembly);
      }
      catch (Exception)
      {
         //Empty Catch used because ninject have problem
         //with loading some of the Sitecore MVC assemblies.
        // Method .ToString()
      }
    }
     return kernel;
   }
 }
With that in place we can create the the NinjectControllerFactory
 public class NinjectControllerFactory : DefaultControllerFactory
 {

  private IKernel _kernel;
  public NinjectControllerFactory(IKernel kernel)
  {
    _kernel = kernel;
  }

  public override void ReleaseController(IController controller)
  {
    _kernel.Release(controller);
  }

  protected override IController GetControllerInstance(RequestContext requestContext, Type controllerType)
  {
    return (IController)_kernel.Get(controllerType);
  }
 }
]
All that is left is now for binding it all together in a new InitilizeContollerFactory
 public class InitializeNinjectControllerFactory
 {
   public virtual void Process(PipelineArgs args)
   {
    SetControllerFactory(args);
   }

  protected virtual void SetControllerFactory(PipelineArgs args)
  {
    NinjectKernelFactory kernelFactory = new NinjectKernelFactory();
    NinjectControllerFactory ninjectControllerFactory = new NinjectControllerFactory(kernelFactory.Create());
    SitecoreControllerFactory sitecoreControllerFactory = new SitecoreControllerFactory(ninjectControllerFactory);
    ControllerBuilder.Current.SetControllerFactory(sitecoreControllerFactory);
  }
 }
And off course we need to swap the originale InitlizeControllerFactory with our new one.
Sitecore default :
</pre>
<processor type="Sitecore.Mvc.Pipelines.Loader.InitializeControllerFactory, Sitecore.Mvc"/>
Replaced with this:
<processor type="SitecoreNinjectModule.InitializeNinjectControllerFactory, SitecoreNinjectModule"/>
Now Lets try it our I have created a really simple example first an Item with a controller rendering on.


And the sourcode for the controller
public class StoryController : SitecoreController

{
 private ITestInterface _testInterface;
 public StoryController(ITestInterface testInterface)
 {
 _testInterface = testInterface;
 }

public ActionResult From()
 {

ViewBag.Froms = _testInterface.Get();
 return View();
 }
 }
And now to the View Code
And our RazerView
@model dynamic
 <h2>From vIew</h2>

@ViewBag.Froms
And a simple TestInterface and TestClass
public interface ITestInterface
 {
 string Get();
 }
public class TestClass : ITestInterface
 {
 public string Get()
 {
 return "Hallo From Test";
 }
 }
And the output of it all

There we are a much nicer and cleaner solution presented then I came up with in my last blog post and without breaking any Sitecore functionalit, and off course you can still unit test the controller.


