Archive
Sitecore 9.1 IdentityServer On-Premise AD via ADFS
Which the launch of Sitecore 9.1 came the introduction of the identity server to Sitecore list roles. You can find a lot more information about the Identity Server here https://identityserver.io/- Personally I think this I is great enhancement and add are more easy extendable way of enabling 3 party authentication providers to Sitecore. As standard the Identity server runs on Sitecore HOST https://doc.sitecore.com/developers/91/sitecore-experience-management/en/sitecore-host.html And ships with the possibility to use Azure AD and the Identiytserver.Contrib.Membership module allowing for cloud AD and the old DB style of authenticating in Sitecore. This also means the the old Sitecore AD module is now deprecated and no longer supported. So in this blog post I will show how to integrated a On Premise Ad with Sitecore Idenityserver hosted on Sitecore Host.
First you need a AD of course and then you need ADFS server to act as a authentication provide to the Identityserver. This however is a little out of scope for this post. But here is two great links on how to configure and forward AD groups as roles
https://stackoverflow.com/questions/55494354/user-groups-as-claims-through-openid-connect-over-adfs
Before we get to code you need to know about this nuget feed related to Sitcore Identity
https://sitecore.myget.org/F/sc-identity/api/v3/index.json
Since this feed contains some of packages needed. So this project or solution rather is to use OpenId Connect against the with the ADFS server
The solution consist of three class’ i will briefly show them here below
The App Settings classe seen below for retrieving the Setting for the Provider
public class AppSettings
{
public static readonly string SectionName = "Sitecore:ExternalIdentityProviders:IdentityProviders:ADFS";
public ADFSIdentityProvider ADFSIdentityProvider { get; set; } = new ADFSIdentityProvider();
}
The ADFSIdentityProvider which allows for a type strong way of accessing settings related to the module.
public class ADFSIdentityProvider
{
public bool Enabled { get; set; }
public string Authority { get; set; }
public string ClientId { get; set; }
public string AuthenticationScheme { get; set; }
public string MetadataAddress { get; set; }
public string DisplayName { get; set; }
}
And the CongifugreSitecore class which handles the communication with ADFS server
using System;
using System.Security.Claims;
using System.Threading.Tasks;
using Microsoft.AspNetCore.Authentication;
using Microsoft.AspNetCore.Authentication.OpenIdConnect;
using Microsoft.Extensions.Configuration;
using Microsoft.Extensions.DependencyInjection;
using Microsoft.Extensions.Logging;
using Microsoft.IdentityModel.Tokens;
using Sitecore.Framework.Runtime.Configuration;

namespace Sitecore.IdentityServer.ADFS
{
public class ConfigureSitecore
{
private readonly ILogger _logger;
private readonly AppSettings _appSettings;

public ConfigureSitecore(ISitecoreConfiguration scConfig, ILogger logger)
{

this._logger = logger;
this._appSettings = new AppSettings();
scConfig.GetSection(AppSettings.SectionName);
scConfig.GetSection(AppSettings.SectionName).Bind((object)this._appSettings.ADFSIdentityProvider);
}

public object IdentityServerConstants { get; private set; }

public void ConfigureServices(IServiceCollection services)
{
ADFSIdentityProvider adfsProvider = this._appSettings.ADFSIdentityProvider;
if (!adfsProvider.Enabled)
return;
_logger.LogDebug($"Adding ADFS clientId {adfsProvider.ClientId} Authority {adfsProvider.Authority} Scheme {adfsProvider.AuthenticationScheme}");
new AuthenticationBuilder(services).AddOpenIdConnect(adfsProvider.AuthenticationScheme, adfsProvider.DisplayName, (Action)(options =>
{

options.SignInScheme = "idsrv.external";
options.SignOutScheme = "idsrv";
options.RequireHttpsMetadata = false;
options.SaveTokens = true;
options.Authority = adfsProvider.Authority;
options.ClientId = adfsProvider.ClientId;
options.ResponseType = "id_token";
options.MetadataAddress = adfsProvider.MetadataAddress;
options.TokenValidationParameters = new TokenValidationParameters
{
NameClaimType = "name",
RoleClaimType = "roles"

};
//Added to enable DEBUG to see all claims
//Can be removed in production
options.Events = new OpenIdConnectEvents()
{
OnTokenValidated = (context) =>
{
//This identity include all claims
ClaimsIdentity identity = context.Principal.Identity as ClaimsIdentity;
//ADD break POINT to see all the claims,
return Task.FromResult(0);
}
};
}));

}
}
}
With the solution build you can deploy this to your Identity Server in sitecoreruntime folder in a production folder. The installationor placement of files should look like below.

The Sitecore Plugin manifest should point to your assembly name an example given below.

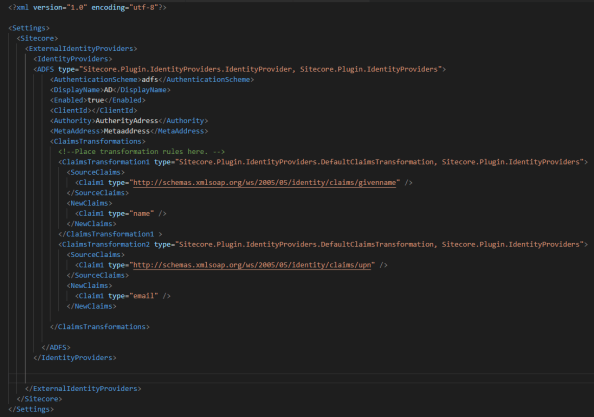
And for the configuration files placed in Config folder is here an examplereplace clientid and autherityaddress and metaaddress with your own values
with that in place you can go ahead and restart the application pool for the identityserver to load in the configurations and you should see the AD login button.
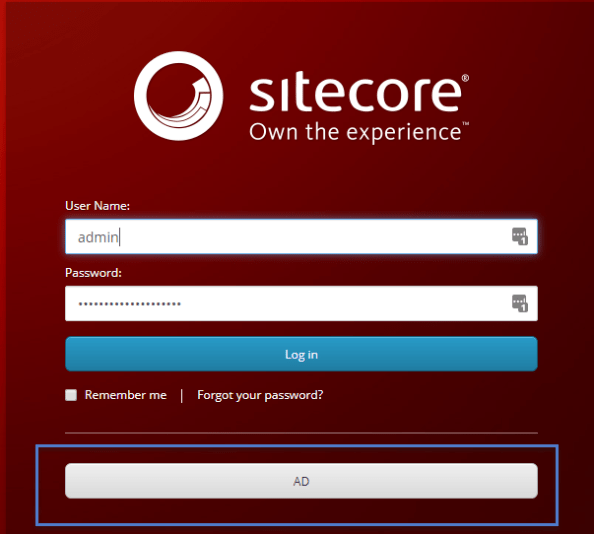
clicking on the button should take you t your ADFS server for authentication, after taht you should be redirect to Sitecore.
Mapping of claims to roles works the same as with Sitecore Azure Ad implementation.
You can find the code for this on github
https://github.com/istern/Sitecore.IdentityServer.ADFS
Sitecore installation Framework (SIF) custom install path.
This is a very short post, and properly there exist different ways to achieve the same thing, but this is my take on installing Sitecore 9 in custom path.
As default when downloading the on prem package for Sitecore 9, the installation will install in “C:\inetpub\wwwroot”.
One way of installing all the different sites for a XP installation (cm/cd, XConnect, Identityserver) would be to change the “Site.PhysicalPath” in each *.json file for each role. But foreach installation you would make in the future you would have to edit all the files and change them accordingly.
So instead you could add a new parameter to *.ps1 file used to kick off the installation. But it near the top along side the other parameters needed by the installation framework
Next added it as parameter to the list for SIF parameters

No we have the parameters in place next we need to add updated “Site.PhysicalPath” in each *.json file but we only have to do this once. Changing the line
From
“Site.PhysicalPath”: “[joinpath(environment(‘SystemDrive’), ‘inetpub’, ‘wwwroot’, parameter(‘SiteName’))]”,
TO
“Site.PhysicalPath”: “[concat(parameter(‘InstallDir’), parameter(‘SiteName’))]”,
Last thing needed to do is to update the installation json fil. this would be the topology–env.json fx. XP0-SingleDeveloper.json with the parameter

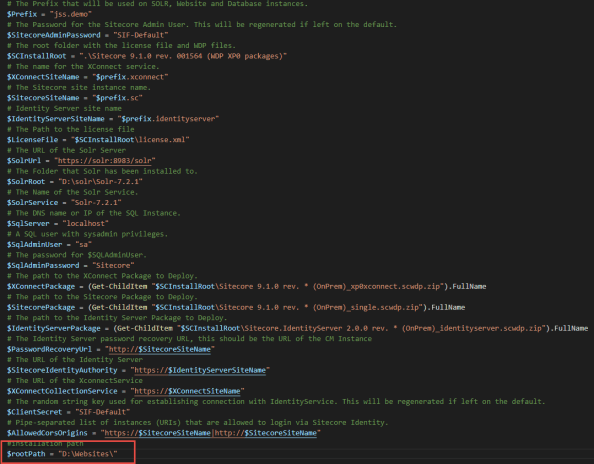
For all future installation all we have to do is changing the $rootPath parameters in the *.ps1 file to install Sitecore in a custom location.
Running Sitecore 9 Field Editor from a Command in Sitecore 9 Experience editor
So I’ve have a post about this topics for the last couple of Sitecore Versions so of course it would make sense to have one for Sitecore 9 as well.
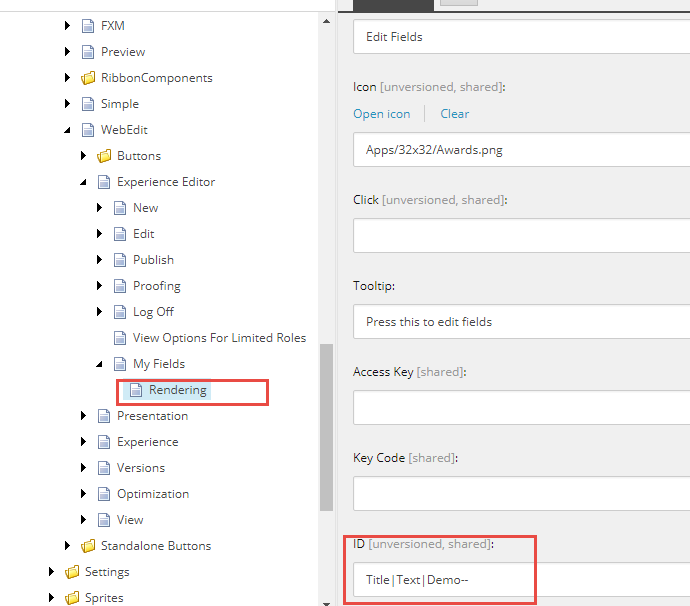
Start by navigating to ” /sitecore/content/Applications/WebEdit/Ribbons/WebEdit/Page Editor” in the core database. From here you can duplicate one of the existing chunk or you can create a new one.

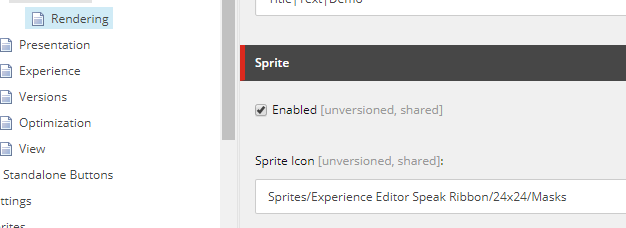
Under your chunk create a new Button for this example I’ve used a “Sprite Large Button”. On the button you can set tootltip and a title for the button. As a field to supply the which Fields is being edited I’m using the id, with the FieldName-Fieldname-Fieldname– I’m using the “-” as a seperated between fields, and “–” to end fieldname section. See image below
In the Sprite section of the button you define the image to be shown in the experience editor.
Now on the presentation details for the Button

There are two important section on is the event section which holds what command is triggered

The other one the path to your script file
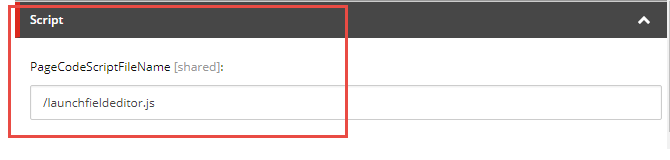
With Sitecore setting part in place.
You can now add the following javascript for convenience if just added the launchfielditor javascript to the root of the site
define(["sitecore", "/-/speak/v1/ExperienceEditor/ExperienceEditor.js",
"/-/speak/v1/ExperienceEditor/ExperienceEditor.Context.js"
, "/-/speak/v1/ExperienceEditor/ExperienceEditorProxy.js"],

function (Sitecore, ExperienceEditor, ExperienceEditorContext,ExperienceEditorProxy) {
Sitecore.Commands.LaunchFieldEditor =
{
canExecute: function (context) {
//YOU COULD ADD FUNCTIONALITY HERE TO SEE IF ITEMS HAVE THE CORRECT FIELDS blog.istern.dk
return true;
},
execute: function (context) {
var rawString = context.button.attributes.name;

var fields = rawString.substring(0,rawString.indexOf("--"))

var fieldsString =fields.replace(new RegExp("-","g"), "|");

var itemId = context.currentContext.itemId.replace("%7b","{").replace("%7d","}")

ExperienceEditorProxy._pe().postRequest('webedit:fieldeditor(command='+itemId+',fields='+fieldsString+',id='+itemId+')', null,false)

}

};
});
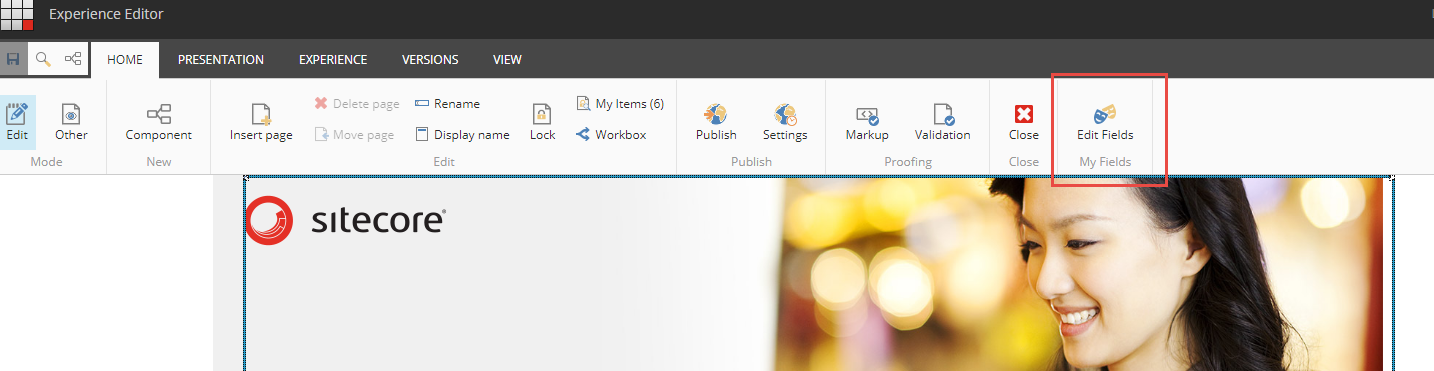
And the outcome of the above can be seen here

Only thing not happening is out save when the editor closes. But I hope to get that part in place soon.


