Archive
Sitecore 9.1 IdentityServer On-Premise AD via ADFS
Which the launch of Sitecore 9.1 came the introduction of the identity server to Sitecore list roles. You can find a lot more information about the Identity Server here https://identityserver.io/- Personally I think this I is great enhancement and add are more easy extendable way of enabling 3 party authentication providers to Sitecore. As standard the Identity server runs on Sitecore HOST https://doc.sitecore.com/developers/91/sitecore-experience-management/en/sitecore-host.html And ships with the possibility to use Azure AD and the Identiytserver.Contrib.Membership module allowing for cloud AD and the old DB style of authenticating in Sitecore. This also means the the old Sitecore AD module is now deprecated and no longer supported. So in this blog post I will show how to integrated a On Premise Ad with Sitecore Idenityserver hosted on Sitecore Host.
First you need a AD of course and then you need ADFS server to act as a authentication provide to the Identityserver. This however is a little out of scope for this post. But here is two great links on how to configure and forward AD groups as roles
https://stackoverflow.com/questions/55494354/user-groups-as-claims-through-openid-connect-over-adfs
Before we get to code you need to know about this nuget feed related to Sitcore Identity
https://sitecore.myget.org/F/sc-identity/api/v3/index.json
Since this feed contains some of packages needed. So this project or solution rather is to use OpenId Connect against the with the ADFS server
The solution consist of three class’ i will briefly show them here below
The App Settings classe seen below for retrieving the Setting for the Provider
public class AppSettings
{
public static readonly string SectionName = "Sitecore:ExternalIdentityProviders:IdentityProviders:ADFS";
public ADFSIdentityProvider ADFSIdentityProvider { get; set; } = new ADFSIdentityProvider();
}
The ADFSIdentityProvider which allows for a type strong way of accessing settings related to the module.
public class ADFSIdentityProvider
{
public bool Enabled { get; set; }
public string Authority { get; set; }
public string ClientId { get; set; }
public string AuthenticationScheme { get; set; }
public string MetadataAddress { get; set; }
public string DisplayName { get; set; }
}
And the CongifugreSitecore class which handles the communication with ADFS server
using System;
using System.Security.Claims;
using System.Threading.Tasks;
using Microsoft.AspNetCore.Authentication;
using Microsoft.AspNetCore.Authentication.OpenIdConnect;
using Microsoft.Extensions.Configuration;
using Microsoft.Extensions.DependencyInjection;
using Microsoft.Extensions.Logging;
using Microsoft.IdentityModel.Tokens;
using Sitecore.Framework.Runtime.Configuration;

namespace Sitecore.IdentityServer.ADFS
{
public class ConfigureSitecore
{
private readonly ILogger _logger;
private readonly AppSettings _appSettings;

public ConfigureSitecore(ISitecoreConfiguration scConfig, ILogger logger)
{

this._logger = logger;
this._appSettings = new AppSettings();
scConfig.GetSection(AppSettings.SectionName);
scConfig.GetSection(AppSettings.SectionName).Bind((object)this._appSettings.ADFSIdentityProvider);
}

public object IdentityServerConstants { get; private set; }

public void ConfigureServices(IServiceCollection services)
{
ADFSIdentityProvider adfsProvider = this._appSettings.ADFSIdentityProvider;
if (!adfsProvider.Enabled)
return;
_logger.LogDebug($"Adding ADFS clientId {adfsProvider.ClientId} Authority {adfsProvider.Authority} Scheme {adfsProvider.AuthenticationScheme}");
new AuthenticationBuilder(services).AddOpenIdConnect(adfsProvider.AuthenticationScheme, adfsProvider.DisplayName, (Action)(options =>
{

options.SignInScheme = "idsrv.external";
options.SignOutScheme = "idsrv";
options.RequireHttpsMetadata = false;
options.SaveTokens = true;
options.Authority = adfsProvider.Authority;
options.ClientId = adfsProvider.ClientId;
options.ResponseType = "id_token";
options.MetadataAddress = adfsProvider.MetadataAddress;
options.TokenValidationParameters = new TokenValidationParameters
{
NameClaimType = "name",
RoleClaimType = "roles"

};
//Added to enable DEBUG to see all claims
//Can be removed in production
options.Events = new OpenIdConnectEvents()
{
OnTokenValidated = (context) =>
{
//This identity include all claims
ClaimsIdentity identity = context.Principal.Identity as ClaimsIdentity;
//ADD break POINT to see all the claims,
return Task.FromResult(0);
}
};
}));

}
}
}
With the solution build you can deploy this to your Identity Server in sitecoreruntime folder in a production folder. The installationor placement of files should look like below.

The Sitecore Plugin manifest should point to your assembly name an example given below.

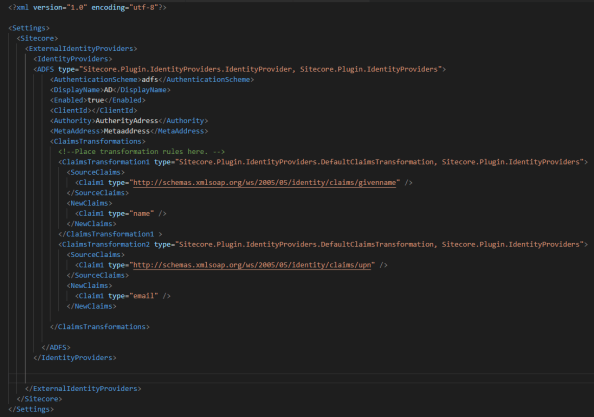
And for the configuration files placed in Config folder is here an examplereplace clientid and autherityaddress and metaaddress with your own values
with that in place you can go ahead and restart the application pool for the identityserver to load in the configurations and you should see the AD login button.
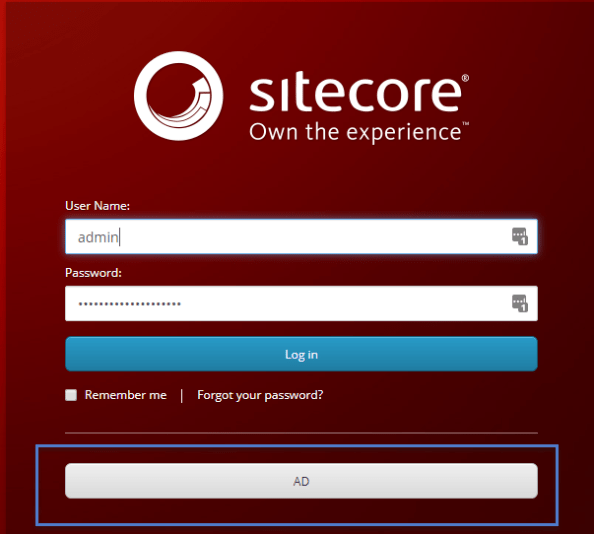
clicking on the button should take you t your ADFS server for authentication, after taht you should be redirect to Sitecore.
Mapping of claims to roles works the same as with Sitecore Azure Ad implementation.
You can find the code for this on github
https://github.com/istern/Sitecore.IdentityServer.ADFS
Running Sitecore Publishing Service in Docker
In this mini series of running Sitecore in docker containers, it is now time to have a look at a container for running Sitecore publishing Service. This container will setting up the service following the manual process found in the installation guide at dev.sitecore.net. The recommendation specifies that service should be hosted on an IIS so as an base image I will be using the Microsoft/IIS from docker hub. Over the base image there will be installed dotnetcore hosting using https://chocolatey.org/. Be aware that this docker image will be using windows containers, and you can’t combine linux and windows continer in docker yet. SO !
STOP REMEMBER TO SWITCH TO WINDOWS CONTAINERS
It is important to note that this container is not being packed with the Publishing Service zip file, but instead a voluome should be created with the publishing service files found in the zip. To be clear this means that you will still have to download and extract the publishing service from dev.sitecore.net
To help configurering the container a couple of support files is created. First a small powershell script for manipaluting the connectionstrings into the templates file ”sc.global.xml” which is then copied into to the configuration.
And yes I know the powershell could be written more crisp sorry..

$user = $env:user
$password = $env:password
$server = $env:server
$coredb = $env:coredb
$masterdb = $env:masterdb
$webdb = $env:webdb
$core = '<core>user id='+$user+';password='+$password +';Data Source='+$server+';Database='+$coredb+';MultipleActiveResultSets=True;</core>'
$master = '<master>user id='+$user+';password='+$password +';Data Source='+$server+';Database='+$masterdb+';MultipleActiveResultSets=True;</master>'
$web = '<web>user id='+$user+';password='+$password +';Data Source='+$server+';Database='+$webdb+';MultipleActiveResultSets=True;</web>'</pre>
(Get-Content C:\resources\sc.global.xml) -replace('{CORE}',$core) | Set-Content C:\resources\sc.global.xml
(Get-Content C:\resources\sc.global.xml) -replace('{MASTER}',$master) | Set-Content C:\resources\sc.global.xml
(Get-Content C:\resources\sc.global.xml) -replace('{WEB}',$web) | Set-Content C:\resources\sc.global.xml

Copy-Item C:\resources\sc.global.xml c:\publishing\config\global\

(Get-IISAppPool "DefaultAppPool" ).ManagedRuntimeVersion = ""

c:\publishing\./Sitecore.Framework.Publishing.Host schema upgrade --force

C:\ServiceMonitor.exe w3svc
And the template xml file
<Settings>
<Sitecore>
<Publishing>
<!--
Overriding & controlling the log level for different parts of the system
-->
<Logging>
<Filters>
<Sitecore>Information</Sitecore>
<Sitecore.Framework.Publishing.DataPromotion>Debug</Sitecore.Framework.Publishing.DataPromotion>
<Sitecore.Framework.Publishing.ManifestCalculation>Trace</Sitecore.Framework.Publishing.ManifestCalculation>
</Filters>
</Logging>
<ConnectionStrings>
{CORE}
{MASTER}
{WEB}
</ConnectionStrings>
</Publishing>
</Sitecore>
</Settings>
With the two helper files, all that is left is the Dockerfile
FROM microsoft/aspnet

RUN mkdir C:\publishing
ADD /resources /resources
RUN powershell -NoProfile -Command \
Import-module IISAdministration; \
New-IISSite -Name "publishing" -PhysicalPath C:\publishing -BindingInformation "*:80:"; \
Remove-IISSite -Name 'Default Web Site' -Confirm:$false;

RUN powershell -Command (Get-IISAppPool "DefaultAppPool" ).ManagedRuntimeVersion = ''

RUN powershell -Command Invoke-Expression ((New-Object Net.WebClient).DownloadString('https://chocolatey.org/install.ps1'))
RUN powershell -Command Install-PackageProvider -Name chocolatey -Force
RUN powershell -Command choco install -y --params="Quiet" dotnetcore-windowshosting
EXPOSE 80

ENTRYPOINT powershell.exe -Command c:\Resources\configure.ps1
Once build you should be able to run it.
docker build . -t sitecorepublisging
Remember to mount a volumen pointing to the folder where you extracted the publishingservice.zip file. The volumen needs to point to “c:\\publishing” inside the container. And also supply relevant information for environment variables ie. your sql user name,password and adresse and Sitecore names for the master web and core so it could looking something like this J
docker run -it -p 80:80 -v d:\\websites\\publishing:c:\\publishing -e “user=sa” -e “password=Sitecore+Docker=Socker!” -e “server=172.29.31.21” -e “coredb=Sitecore_Core” -e “webdb=Sitecore_Web” -e “masterdb=Sitecore_Master” –name demop sitecorpublishingservise
DID YOU REMEMBER TO SWITCH TO WINDOWS CONTAINERS ?
You can’t use localhost because of some windows natting with docker issues sorrym this is comming in the near future.
Once the container is up and running inspect the container to get the ip.
Docker inspect {containername}
With the ip verify the service is running
http://{CONTAINERIP}/api/publishing/operations/status
you should see a status 0
Once you installed the sitecore package enabling publishing service inside Sitecore. you can copy the the container ip into your configuration found in /App_Config/Include/Sitecore.Publishing.Service.config and update the setting
<setting name="PublishingServiceUrlRoot">http://CONTAINERIP/</setting>
And that’s all. Now you are using the new publishing service with IIS hosted in docker.

Congrats. So test it by publish your entire site i Sitecore 🙂 and be amazed be the publishing service speed.
Once i get around to it i will publish the image to docker hub. In this blog post i only gave one way to run the publishing service there are of course others. And also the image can be optimised.
Sitecore MVC the first controller.
Sitecore 6.6 is now out, (as a technical preview), with the realse of this version Sitecore now offers full support for MVC. There have all ready been quite a few blog post how to user MVC with Sitecore and some of the new fetures offers a great deal of ease when developing with Sitecore.
So this is the first in a series of how to develop with Sitecore using MVC and some of the benefits you get for free using MVC.
If you haven’t allready read John West blog post on how to setup you Sitecore solution to use MVC you can read them here start with Part 1 and use part 3 to setup a visual studio solution .John also wrote some simple examples on how to use the MVC framework to return JSON serialized result from a controller you read his original post here. For a first post in this Sitecore MVC series we will revisit his example and create our own controller but with a different approach, and with the soon to be released .Net 4.5 Framework which include the new web-api this should be even easier, and given you even more flexibility for free and out of the box, we will look back at this example when the final release is out.
By now you should now have an up an running Sitecore 6.6 solution. My visual studio solution setup is shown below.


Now lets create our first controller Code listed below.
public class ItemController : Controller
 {

public JsonResult Index(string id)
 {
 return Json(CreateObject(ChildRepository.Get(parentItemId)), JsonRequestBehavior.AllowGet);
 }

private ChildItemRepository _childRepository;
 public virtual ChildItemRepository ChildRepository
 {
 get { return _childRepository ?? (_childRepository = new ChildItemRepository()); }

}

private IEnumerable<object> CreateObject(IEnumerable<Item> items)
 {
 foreach (Item item in items)
 yield return new {item.Name};
 }

}
With the controller in place you can change the route to newly created controller John in his example uses a Pipeline in Sitecore to achieve this i like this approache so much more the using the global.asax so we reuse his code for this with some minor alternations. The Id of the node we want to retrieve children for if not specified default to the id of the Home-node. I’ve done this because i don’t like all his assert for empty id, and if you don’t like you can just use the original approach with optional url parameter.You could if liked alsp default the index action. But instead of getting the id trough the url route data you should supply it as a argument to the action method. The key here is that parameter Id must be named the same as the input parameter in index method.
public class SitecoreMVCRoutes
 {

public virtual void Process(Sitecore.Pipelines.PipelineArgs args)
 {
 this.RegisterRoutes(RouteTable.Routes);
 }

public bool MvcIgnoreHomePage { get; set; }

protected virtual void RegisterRoutes(RouteCollection routes)
 {
 if (this.MvcIgnoreHomePage)
 {
 routes.IgnoreRoute(String.Empty);
 }

routes.MapRoute(
 "Default", // Route name
 "Item/{action}/{id}", // URL with parameters
 new { controller = "Item", action = "Index", id = "{110D559F-DEA5-42EA-9C1C-8A5DF7E70EF9}" } // Parameter defaults with Id to home node
 );
 }
 }
Now we will implement the busyness layer that will supply the controller with data.
This is done through a ChildRepository the code is listed below.
</pre>
public class ChildItemRepository
 {
 public virtual IEnumerable<Item> Get(string parentItemId)
 {
 ID parentId;
 if(ID.TryParse(parentItemId,out parentId))
 return GetChildNodes(parentId);
return new List<Item>();
 }

private IEnumerable<Item> GetChildNodes(ID parentId)
 {
 Item parentItem = Sitecore.Context.Database.GetItem(parentId);
 return parentItem.GetChildren();
 }
 }
<pre>
Lets test the new controller

First with out supplying a id,

Now with a valid id different form the home-node.

And now with a invalid id.

There we go the code does the same as Johns but with out all the assert tests.


