Archive
Running Sitecore Field Editor from a Speak Command in Sitecore Experience editor Sitecore 8.1 Version
So with the release of sitecore 8.1 also came some minor changes to how the javascript are structured, this means that to run the Sitecore Field Editor from a Speak Command in Sitecore Experience editor, which i presented in this post, a minor changes is required. All that is needed to be changed is the way the reference to Experience editor is handled the full Javascript with the modification is show below.
define(["sitecore", "/-/speak/v1/ExperienceEditor/ExperienceEditor.js"], function (Sitecore, ExperienceEditor) {
    Sitecore.Commands.LaunchFieldEditor =
    {
        canExecute: function (context) {
            //YOU COULD ADD FUNCTIONALITY HERE TO SEE IF ITEMS HAVE THE CORRECT FIELDS
            return true;
        },
        execute: function (context) {
            // THIS IS FOR THE ALT TEXT ON IMAGE
            context.currentContext.argument = context.button.viewModel.$el[0].firstChild.alt;

            //THIS IS THE TOOLTIP ON LINK TAG "A"
            context.currentContext.argument = context.button.viewModel.$el[0].title;
            console.log(Sitecore);
            console.log(ExperienceEditor);
            ExperienceEditor.PipelinesUtil.generateRequestProcessor("ExperienceEditor.GenerateFieldEditorUrl", function (response) {
                var DialogUrl = response.responseValue.value;
                var dialogFeatures = "dialogHeight: 680px;dialogWidth: 520px;";
                ExperienceEditor.Dialogs.showModalDialog(DialogUrl, '', dialogFeatures, null);
            }).execute(context);

        }
    };
});
Only modification is the mapping of The Experience editor is now loaded with a direct link to ExperienceEditor.js Line 1.
Sitecore social connected Invalid Scopes: user_interests
I’ve set my self the task to have a go at the social connected, which I never really had a look at before.
So I’ve set it up a clean sitecore 8.1 and included the Facebook login in a MVC rendering and everything is working fine, except when trying to login on facebook, then I was shown an error See image below

The fix is pretty simple, fields that are pulled out of Facebook is configured in /app_config/include/Social/Sitecore.Social.ProfileMapping.Facebook.config and for the error i got it was the interest field that did’t exist in my user profile or had been renamed, but commenting out the field made, se below,e the error go away. the downside is that facebook interest isn’t mappen to contact details.
<!-- The interests listed on the user's profile. -->
<field enabled="true" originalKey="" sitecoreKey="fb_interests" permission="user_interests" access="/me/interests" text="Interests" />
I have to say my first impression of the module is it an great module easy to use and easy top configure, and can add a lot of value to any Sitecore solution
Running Sitecore Field Editor from a Speak Command in Sitecore Experience editor
This post is an update of an old post https://blog.istern.dk/2012/05/21/running-sitecore-field-editor-from-a-command/ . Sitecore 8 brought along speak and deprecated the old solution presented in that blog post. So let’s speakify it and create a new solution. Luckily Alister Berry provided an excellent blog post about creating simple custom ribbon in the experience editor http://www.programmingbynumbers.com/2015/01/31/creating-a-new-experience-editor-button-in-sitecore-8/ – So go read the post a comeback when your are done J. For the rest of this post the button or functionality, if you like, will be to edit the HTML metatags ie. Title, meta-description, meta-keywords.
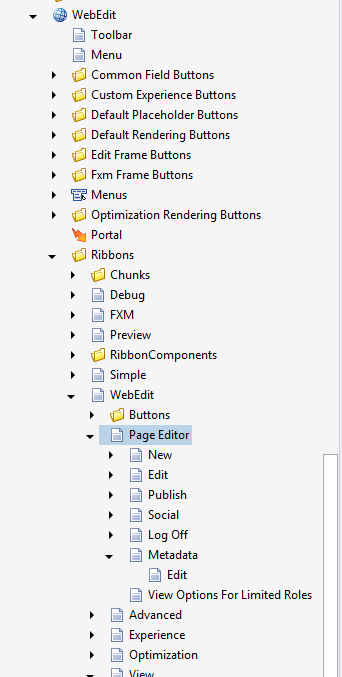
So let us begin with creating the button. Start Visual Studio launch the Sitecore Rocks and go to the Core database and navigated to “/sitecore/content/Applications/WebEdit/Ribbons/WebEdit/Page Editor” under the item create a new folder and the the newly created folder add a new Large button Fille out the fields as shown below.


So next step is to and a layout to the new button select the button and choose “Design layout” in Sitecore Rocks – shortcut “ctrl + u”, and choose and a new rendering “Large Button”


Next lets add the properties required for the solution to work
The properties are Click is “trigger:button:click”, Command “LaunchFieldEditor”, PageCodeScriptFileName : “PATH TO THE JS FILE WE CREATE NEXT”


Okay now we need to create PageCodeScriptFile:
define(["sitecore"], function (Sitecore) {

Sitecore.Commands.LaunchFieldEditor =
{
canExecute: function (context) {
//YOU COULD ADD FUNCTIONALITY HERE TO SEE IF ITEMS HAVE THE CORRECT FIELDS
return true;
},
execute: function (context) {
///CHOOSE YOUR OPTION BELOW

// THIS IS FOR THE ALT TEXT ON IMAGE
context.currentContext.argument = context.button.viewModel.$el[0].firstChild.alt;

//THIS IS THE TOOLTIP ON LINK TAG "A"
context.currentContext.argument = context.button.viewModel.$el[0].title;

Sitecore.ExperienceEditor.PipelinesUtil.generateRequestProcessor("ExperienceEditor.GenerateFieldEditorUrl", function (response) {
var DialogUrl = response.responseValue.value;
var dialogFeatures = "dialogHeight: 680px;dialogWidth: 520px;";
Sitecore.ExperienceEditor.Dialogs.showModalDialog(DialogUrl, '', dialogFeatures, null);
}).execute(context);

}
};
});
Rather simple file which calls some server side code. Also note that the settings will be save to the item when the ok button is clicked right away not need to click the save button in the experience editor.
public class GenerateFieldEditorUrl : PipelineProcessorRequest<ItemContext>
{
public string GenerateUrl()
{
var fieldList = CreateFieldDescriptors(RequestContext.Argument);
var fieldeditorOption = new FieldEditorOptions(fieldList);
//Save item when ok button is pressed
fieldeditorOption.SaveItem = true;
return fieldeditorOption.ToUrlString().ToString();
}

private List<FieldDescriptor> CreateFieldDescriptors(string fields)
{
var fieldList = new List<FieldDescriptor>();
var fieldString = new ListString(fields);
foreach (string field in new ListString(fieldString))
fieldList.Add(new FieldDescriptor(this.RequestContext.Item, field));
return fieldList;
}

public override PipelineProcessorResponseValue ProcessRequest()
{
return new PipelineProcessorResponseValue
{
Value = GenerateUrl()
};
}
}
Now lyou should register the Request processor open the this file “Sitecore.ExperienceEditor.Speak.Requests.config” found in App_config/include folder. And add the new processor.
<request name="ExperienceEditor.GenerateFieldEditorUrl" type="PT.Framework.SitecoreEditor.GenerateFieldEditorUrl, PT.Framework.SitecoreEditor"/>
Just before we see the result there a few things that are nice to know. Because the server side code actually does a bit more the just returning and url for fieldeditor. The creation of the URL Handle also besides creating a URL to the fieldeditor is storing required parameters in the current session in the urlhand id. The fieldeditor then pickups on parameters by going in to the session with hdl-id see url below. Hdl=F60F9A3AB4DC4CC8A7E28D25C4EC13B8
http://local/sitecore/shell/applications/field%20editor.aspx?mo=mini&hdl=F60F9A3AB4DC4CC8A7E28D25C4EC13B8
Okay now to the tricky part we need to pass in which fields we want to edit to the server class GenerateFieldEditorUrl, unfortunately the parameter part of the layout isn’t rendered out and can’t be used but there are som simple ways we can force the fieldnames out in the HTML.
First you can edit the button item and set in the fieldnames in n the tool tips section

Alternatively you can set it in layout details page under tooltips, Be advised that if you choose this, editor will see the fieldname in the editors.

See the two different models below. The javascript in this post include selector for both option see comments in the js file


And now to the final result

So thats how you laucnh the field editor with a speak modal dialog, in the sitecore experience editor.
UPDATE 1
A problem with the two selector presented above is that they both requires you to add the fields to all language versions of the button item. So one of collegues Stephan Rifbjeg came up with a smart solution, simply to add the fields to the acceskey field on the layout see image below.
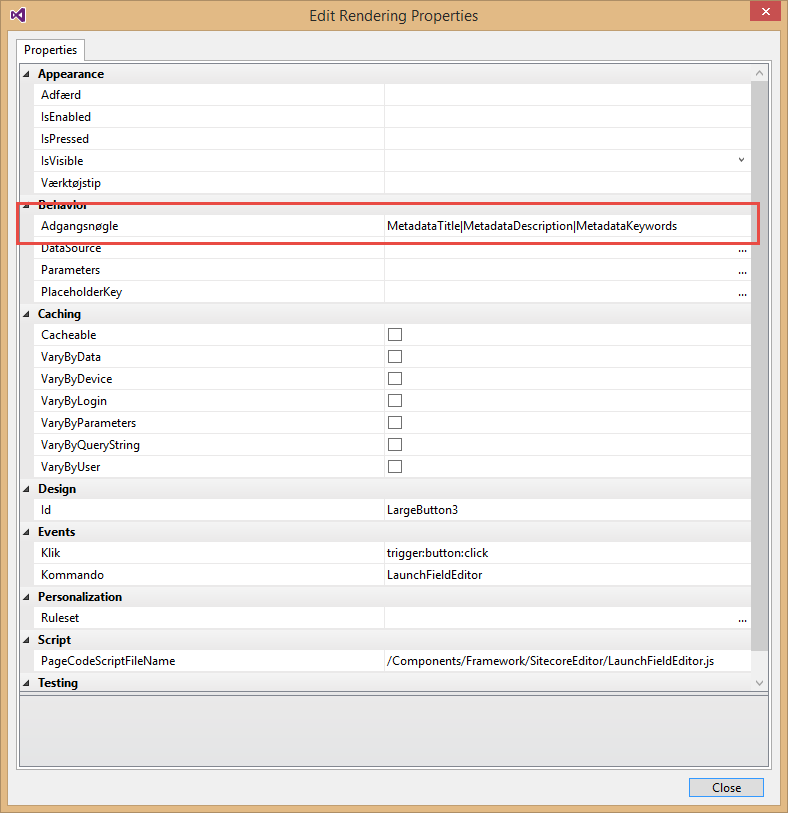
You can now get the value out with the following selector
context.currentContext.argument = context.button.viewModel.$el[0].accessKey;
Update from kayeenl to catch the GenerateFieldURI
public class GenerateFieldEditorUrl : PipelineProcessorRequest<ItemContext>
{
public string GenerateUrl()
{
var fieldList = CreateFieldDescriptors(RequestContext.Argument);
var fieldeditorOption = new FieldEditorOptions(fieldList);
//Save item when ok button is pressed
fieldeditorOption.SaveItem = true;
return fieldeditorOption.ToUrlString().ToString();
}<span class="para_break"><i class="copy_only">
</i></span>       private List<FieldDescriptor> CreateFieldDescriptors(string fields)
{
var fieldList = new List<FieldDescriptor>();
var fieldString = new ListString(fields);
foreach (var field in new ListString(fieldString))
{
try
{
var descriptor = new FieldDescriptor(RequestContext.Item, field);
fieldList.Add(descriptor);
}
catch (Exception)
{
Log.Error(string.Format("Cannot create field editor for field '{0}'. Please configure the fields on the tooltip of the button", field), this);
}
}
return fieldList;
}<span class="para_break"><i class="copy_only">
</i></span>       public override PipelineProcessorResponseValue ProcessRequest()
{
return new PipelineProcessorResponseValue
{
Value = GenerateUrl()
};
}
Storring Sitecore Logs Using RabbitMQ Logstash Elasticsearch and Kibana (ELK)
In an earlier post I showed how to store Sitecore logs files in MongoDB see it here. Now I will demonstrate how to do the same thing using RabbitMQ, Logstash and Elasticsearch, and afterwards you can view and search in the logs using Kibana. It out of scope for this post to do any advance installation of the stack during this post. Also for the entire will be setup on localhost, if moved to a server additional configuration may be required.
So let’s jump right in and get RabbitMQ installed. So go to and download RabbitMQ and Erlang. See the marked download links in image below-
https://www.rabbitmq.com/install-windows-manual.html
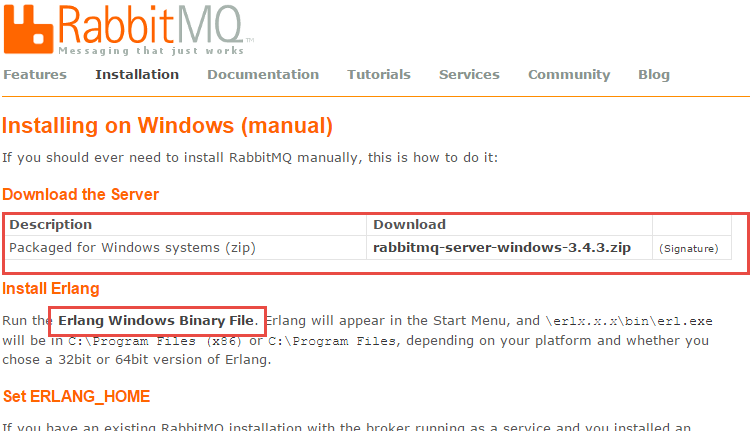
Erlang dowload

Start running the Erlang installer the installation should be next … next and done Next install RabbitMQ again next … next and done.
Now we need to install a add on to RabbitMQ this is easiest done by go through the windows start menu
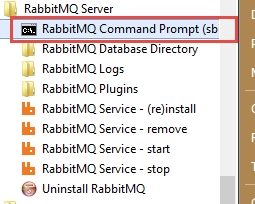
In the command prompt copy in and hit enter
“rabbitmq-plugins enable rabbitmq_management”
Now you can navigate to http://localhost:15672/ The default username and password is guest and guest.
Go to the Queues tab and create a new queue call it Sitecore-Log and make it Transient
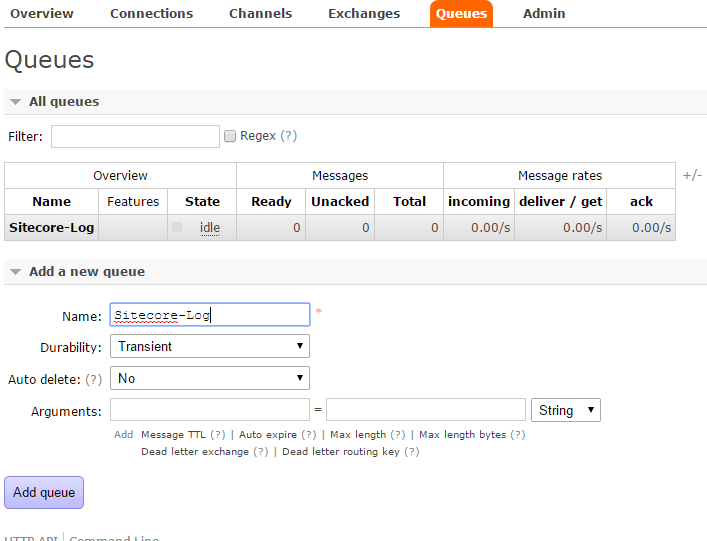
Perfect now with that in place lets get some code to push log entries to out newly created queue.
First lets create our Log appender
public class LogAppender : AppenderSkeleton
{
  public virtual string Host { get; set; }
  public virtual string UserName { get; set; }
  public virtual string Password { get; set; }
  public virtual string ExchangeName { get; set; }
  public virtual string QueueName { get; set; }
  protected override void Append(LoggingEvent loggingEvent)
  {
   var message = LogMessageFactory.Create(loggingEvent);
   var messageBuffer = SerializeMessage(message);
   PushMessageToQueue(messageBuffer);
  }

  private byte[] SerializeMessage(LogMessage message)
  {
   var serializedMessage = JsonConvert.SerializeObject(message);
   byte[] messageBuffer = Encoding.Default.GetBytes(serializedMessage);
   return messageBuffer;
  }

  private void PushMessageToQueue(byte[] messageBuffer)
  {
    RabbitQueue.GetInstance(Host,UserName,Password).Push(ExchangeName, QueueName, messageBuffer);
  }
}
If created a simple LogMessage with the additional parameters that I want to log, like the Machine name ApplicationPoolNameand and the Sitename. So here is a factory tha can create a LogMessage from the LoggingEvent
public class LogMessageFactory
{
 public static LogMessage Create(LoggingEvent loggingEvent)
 {
  loggingEvent.GetLoggingEventData();
  var message = new LogMessage()
  {
   ApplicationPoolName = HostingEnvironment.SiteName,
   InstanceName = Environment.MachineName,
   Level = loggingEvent.Level.Name,
   Message = loggingEvent.RenderedMessage,
   Site = GetSiteName(),
   Exception = GetException(loggingEvent),
   TimeStamp = loggingEvent.TimeStamp
  };
  return message;
}

 private static string GetSiteName()
 {
  return Sitecore.Context.Site != null ? Sitecore.Context.Site.Name : string.Empty;
 }

 private static string GetException(LoggingEvent loggingEvent)
 {
  if (!string.IsNullOrEmpty(loggingEvent.GetLoggingEventData().ExceptionString))
   return loggingEvent.GetLoggingEventData().ExceptionString;
  return string.Empty;
 }
}
public class LogMessage
{
  public string Level { get; set; }
  public string Message { get; set; }
  public string Source { get; set; }
  public DateTime TimeStamp { get; set; }
  public string ApplicationPoolName { get; set; }
  public string InstanceName { get; set; }
  public string Site { get; set; }
  public string Exception { get; set; }
}
Next is the communication with the queue, This is done through a singleton pattern but use whatever implementation fit your purpose best.
public sealed class RabbitQueue
{
  private static volatile RabbitQueue instance;
  private static object syncRoot = new Object();
  private static IModel _queue;
  private static IBasicProperties _queueProperties;

  public static string Host { get; set; }
  public static string UserName { get; set; }
  public static string Password { get; set; }

  private RabbitQueue(string host, string userName, string password)
  {
   Host = host;
   UserName = userName;
   Password = password;
   IntializeConnectionToQueue();
  }

public static void IntializeConnectionToQueue()
{
  var connectionFactory = new ConnectionFactory() { HostName = Host, UserName = UserName, Password = Password };
  var connection = connectionFactory.CreateConnection();
  _queue = connection.CreateModel();
  _queueProperties = _queue.CreateBasicProperties();
  _queueProperties.SetPersistent(false);
}

public static RabbitQueue GetInstance(string host, string userName, string password)
{
  if (instance == null)
  {
   lock (syncRoot)
   {
    if (instance == null)
    instance = new RabbitQueue(host,userName,password);
   }
  }
 return instance;
}

 public void Push(string exchangeName, string queueName, byte[] messageBuffer)
 {
  _queue.BasicPublish(exchangeName, queueName, _queueProperties, messageBuffer);
 }
}
Now lets add the new appender to web.config, use something like this
<appender name="RabbitMqAppender" type="RabbitMQLog4NetAppender.LogAppender, RabbitMQLog4NetAppender">
<host value="localhost" />
<username value="guest" />
<password value="guest" />
<exchangeName value="" />
<queueName value="Sitecore-Log" />
<layout type="log4net.Layout.PatternLayout">
<conversionPattern value="%4t %d{ABSOLUTE} %-5p %m%n %X{machine} " />
</layout>
<encoding value="utf-8" />
</appender>
Lets add out new log appender to the default file appender so we still have log files written to disk. This means that we can set the queue to be transient, and not persistent.
<root>
  <priority value="INFO" />
  <appender-ref ref="LogFileAppender" />
  <appender-ref ref="RabbitMqAppender" />
 </root>
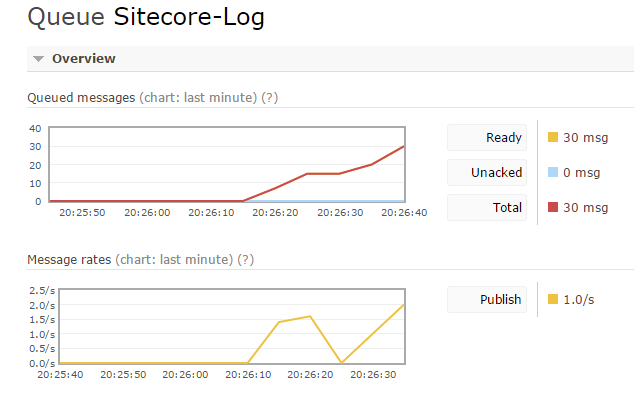
Now you can start up Sitecore and you should start to see Messages starting to build up in the queue
Wuhuuuu now lets start putting the messages into elasticsearch via Logstash. Go to http://www.elasticsearch.org/overview/elkdownloads/ and download elasticsearch, Kibana and Logstash . Now lets start with the setting up elastichsearch After you have extracted the zip file you should see a file structure like the one below. Before you start the server edit the file elasticsearch.yml placed in the config directory at the end of the files add “http.cors.enabled: true”. Now go to the bin directory and launch the elasticsearch.bat.

Next we need Kibana, Make a new site in IIS setting the root the kibana folder it should look something like this.

Now we are almost done last part is logstash so in the directory where you have extracted logstash go into the bin folder

Create a new file call it test.conf and put in the following content
input {
  rabbitmq {
    host => localhost
    queue => "Sitecore-Log"
  }
}

output {
  elasticsearch {
    host => localhost
  }
}
Startup a cmd and go to the bin folder of logstash and run the following command
logstash-1.4.2\bin>logstash.bat agent -f test.conf
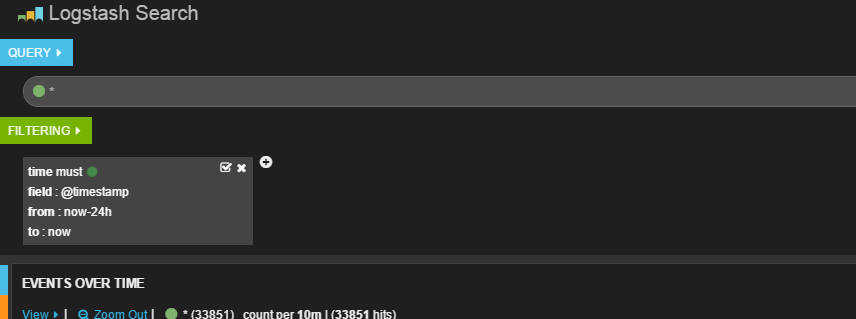
Now we done lets go into our kibana website and have a look Kibana comes with a default view for logstash See below.

With that in place we can start seeing our log entries.

Choose what is shown by selecting on left side

You can see details about individual message by click on them se example below

In the top you can add your own filtering and search in through the log entries
That was the first post in 2015, and the first post that for Sitecore 8.
Alexander Smagin have also done something like this see his blog here
WFFM publishing with related item, fixing missing form elements
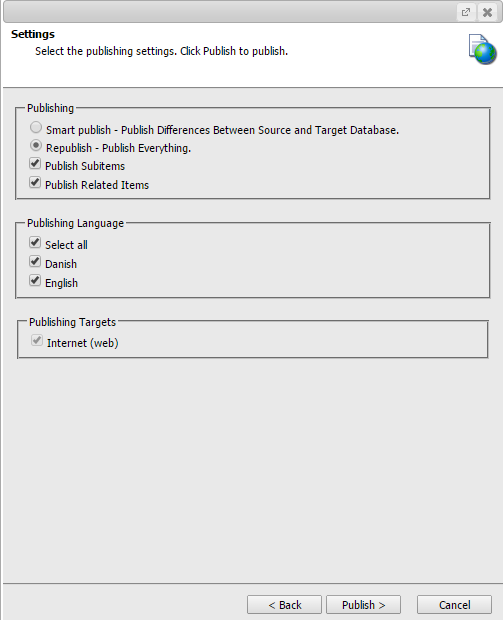
When adding a form to a page via the page editor, Sitecore registers a reference to form element, so when you publish you can check the publish related Items checkbox, and you would expect the form to be visible on your CD-server
However WFFM places all elements in the form as children to form element itself, and these are not added to the publishing queue because they are not related to page where the form was first added.

So when publishing the form is correctly being published, but the fields for the forms isn’t moved from the master database to web database and the form is of course then not rendered out.
As always Sitecore has a pipeline, that you can hook into in this case the “getItemReferences” this pipelines, resolves related items and adds them to the publishing queue. So hooking into this and adding child elements for forms is actually quite easy.
public class GetFormChildElementProcessor : GetItemReferencesProcessor
{
  private readonly ID _formTemplateId = new ID("{FFB1DA32-2764-47DB-83B0-95B843546A7E}");
 protected override List<Item> GetItemReferences(PublishItemContext context)
 {
  List<Item> relatedformItems = new List<Item>();
  if(!context.Result.ReferredItems.Any())
   return relatedformItems;
  Database database = context.PublishContext.PublishOptions.SourceDatabase;
  var formItems = context.Result.ReferredItems.Where(i=>IsDerived(database.GetItem(i.ItemId).Template, _formTemplateId)).ToList();

  foreach (var form in formItems)
  {
    var formChildren = form.ChildEntries;
    foreach (var child in formChildren)
    {
      relatedformItems.Add(database.GetItem(child.ItemId));
    }
  }
  return relatedformItems;
}

 public bool IsDerived(TemplateItem template, ID templateId)
 {
  if (!(template.ID == templateId))
  {
   return Enumerable.Any<TemplateItem>(template.BaseTemplates, baseTemplate => IsDerived(baseTemplate,templateId));
  }
   return true;
 }
}
And now register the processor in the web.config under /configuration/sitecore/pipelines/getItemReferences add it at the end.
<processor type="PT.Framework.PublishForm.GetFormChildElementProcessor, PT.Framework.PublishForm"/>
Now all the child elements to items the derives from the form element will be added to the publishing queue.
Escaping dashes/“-” in Sitecore Queries. Datasource query Update
This is actually more an update to the post Query in Datasource location I wrote some while ago. As I was working on a new solution I often saw an error with “unterminated literal string in Query”. In my case it was actually quite simple because an item name include a dash “-”, which is an illegal character in a query, the solution is to escape the part of the the path that contains the “-”. you escape it by adding “#” around the word, see the example below.
query:/sitecore/content/some/path-with-dash/becomes
query:/sitecore/content/some/#path-with-dash#/becomes
The code to fix this is simple and Anders Laub wrote the version you see below.
private string EscapeItemNamesWithDashes(string queryPath)
{
  if (!queryPath.Contains("-"))
   return queryPath;

  var strArray = queryPath.Split(new char[] { '/' });
  for (int i = 0; i < strArray.Length; i++)
  {
    if (strArray[i].IndexOf('-') > 0)
    strArray[i] = "#" + strArray[i] + "#";
  }
  return string.Join("/", strArray);
}
The source code for using queries is also available on github , with the above enhancement.
https://github.com/istern/RenderingsDatasources
Launch Mongo DB with Sitecore Pipelines
My colleague Brian Pedersen recently wrote at blog post about setting up MongoDB and starting it up with a simple bat-file read it here
Combine the first step “download” mongo with starting a process as my other colleague Anders Laub showed how to do in his crush png post here http://laubplusco.net/crush-png-in-sitecore/
Then you have a pipeline that can start mongo if it isn’t running.
First lets create a new custom pipeline to start a mongo instance if none is running
First the new “startmongodb” pipeline
<startmongodb>
  <processor type="Mongo.PingMongoDB, Mongo" />
  <processor type="Mongo.StartMongoDB, Mongo" />
</startmongodb>
Replace string constant with more generic method, First a processor that test to see if mongo is allready running.
   public class PingMongoDB
    {
        public void Process(PipelineArgs args)
        {
            Log.Audit("Pinging Mongo", this);
            //Replace with connectionstring from config file
            var client = new MongoClient("mongodb://localhost");

           var server = client.GetServer();

            try
            {
              server.Ping();
              Log.Audit("Mongo Allready running", this);
              args.AbortPipeline();
            }
            catch (Exception)
            {
                Log.Audit("Mongo Not Running", this);
            }
        }
    }
Now to the start mongo processor
    public class StartMongoDB
    {
        public void Process(PipelineArgs args)
        {
            var startInfo = new ProcessStartInfo
            {
                CreateNoWindow = true,
                UseShellExecute = false,
                //Replace with path to  your mongo
                FileName = "D:\\MongoDB\\bin\\mongod.exe",
              //Replace with path to  your mongo datadrive
                Arguments = @"--dbpath sc75rev140429\Databases\MongoDBData",
                WindowStyle = ProcessWindowStyle.Hidden
            };
            try
            {
                Log.Audit("Trying to start mongo",this);
                using (var exeProcess = System.Diagnostics.Process.Start(startInfo))
                {
                    exeProcess.WaitForExit(50);
                }
                Log.Audit("Mongo started", this);
            }
            catch (Exception exception)
            {
                Log.Error("Could not start mongo", exception, this);
            }
        }
    }
Finally we need to run the “startmongodb” pipeline when Sitecore Starts/Initialize so in
the initialize pipeline and at the end add
<processor type="Mongo.RunMongoPipeline, Mongo" />
code for this simple processor
public class RunMongoPipeline
    {
        public void Process(PipelineArgs arg)
        {
            CorePipeline.Run("startmongodb",new PipelineArgs());
        }
    }
From the log we can now see if mongo isn’t runnnig and was started also there is now warnings in the log :
INFO AUDIT (default\Anonymous): Mongo Not Running
INFO AUDIT (default\Anonymous): Trying to start mongo
INFO AUDIT (default\Anonymous): Mongo started
so the follwing isn’t seen in the log which it would be if mongo wasn’t running
ERROR MongoDbDictionary.Store() has failed.
Exception: Sitecore.Analytics.DataAccess.DatabaseNotAvailableException
Message: Database not available
Source: Sitecore.Analytics.MongoDB
   at Sitecore.Analytics.Data.DataAccess.MongoDb.MongoDbCollection.Execute(Action action, ExceptionBehavior exceptionBehavior)
   at Sitecore.Analytics.Data.DataAccess.MongoDb.MongoDbDictionary.Store(Object value)
What is left now is cleaning the code and use args for supplying the correct values instead of hardcoded strings. This is left as a free of charge excercise.
Storing Sitecore log events in MongoDB
After Sitecore announced the new Sitecore Experience Database (former DMS), which also included a move from a SQL to a NoSQL database, I thought it was about time to give MongoDB a closer look. After reading a lot of related blog post, seeing educational videos and more, I build few demo apps using the MongoDB. But what Ireally wanted to do, was to use Mongo along with Sitecore, and yes i know there exist MongoDB data providers but i really wanted to start with something more simple, or at least for me as an MongoDB rookie.
So what better then trying to store Sitecore’s Log events in a Mongo database.
First we need to derive from the log4net implementation found in Sitecore.Logging.dll, to build functionality to catch log entries.
public class MongoLogger : AppenderSkeleton
{
  public string ConnectionString { get; set; }
  public string CollectionName { get; set; }
  private MongoRepository _mongoRepository;

  public MongoRepository MongoRepository
  {
   get
     {
      if (_mongoRepository == null)
      {
        _mongoRepository = new MongoRepository(ConnectionString, CollectionName);
      }
      return _mongoRepository;
     }
  }

  protected override void Append(LoggingEvent loggingEvent)
  {
    MongoRepository.Put(loggingEvent);
  }
}
As it turns out the LogEvents is easily serialized and deserialized by the Mongo C# driver. I’ve used the offcial MongoCSharprDRiver for this project.
As seen in code above the logger talks with a Data Repository. So next is the MongoDB repository that handles all calls to the Database.
public class MongoRepository
{
private readonly string _connectionString;
private readonly string _collectionName;

public MongoRepository(string connectionString, string collectionName)
{
_connectionString = connectionString;
_collectionName = collectionName;
UnMapAllMongoIdField();
}

public void UnMapAllMongoIdField()
{
//Only need once per instance

BsonClassMap.RegisterClassMap<T>(cm =>

{
cm.AutoMap();
cm.SetIgnoreExtraElements(true);
});
}

public virtual void Put(LoggingEvent logEntry)
{
Collection.Insert(logEntry);
}

public virtual LoggingEvent GetSingle(Func<LoggingEvent, bool> filter)
{
return Get(filter).FirstOrDefault();
}

public virtual IEnumerable<LoggingEvent> Get(Func<LoggingEvent, bool> filter)
{
return Collection.AsQueryable<LoggingEvent>().Where(filter);
}

private MongoUrl _mongoUrl;
private MongoUrl MongoUrl
{
get { return _mongoUrl ?? (_mongoUrl = MongoUrl.Create(_connectionString)); }
}

private MongoClient _client;
private MongoClient Client
{
get { return _client ?? (_client = new MongoClient(MongoUrl)); }
}

private MongoServer _server;
private MongoServer Server
{
get { return _server ?? (_server = Client.GetServer()); }
}

private MongoDatabase _database;
private MongoDatabase Database
{
get { return _database ?? (_database = Server.GetDatabase(MongoUrl.DatabaseName)); }
}

private MongoCollection<BsonDocument> _collection;
private MongoCollection<BsonDocument> Collection
{
get { return _collection ?? (_collection = Database.GetCollection(_collectionName)); }
}
}
You could off course make the repository more generic but for simplicity it will only handle LogEvents.
Next we need to change the default Logger to use our new Mongo Logger. For this post I will only change the default Logger but you could if you wanted change all the Logger Appenders (SearchLogger, WebDavLogger, CrawlingLoggeror the PublishLogger). In the web.config under the log4net section add a the new log appender we created above like shown below. You can off course change DB-name and collection name as you like.
<appender name="MongoDBAppender" type="SitecoreMongoDBAppender.MongoAppender, SitecoreMongoDBAppender">
<connectionstring value="mongodb://localhost:27017/Logs" />
<collectionname value="log" />
</appender>
and also update the root section to point to long appender
 <root>
 <priority value="INFO" />
 <appender-ref ref="MongoDBAppender" />
 </root>
if you start up Sitecore now you should get entries into the MongoDB

You could replace all the log appender with the new MongoLogger . You can if you want use the different collections or just store each logevent in one big collection. Maybee next one should build a Sitecore Speak application to show the relevant log information, inside Sitecore but that is left for the reader :). The repository allready have Get method, where you can parse in your own linq queries.
Encrypting and securing your Sitecore connenction strings.
Finally after a long brake from bloggign here is a little starter post.
It is actually a fairly simple task to encrypt your .net connection strings using the aspnet_regiis.exe. you can find it in C:\Windows\Microsoft.NET\(Framework(32/64))\(.net version fx :4.0.30319)\aspnet_regiis.exe
So what I usually have, is a little .bat file placed in the www-root folder see the file content below
echo Encrypting app_config/connectionstrings.config
C:\Windows\Microsoft.NET\Framework64\v4.0.30319\aspnet_regiis.exe -pef “connectionStrings” .
Pause
running the bat file will transform your connectionstring from
<add name="core" connectionString="user id=user;password=password;Data Source=(server);Database=Sitecore_Core" />

<add name="master" connectionString="user id=user;password=password;Data Source=(server);Database=Sitecore_Master" />

<add name="web" connectionString="user id=user;password=password;Data Source=(server);Database=Sitecore_Web" />
to something like this
<connectionStrings configProtectionProvider="RsaProtectedConfigurationProvider">

<EncryptedData Type="http://www.w3.org/2001/04/xmlenc#Element"

xmlns="http://www.w3.org/2001/04/xmlenc#">

<EncryptionMethod Algorithm="http://www.w3.org/2001/04/xmlenc#tripledes-cbc" />

<KeyInfo xmlns="http://www.w3.org/2000/09/xmldsig#">

<EncryptedKey xmlns="http://www.w3.org/2001/04/xmlenc#">

<EncryptionMethod Algorithm="http://www.w3.org/2001/04/xmlenc#rsa-1_5" />

<KeyInfo xmlns="http://www.w3.org/2000/09/xmldsig#">

<KeyName>Rsa Key</KeyName>

</KeyInfo>

<CipherData>

<CipherValue>RTRWE..=</CipherValue>

</CipherData>

</EncryptedKey>

</KeyInfo>

<CipherData>

<CipherValue>FSM</CipherValue>

</CipherData>

</EncryptedData>

</connectionStrings>
That works for all connection strings in the ConnectionStrings.config file, unlike the analytics connectionstring for example, the standard WFFM connectionstring is stored in the /app_config/include/Sitecore.Forms.Config in following section.
<formsDataProvider type="Sitecore.Forms.Data.DataProviders.WFMDataProvider,Sitecore.Forms.Core">
but it turns out it is fairly simple to encrypt the connection string along with the others just move the connection string to standard ConnectionStrings.config file and call it wfm as shown below
<add name="wfm" connectionString="user …. />
now you can run the .bat file again and the wfm connectionstring is encrypted as well.
Remember that the encrypted connectionstring can only be decrypted on the machine that ran the .bat file.
To decrypt you can run the command
C:\Windows\Microsoft.NET\Framework64\v4.0.30319\aspnet_regiis.exe -pdf “connectionStrings”
Using SecurityDisabler and EditContext With Sitecore Fakes
Recently I had to write some code that import a lot of content for a customer, who on a daily basis wanted to imported 100+ news Items into Sitecore. Importing and filling out the data field of items isn’t that complex task, or code to write. But I really wanted to test the functionality so I could guarantee and verify the behavior of my code before I released into a running LIVE environment. So I’ve sat myself the goal to extend Sitecore Fakes so I could test against and “Database” in memory instead of cleaning the Sitecore solution every time I’ve ran a test import.
An Example of a simple import code could look something like this
using (new SecurityDisabler())
{
subNode = homeItem.Add("SubNode", templateId);
using (new EditContext(subNode))
{
subNode[fieldIdA] = "test";
subNode[fieldIdB] = "testBBB";
}
}
To do this I’ve had to include some more section in the App.config for the test project. The section is listed below are the changes I’ve added
<authentication defaultProvider="forms">
 <providers>
 <clear />
 <add name="forms" type="Sitecore.Security.Authentication.FormsAuthenticationProvider, Sitecore.Kernel" />
 </providers>
 </authentication>
 <authorization defaultProvider="sql">
 <providers>
 <clear/>
 <add name="sql" type="Sitecore.Fakes.ConfigurationFakes.FakeAutheorizationProvider, Sitecore.Fakes" />
 </providers>
 </authorization>
 <domainManager defaultProvider="file">
 <providers>
 <clear />
 <add name="file" type="Sitecore.Fakes.ConfigurationFakes.FakeDomainProvider, Sitecore.Fakes" />
 </providers>
 </domainManager>
 <accessRights defaultProvider="config">
 <providers>
 <clear />
 <add name="config" type="Sitecore.Fakes.ConfigurationFakes.FakeAccessRight,Sitecore.Fakes" />
 </providers>
 </accessRights>
As you can see the Sitecore Fakes comes with som substitutes from the original configuration section, this implements dummy functionality and helps keeping the app.config file to a minimum. These includes
Sitecore.Fakes.Config.FakeAutheorizationProvider
Sitecore.Fakes.Config.FakeDomainProvider
Sitecore.Fakes.Config.FakeAccessRight
Also the itemprovider have been extended so it now overrides the base functionality for Item.Add(..)
public override Item AddFromTemplate(string itemName, ID templateId, Item destination, ID newId)
 {
 FakeDatabase fakeDatabase = Factory.GetDatabase(destination.Database.Name) as FakeDatabase;
 FakeItem child = new FakeItem(newId, templateId, itemName, fakeDatabase.Name);
 FakeItem fakeParent = destination as FakeItem;
 fakeParent.AddChild(child);
 fakeDatabase.FakeAddItem(child);
 return child;
 }
With these change in place we can now run our test from the beginning.
public void CreateAndEditItemTest()
 {
 //setup database so we have a rood node to add our content to
 var homeFakeItem = new FakeItem();
 Item homeItem = (Item) homeFakeItem;

 //Define some Field IDs
 TemplateID templateId = new TemplateID(ID.NewID);
 Item subNode;
 ID fieldIdA = ID.NewID;
 ID fieldIdB = ID.NewID;

//add and edit the ite,
 using (new SecurityDisabler())
 {
 subNode = homeItem.Add("SubNode", templateId);
 using (new EditContext(subNode))
 {
 subNode[fieldIdA] = "test";
 subNode[fieldIdB] = "testBBB";
 }

}
 subNode[fieldIdA].ShouldAllBeEquivalentTo("test");
 subNode[fieldIdB].ShouldAllBeEquivalentTo("testBBB"); ;
 }
If you need more then one database or another then “web” which is default for Sitecore Fakes either alter or add one more to the DataBase section of your test project so it look like something like below.
<databases>
<database id="web" singleInstance="true" type="Sitecore.Fakes.FakeDatabase, Sitecore.Fakes">
<param desc="name">$(id)</param>
</database>
<database id="master" singleInstance="true" type="Sitecore.Fakes.FakeDatabase, Sitecore.Fakes">
<param desc="name">$(id)</param>
</database>
 </databases>
You Can download Sitecore fakes from github here: https://github.com/istern/Sitecore-Fakes


